You can use the ‘User Information List’ in InfoPath to access details related to the current or other users, such as the users first and last name, email address, title and other useful details.
To get this information do the following:
Add a data connection to the ‘User Information List’
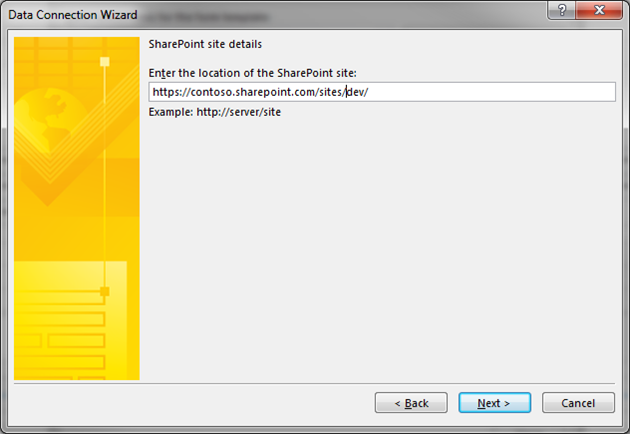
Add a new data connection to Receive Data from a SharePoint library or list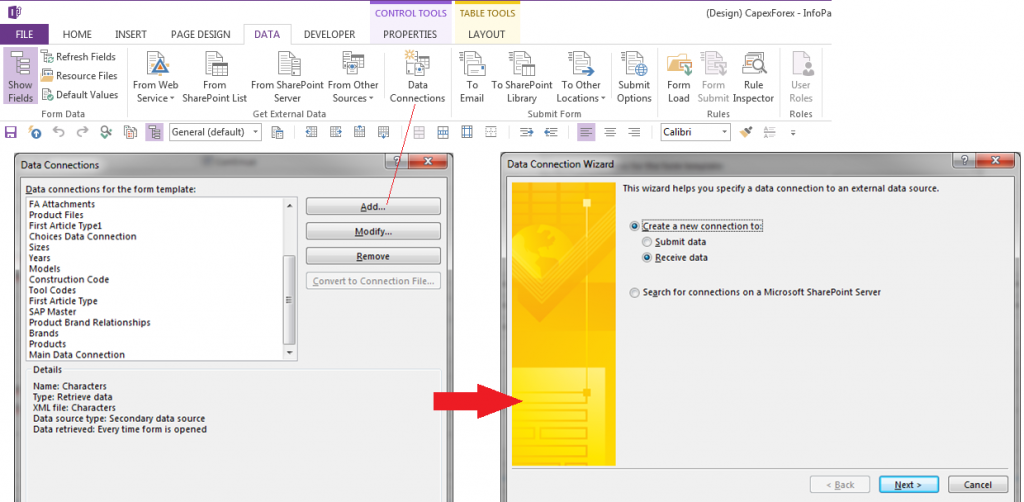
Select the site that that contains the User Information List (iin most cases this is the current site)
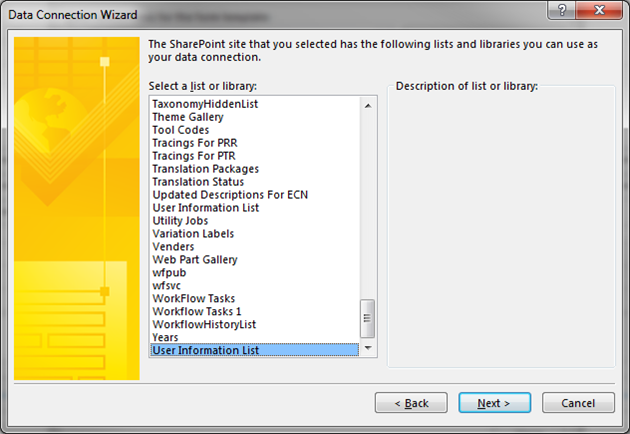
The system will display a panel that details current lists and libraries in the site. Scroll down through the lists and libraries and select ‘User Information List’. Click Next
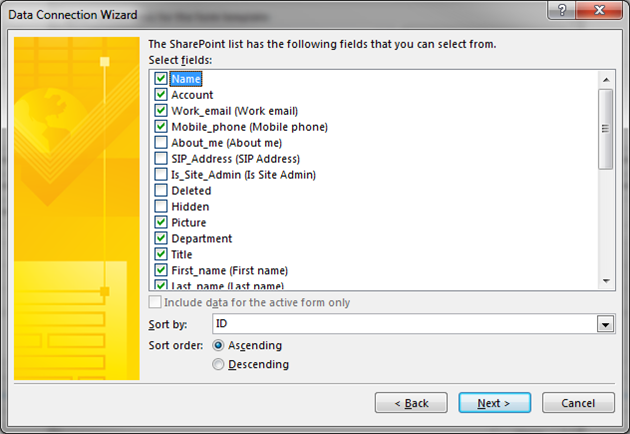
Select the fields that you want to use – mostly this will be the ones indicated in the image below. Click Next
Make sure the ‘Store a copy of the data in the form template’ is unchecked and click Next

Uncheck the box ‘Automatically retrieve data when form is opened’. We uncheck this box because this particular list can be very large and the system would attempt to load all users into the form even though we only require the user information for the person who is currently opening the form. If checked, your form would take longer to open or may even fail to open
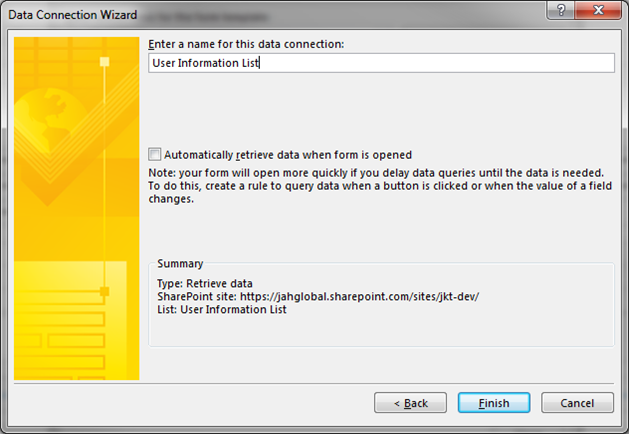
The system will default the name. My practice is generally to make two data connections to the UIL – the one to contain the current users information and the other to contain information related to other users. In this case, the second UIL would of course have a different name
Create a ‘Form Load’ rule to read the user information list
In the InfoPath data area, select ‘Form Load’ to open the pane that shows the rules that execute when the form is opened
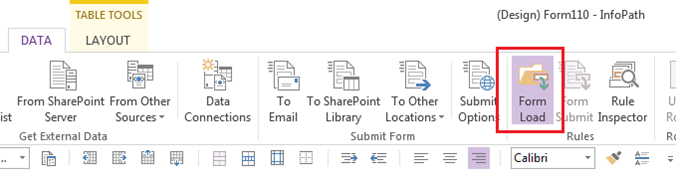
Create an action rule with a meaningful name, like ‘Get user details’. This rule should probably be the first rule that executes since you may want to use the information it returns in subsequent rules
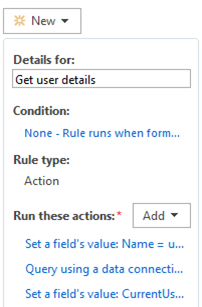
We now require two or possibly three separate actions:
The first action specifies the data we are searching on (the query data)
The second performs the search
The optional third action stores the data in another field on the form
Set the Query fields value
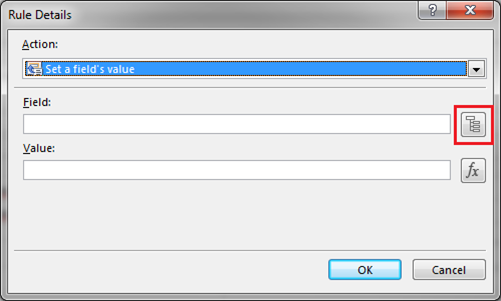
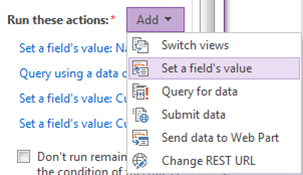
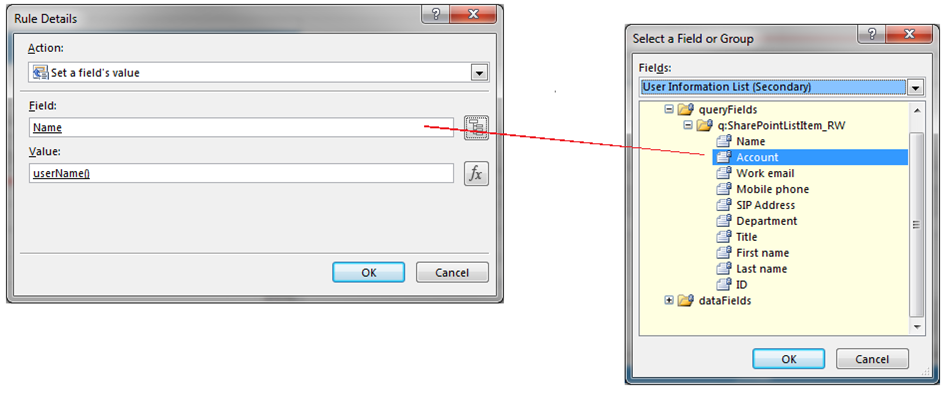
The first action of the rule specifies the data we wish to use to query the UIL (If we did not do this, the query data would be empty and ALL records would be returned). Click on the ‘Add’ button and select “Set a field’s value”. A dialog box similar to the one below will be displayed. Click on the ‘Fields’ box highlighted in Red below
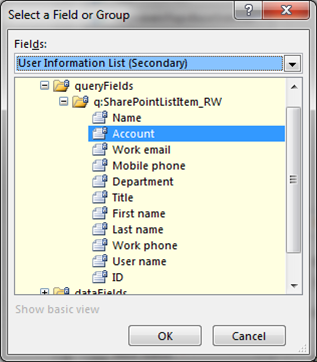
A screen like the following will appear. In the top drop-down list, select ‘User Information List’ and then explode the fields below the ‘queryField’ item as shown below. The fields displayed are the fields that you can base your query on. Since the InfoPath userName() function returns the ‘Account’ data, select ‘Account’ to perform the query based on the current user (In this instance, a single query field is being used, but you can use multiple set field values to query based on any number of fields)
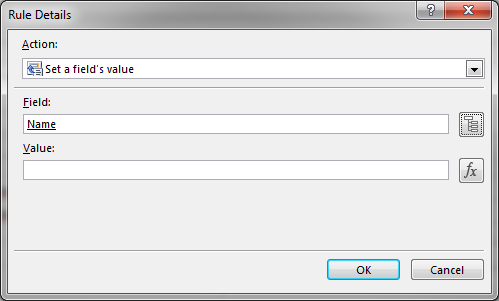
The system completes the name in the Field fill-in as shown below (Do not be alarmed that the system returns ‘Name’ instead of ‘Account’. This seems to be a Microsoft nomenclature problem with the list as the ‘Account’ is the actual field being queried
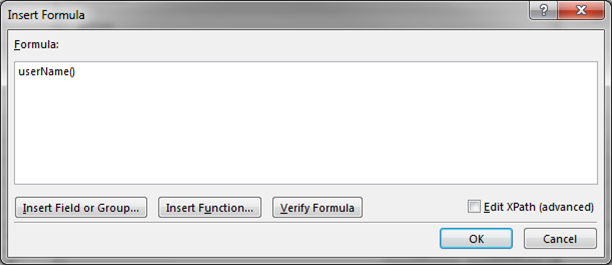
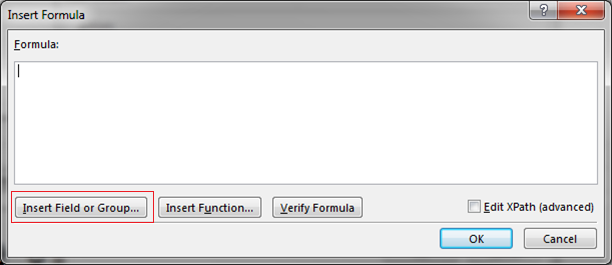
Click on the fx button to specify a formula to set the Account query field to. A screen similar to the one below will be displayed. Use the ‘Insert Function…’ key to insert the ‘userName()’ function into the formula. Click on the OK button
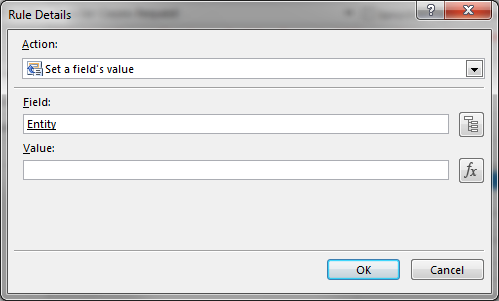
Your ‘Set a field’s value’ dislog box should now look as follows. This is telling the system to set the Name (Account) in the lists query parameters to the current user name
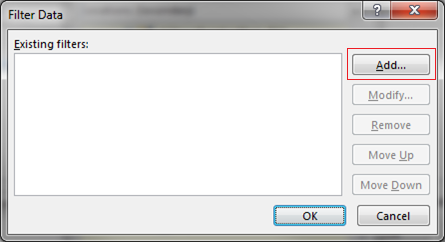
Perform the query on the User Information List
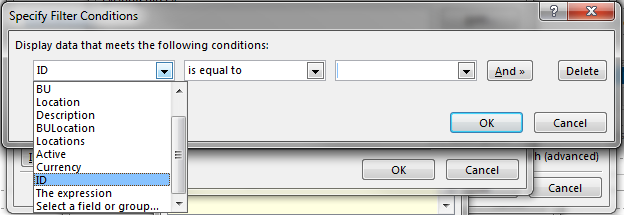
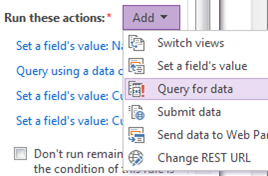
Now we need to query the data and return the user details to the form. Select the ‘Query for data’ action from the Add button as shown below
In the screen that is displayed, select the ‘User Information list’ as your ‘Data connection’ as shown below
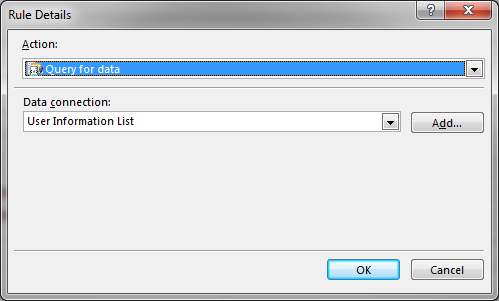
The system will now query the user information list based on the current user name (account) to make the first name, last name and any other user attribute available to the InfoPath form
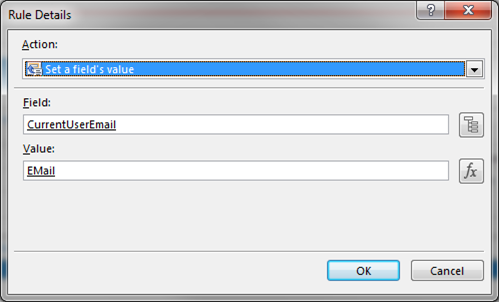
Set an InfoPath field to the current users name
Now let’s set a field’s value to the name of the user. Once again choose ‘Set a fields value’ from the ‘Add’ button
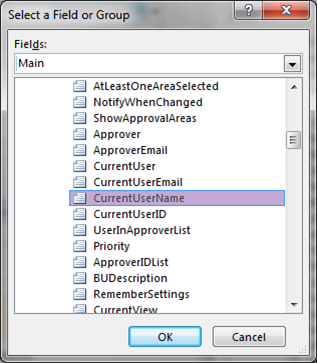
In a similar way to before, click on the ‘Fields’ box highlighted in Red below to enable you to choose a field from the selector
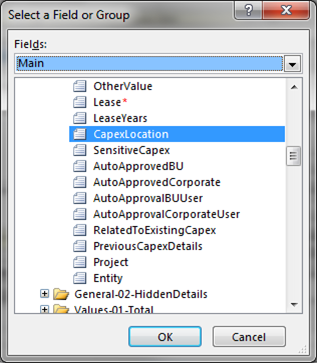
Select the field whose value you want to set, by selecting ‘Main’ and then choosing the field. In the example below I am setting my CurrentUserName (which I subsequently access through a workflow so that I know who the last person was to update the form)
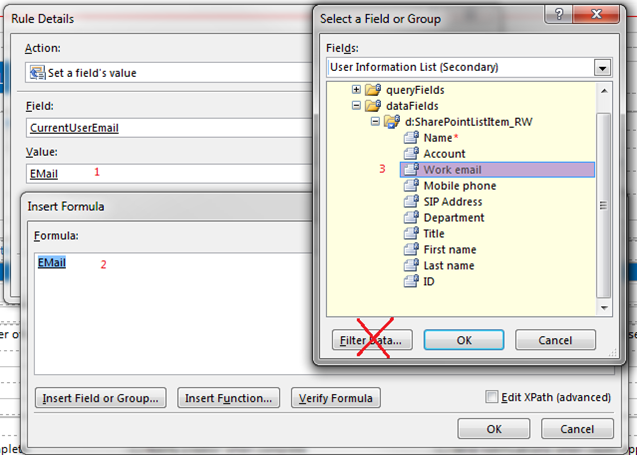
Once again, click on the Function button fx to open up the formula box and then select ‘Insert Field or Group’ so that we can move the value in the query that was completed previously into this field
A dialog box similar to that shown before is displayed. In the ‘Fields’ section select the User Information List and explode the tree so that you can see the fields under ‘dataFields’ as shown below (The ‘queryFields’ only contains the data you used for the query, while the dataFields contain all the rows returned by the last query)
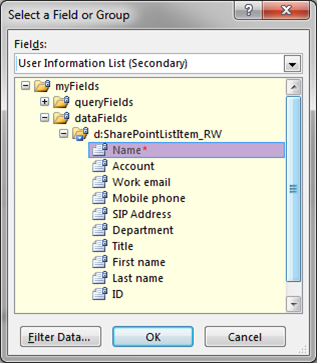
Select the ‘Name’ of the user. A note on names: In many cases, the SharePoint data comes in the not so friendly format of ‘Last Name, First Name’. You can use the ‘concat()’ function in your formula box with the ‘First name’, ‘ ‘ and ‘Last name’ to create a more user friendly version of the name, but beware: External users (Those signing onto SharePoint through other accounts) will have empty ‘First name’ and ‘Last name’ fields
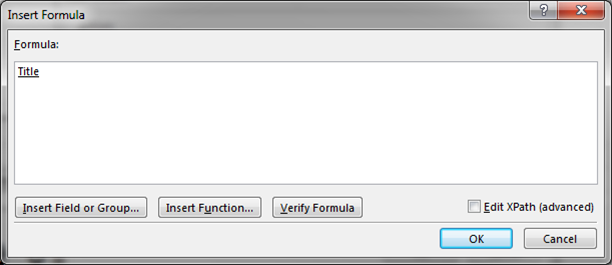
Your ‘Formula’ box should now look like this (you will notice that the name says ‘Title’ instead of ‘Field’, but don’t be concerned as this is that nomenclature thing again)
Click OK to save your Formula
Notes and tips
- Once you perform a Query action, the rows of the list that are returned remain in memory, so you can refer to them directly without having to run another Query action
- I suggest that you always use the data connection to return the single row of data based on the current userName(). If you need to select a user from a list of users, I suggest you create another Data Connection to the same ‘User Information List’ (give it a different name of course) and then link your combo-box or repeating table to this new list. Be sure to set your query parameters to only return the rows you want
- I believe it is good practice to save the current user name in the form so that it is possible to get the identity of the user who last changed the data, in either the form, workflow, or SharePoint view.
- If you require additional user information that is not in the User Information List, you may need to create a User List for those particulars. This would be a standard SharePoint app, keyed on the email address of the user so that it is a simple process to access the user details in InfoPath through a Data Connection to this table
UserName() function
The userName() function returns the identity of the user currently accessing the formExamples of the data format returned:
Internal users: ‘i:0#.f|membership|melsmith@contoso.com’
External users: ‘i:0#.f|membership|msmith_gmail.com#ext#@contoso.onmicrosoft.com’
In preview: ‘136909’
Note that in preview, this function may return a value in a very different format from the one it returns when not in preview, which means that you will not be able to properly test user related functionality in preview.


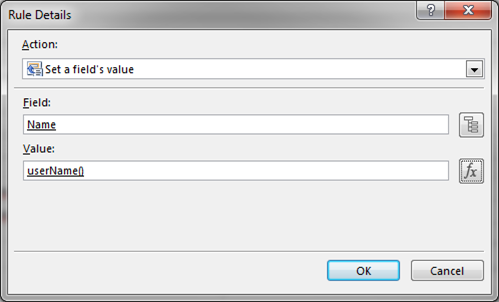
 Here I set the query field Account (which strangely enough displays as ‘name’ in the Rule Details box) to the function ‘userName()’.
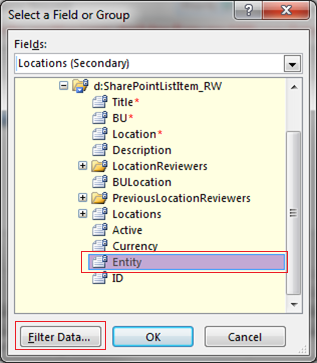
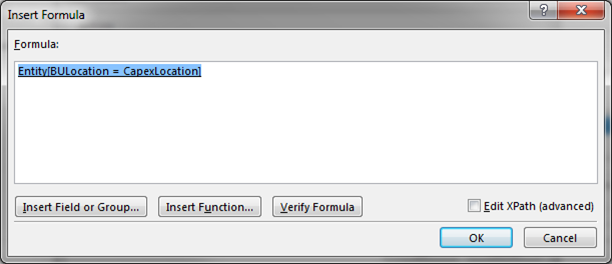
 Once you click the ‘Insert Field or Group …’ button, a ‘Field’ selection box will be displayed, initially set to ‘Main’. I use the drop-down arrow to select the list I want – in this case ‘Locations (Secondary). This will display fields similar to the following