Tag : sharepoint

Workflow – Useful REST calls – Get Role ID

Microsoft requires that Role ID’s are used when granting permission and although the 10 digit ID’s can be found online, custom permissions are not easily available.

There are two ways to get the Role ID’s

Examine the source code of a raw HTTP statement

After logging into SharePoint, open a Browser window and enter the following after the site name

https://contoso.sharepoint.com/sites/dev/_api/web/roledefinitions

A screen similar to the one below will be displayed.

211-1

Select View>Source as shown above and the raw data of the request will appear in a window similar to the following

211-2

This represents the raw data returned by the call. You can search for your Permission Level within this viewer, or you can paste this data into an XML Viewer as I have done first, which makes for an easier search as shown in the following image

211-3

Actually, this is not much better, but in the highlighted section, you can see that the Role ID for ‘Full Control’ is 1073741829. Now you have your role ID

Execute a REST call directly from the Workflow

Alternatively, you can execute a REST call directly from the workflow to get a role ID of a particular permission level. The complete statements are shown below and then broken down after this image

211-4Set a string variable to the name of the permission level whose Role ID you require.

211-6
In this case I am looking for the ‘Full Control’ Role ID

Define the REST call string

Set String01 to the following

211-5
[%Workflow Context:Current Site URL%]/_api/web/roledefinitions([%Variable:String02%])

This statement will get the ‘single’ role ID for the values defined in ‘String02’ – namely ‘Full Control’

Make the REST call

Insert a ‘Call HTTP Web Serice’ action to make the REST call using the value in ‘String01’ as follows:

211-8

211-7

Make sure that the Request Headers (accessible via the actions properties) isset to a Header Dictionary that has the name ‘Accept’ set to ‘application/json;odata=verbose

Update the Current Item.

This is optional and is not required but I use it so I can query the Response returned by the rest call.

211-9

For your edification, the REST call will return the following values (shown in JSON format). You can see that all the attributes of the Role are returned, including the Description, ID and RoleTypeKind

{
“odata.metadata”: “https://jahglobal.sharepoint.com/sites/jkt-dev/_api/$metadata#SP.ApiData.RoleDefinitions/@Element”,
“odata.type”: “SP.RoleDefinition”,
“odata.id”: “https://jahglobal.sharepoint.com/sites/jkt-dev/_api/Web/RoleDefinitions(1073741829)”,
“odata.editLink”: “Web/RoleDefinitions(1073741829)”,
“BasePermissions”: {
“High”: “2147483647”,
“Low”: “4294967295”
},
“Description”: “Has full control.”,
“Hidden”: false,
“Id”: 1073741829,
“Name”: “Full Control”,
“Order”: 1,
“RoleTypeKind”: 5
}

Get the ID of the Role

Use a ‘Get an item from a dictionary’ action to get the ID of the role. This value is stored in the workflow variable ‘ID’ as shown below

211-10

You now have the Role ID in the variable ‘ID’


Workflow – Useful REST calls – Share Item

Four steps are involved in updating share permissions on a list:

  1. Breaking inheritance on the list
  2. Granting access to the list
  3. Breaking inheritance on a list item
  4. Granting access to a list item

This blog will step through all four of these steps to add share access to a particular list item. In the examples that follow, ‘FA Test’/’ListName’ refers to the text name of list you are working with, ‘ListID’ refers to the numeric ID of the list, ‘ItemID’ refers to the numeric ID of the item in the list and ‘UserID’ refers to the numeric ID of the user being granted permission. When working with REST calls, make sure that the Workflow App Permissions are scoped correctly otherwise you could receive an ‘Unauthorized’ response (See Scoping). Also note that you could specify the sharing process in 5 simple steps without having to redefine the Header each time

Many thanks to Jason Lee (Custom Workflow Activity for Granting Permissions on a SharePoint Site) and Bijay Kumar (SharePoint 2013 Add User to SharePoint group using REST API) for sharing their knowledge

Define the header dictionary

This step defines the header format that will be used by all four of the functions mentioned previously.

Create a dictionary variable that will tell the system to return values in JSON format.

203-2202-3

Click on ‘this’ and use the ‘Add …’ button to define the dictionary names ‘Accept’ and ‘Content Type’ with both having exactly the same value: ‘application/json;odata=verbose’. I replace the ‘Variable:dictionary’ with my standard ‘Header’ dictionary

203-3

Break inheritance on a list (breakroleinheritance)

Since you will be defining custom permissions for the list, you will need to break the role inheritance. This will not change permissions, but will simply change the current users to ‘specified’ rather than ‘inherited’ permissions

Define the REST call in a string variable

210-1
[%Workflow Context:Current Site URL%]_api/web/lists/GetByTitle(‘ListName’)/breakroleinheritance

Use a ‘Call HTTP Web Service’ action to make the REST call using the string previously defined with an HTTP POST method

210-2

We are still not finished with the web service.  Click on the right combo-box of the ‘Call’ action and select ‘Properties…’ Set the RequestHeaders to the ‘Header’ dictionary previously created

210-3

That is all that is needed to break the role inheritance – no results are returned. Simply check the ‘ResponseStatusCode’ variable to make sure the call functioned correctly

Grant access to the list (addroleassignement)

Once the role inheritance is broken, we need to add the user to the list permissions.  Use these actions to give a user or group access to a list (performed prior to granting unique permissions to a list item)

Define the REST call in a string variable

Once you have created the header dictionary, set a workflow variable to the string value of the REST call. In the example shown below, [%Current Item:Created By%] is returning the ‘User Id Number’

210-5
[%Workflow Context:Current Site URL%] /_api/web/lists/GetByTitle(‘ListName’)/roleassignments/addroleassignment (principalid=UserGroupID , roleDefId=1073741826)

Set the values in the string builder as follows:

principalid:          ID of the user or group receiving permissions on the list
roleDefId:           A role definition ID. The standard Microsoft 10 digit out of the box ID’s are as follows:

Full Control:        1073741829
Read:                   1073741826
Contribute:          1073741827

See my post on getting the Role ID values – useful for custom permission definitions

Use a ‘Call HTTP Web Service’ action to make the REST call using the string previously defined with an HTTP POST method

210-2

We are still not finished with the web service.  Click on the right combo-box of the ‘Call’ action and select ‘Properties…’ Set the RequestHeaders to the ‘Header’ dictionary previously created

210-3

That is all that is needed to allow the user to access the list – no results are returned. Simply check the ‘ResponseStatusCode’ variable to make sure the call functioned correctly

Break inheritance on a list item (breakroleinheritance)

You would perform this call prior to granting unique permissions to a list item. This is similar to the call to break inheritance on a list, except that here we specify the list item ID on which to break inheritance

Define the REST call in a string variable

Once you have created the header dictionary, set a workflow variable to the string value of the REST call. In the example shown below, [%Current Item:SourceID%] is returning the ID of the list item

210-6

[%Workflow Context:Current Site URL%]_api/web/lists/GetByTitle(‘ListName’)/getItemById (ItemID)/breakroleinheritance

Use a ‘Call HTTP Web Service’ action to make the REST call using the string previously defined with an HTTP POST method

210-2

We are still not finished with the web service.  Click on the right combo-box of the ‘Call’ action and select ‘Properties…’ Set the RequestHeaders to the ‘Header’ dictionary previously created

210-3

That is all that is needed to break the role inheritance – no results are returned. Simply check the ‘ResponseStatusCode’ variable to make sure the call functioned correctly

Share an item with a user

You would perform this call after you have broken permissions on the list and list items and granted the user in question access to the list. These processes were covered in the previous three HTTP Calls)

Define the REST call in a string variable

Once you have created the header dictionary, set a workflow variable to the string value of the REST call. In the example shown below, [%Current Item:SourceID%] is returning the ID of the list item while  [%FA Test:Created By%] is  returning the ‘User Id Number’

210-7

[%Workflow Context:Current Site URL%]_api/web/lists/GetByTitle(‘ListName’)/getItemById(ItemID)/roleassignments/addroleassignment (principalid=UserID, roleDefId=1073741829)

Use a ‘Call HTTP Web Service’ action to make the REST call using the string previously defined with an HTTP POST method

210-2

We are still not finished with the web service.  Click on the right combo-box of the ‘Call’ action and select ‘Properties…’ Set the RequestHeaders to the ‘Header’ dictionary previously created

210-3

That is all that is needed to allow the user to access the list item – no results are returned. Simply check the ‘ResponseStatusCode’ variable to make sure the call functioned correctly


Workflow – Using the ‘Wait-for’ instead of tasks

As a beginner I found it difficult to deal with tasks and forms simultaneously. Although the tasks and documents/forms were directly related, the users also found it confusing to switch between the two as they preferred to make any decisions regarding the future direction of the form directly on the form itself. Enter the ‘Wait for field change in current item’ action. From my reading I deduced that workflows in this state have no impact on the overall performance of the site. Not only that, but it simplified my approval flows and form management considerably.

In general terms, this is how I used this action to get updates:

209-1

  1. When the workflow reaches a point at which user interaction is required, I use the ‘Update List Item’ action to set two variables in the Form/SharePoint list item; the Boolean field ‘Continue’ is set to false and the integer field ‘Outcome’ is set to 0.
  1. Generally, although this is not shown in this example, it is at this point I also write the account ID’s to a field that specifies who is entitled to perform the update. Because the view of the form is set to have this People field filtered to ‘[Me]’, this item will only appear to the users that need to perform the interaction (In many of my SharePoint sites, I do not allow the user to change the form in these libraries. I also validate within the form itself if the user has rights to view the data)
  2. In the next statement in the workflow, I add the ‘Wait for field change in current item’ action as follows:209-2
  1. The workflow then remains paused until a valid user interacts with the form and sets the field Completed to yes. This is done within the form itself and the action of the Approval button also sets the ‘Outcome’ field so that the option selected in the form can be used to decide on the flow within the workflow
  1. In the statements that follow the ‘Wait for’, I generally log the name of the user who updated the form as well as the date that the form was updated. I then examine the field ‘Outcome’ to determine what action to take within the workflow


Workflow – Useful REST calls – Get foreign currency

I cannot remember the post that pointed me in this direction. While there are many Web Services that return currency cross rates, the site http://currency-api.appspot.com returns a restricted set of rates for free – all you need is to get an access key. The API is documented and easy to work with, but there some restrictions, namely how many rate requests you can make in a month.

To work with this Web Service:

Get you Free API Access key

Visit ‘http://currency-api.appspot.com/’ and click on the button ‘Get Your Free API Access Key’ . This will open up a new screen where you can sign up for free. Follow all instructions to get your key. The key is important

208-1

Create the REST call string

In your workflow, create a string with the following value

http://currency-api.appspot.com/api/EUR/USD.json?key=3af4391296f24977235b738d5f2e4680

208-2

This string converts from EUR to USD using my key:

(You can perform any desired substitutions in the string makeup with the variables available in your workflow)

Call the Web Service to get the rate

Build the ‘standard’ Header dictionary with the names ‘Accept’ and ‘Content-Type’ set to ‘application/json;odata=verbose’

208-3

Call the Web Service with a Call HTTP Web Service action using the string previously defined

208-4

Create the various dictionary items needed in the call and remember to set the ‘RequestHeaders’  to your Header dictionary previously defined by using the ‘Properties’ option of the call statement

208-6

This should return something similar to the following in the response:

{
successtrue,
source: “EUR“,
target: “USD“,
rate1.1366,
amount1.14,
message: “”
}

Check if data returned is OK

I then check if the Response code equals OK before I move to the next step. If it is not OK, I know something went wrong in the call, and I email the administrator

208-7

Get the exchange rate

The next steps involve getting the rate from the returned response. This is performed using a Get action as follows (remember to get the case correct):

Get rate from Variable:Response (Output to Variable:ExchangeRate)

Finally, you have the exchange rate of EUR to USD to do with as is your wont. Since the API has a restriction on the number of times it can be accessed, I allow the users to specify how often they would like the rate updated and in most cases, they selected a monthly update. But your user may require more up-to-date information so it could be that you have to buy ‘professional’ access to the API


Workflow – Troubleshooting REST calls

When the REST/HTTP Call to a Web Service is not returning correct results, the reason why may not be immediately obvious. In these cases you may need to interrogate the data returned to discover what went wrong

Check the Response Status Code

Add a Log action after the rest call to display the value of the ‘ResponseStatusCode’ variable ‘ResponseCode’ as shown below

205-1

Check the logged Response Status Code

Run your workflow and check your workflow log. If everything is OK, this will normally return a positive indication such as ‘OK’ or ‘Created’. If there is a problem, it will display something similar to the message shown below:

205-2

If it returns a message such as ‘NotFound’ (as shown above) or ‘InternalServerError’ you may need to display the error in more detail, by logging the actual error message to the workflow log. This is done using a ‘Get’ action on the ResponseContent Variable (‘Response’) as follows:

Get odata.error/message/value from Variable:Response (Output to Variable:ErrorMessage)

205-3

The field ‘ErrorMessage’ is a workflow variable that I created to store the contents of the error message. Alternatively, you can display the entire ‘Response’ but displaying this value if the length is greater than 255 characters would hang your workflow.

Run the workflow again

Publish and run the workflow again and check your workflow log again. In my case it displayed the following

205-4

In my case, the message is saying that it could not find the SharePoint resource ‘GetByNameXXX’.

Aha! – It should be ‘GetByName’ not ‘GetByNameXXX’. I change my workflow to specify ‘GetByName’ instead of ‘GetByNameXXX’ and republish it. When it runs without error, I remove the error message from the workflow and the world is in balance

Other issues

If no error is being generated, it could be that the field names or their assignments are incorrect in the ODATA call. Check the following:

The body of the REST/HTTP call is normally in an ODATA format similar to the following:

[%Workflow Context:Current Site URL%]_api/Lists/GetbyTitle(‘Quotes’)/items/?$select=ID&$filter=Form_x0020_Status eq ‘In Approval’ and Active eq 1&$Top=500&$orderby=SpecApprover

Some common mistakes in the REST calls:

  1. Your field names are not in the correct case. If your SharePoint field is ‘Title’, then in the REST call it should be ‘Title’ not ‘title’
  2. Your field names are incorrectly stated in either the select, filter or orderby options. This can sometimes be tricky especially if your SharePoint fields have spaces in them (Not the best practice, but it happens). For example the SharePoint field Form Status must be specified as Form_x0020_Status. To find the real value of the field, open the list and select Library Settings. Scroll down to the field you are interested in and click on it. Then cut the full URL it navigates to and view the last bit after ‘Field=’. This is the internal field name. In my case, Form Status is actually Form%5Fx0020%5FStatus (Note how the system substitutes %5F for underscores and x0020% for spaces)
  3. You have mistakenly used ‘=’ instead of ‘eq’ or vice-versa in your ODATA statement
  4. Your Boolean vales are specified as true or false or yes or no. Boolean values must be specified as 1 for true and 0 for false. To check for records that have the field ‘Active’ equal to Yes, the ODATA statement should contain Active eq 1 and not Active eq Yes
  5. Your Top query option ($top) is not specified and will therefore only return 100 rows. If you expect more, then set ‘$Top’ to the maximum amount you expect (say ‘$Top=500’). At the time of writing, the maximum number of rows returned is 500
  6. Your string filter values are not enclosed in single quotes (for example BU eq AB should be BU eq ‘AB’ or BU eq ‘[%Current Item:BUShortName%]’
  7. Your number values are placed in single quotes (ID eq ‘307’ should be ID eq 307)
  8. When an HTTP Call statement returned more records than expected, I often found that either the names of fields or values was specified incorrectly (Boolean values in ODATA appear to be 1 or 0 instead of true or false for example, or perhaps the field name was misspelled or used spaces instead of the substitution characters)


Workflow – Understanding returned JSON format

Sometimes you need to see the data that is returned by a REST call to be able to work out how to use it. To view the data returned, I copy the HTTP Call Response into a Multi-Line field in a SharePoint list, query the list item and then cut and paste the string into a JSON Viewer (Like http://codebeautify.org/jsonviewer). I do not display the results of the call in the log as the Response content is often over the 255 character SharePoint print limit, which would result in a hung workflow.

The following steps assume that your REST Call is contained in the workflow variable ‘String01’

Setup your RequestHeaders dictionary

Create a dictionary variable as follows

203-3

… then click on the ellipsis (…) to define the names ‘Accept’ and ‘Content-Type’ in the dictionary. Set the value for both of these names to

application/json;odata=verbose

202-3

Make the HTTP Get Web Service Call

Specify the HTTP Get Web Service call using your REST statement (In my example, this is defined in ‘String01’). Be sure to use the ‘Properties…’ option to specify the correct ‘RequestHeaders’ variable otherwise the data may not be returned in the correct format

202-8

204-1

Save the response into a multi-line text field

Copy the response into a SharePoint Multi-Line field. In this example, I update the ‘Results’ field in ‘Current Item’ with the response returned by the call

204-2

Copy the data returned

Open the list item in SharePoint and copy the string from the field ‘Results’ to the clipboard

204-3

The example I used copied the following data to the clipboard

{“d”:{“results”:[{“__metadata”:{“id”:”https:\/\/contosa.sharepoint.com\/sites\/dev\/_api\/Web\/Lists(guid’f2c6ac85-9999-2222-a306-9500622ff36d’)\/Items(154)\/AttachmentFiles(‘Ferrari 2.jpg’)”,”uri”:”https:\/\/contosa.sharepoint.com\/sites\/dev\/_api\/Web\/Lists(guid’f2c6ac85-9999-2222-a306-9500622ff36d’)\/Items(154)\/AttachmentFiles(‘Ferrari%202.jpg’)”,”type”:”SP.Attachment”},”FileName”:”Ferrari 2.jpg”,”ServerRelativeUrl”:”\/sites\/dev\/Lists\/Utility Jobs\/Attachments\/154\/Ferrari 2.jpg”},{“__metadata”:{“id”:”https:\/\/contosa.sharepoint.com\/sites\/dev\/_api\/Web\/Lists(guid’f2c6ac85-9999-2222-a306-9500622ff36d’)\/Items(154)\/AttachmentFiles(‘Ferrari.jpg’)”,”uri”:”https:\/\/contosa.sharepoint.com\/sites\/dev\/_api\/Web\/Lists(guid’f2c6ac85-9999-2222-a306-9500622ff36d’)\/Items(154)\/AttachmentFiles(‘Ferrari.jpg’)”,”type”:”SP.Attachment”},”FileName”:”Ferrari.jpg”,”ServerRelativeUrl”:”\/sites\/dev\/Lists\/Utility Jobs\/Attachments\/154\/Ferrari.jpg”},{“__metadata”:{“id”:”https:\/\/contosa.sharepoint.com\/sites\/dev\/_api\/Web\/Lists(guid’f2c6ac85-9999-2222-a306-9500622ff36d’)\/Items(154)\/AttachmentFiles(‘Maserati.jpg’)”,”uri”:”https:\/\/contosa.sharepoint.com\/sites\/dev\/_api\/Web\/Lists(guid’f2c6ac85-9999-2222-a306-9500622ff36d’)\/Items(154)\/AttachmentFiles(‘Maserati.jpg’)”,”type”:”SP.Attachment”},”FileName”:”Maserati.jpg”,”ServerRelativeUrl”:”\/sites\/dev\/Lists\/Utility Jobs\/Attachments\/154\/Maserati.jpg”}]}}

View the data in a JSON viewer

Open a JSON viewer in a browser (I’ll use http://codebeautify.org/jsonviewer) and paste the clipboard into the viewer. In the example shown below, I pasted the data into the ‘JSON Input’ field. Once that is done, click on the format button in the viewer (‘Beautify’) and the system will display the data in an easier to read format as shown below on the right

204-4

If your ‘HeaderRequest’ dictionary had the ‘Accept’ and ‘Content-Type’ names set to ‘application/json;odata=verbose’, then your values should almost always have a “d” as the first element in the data, but there are some exceptions, especially when you are evaluating returned errors

The JSON formatted data from the above request is shown here for convenience (I replaced the ‘contosa.sharepoint.com/sites/dev/_api/Web’ with ‘…’ to make it easier to read:

{
    “d”: {
        “results”: [
            {
                “__metadata”: {
                    “id”: “https://…/Lists(guid’f2c6ac85-9999-2222-a306-9500622ff36d’)/Items(154)/AttachmentFiles(‘Ferrari 2.jpg’)”,
                    “uri”: “https://…/Lists(guid’f2c6ac85-9999-2222-a306-9500622ff36d’)/Items(154)/AttachmentFiles(‘Ferrari%202.jpg’)”,
                    “type”: “SP.Attachment”
                },
                “FileName”: “Ferrari 2.jpg”,
                “ServerRelativeUrl”: “/sites/dev/Lists/Utility Jobs/Attachments/154/Ferrari 2.jpg”
            },
            {
                “__metadata”: {
                    “id”: “https://…/Lists(guid’f2c6ac85-9999-2222-a306-9500622ff36d’)/Items(154)/AttachmentFiles(‘Ferrari.jpg’)”,
                    “uri”: “https://…/Lists(guid’f2c6ac85-9999-2222-a306-9500622ff36d’)/Items(154)/AttachmentFiles(‘Ferrari.jpg’)”,
                    “type”: “SP.Attachment”
                },
                “FileName”: “Ferrari.jpg”,
                “ServerRelativeUrl”: “/sites/dev/Lists/Utility Jobs/Attachments/154/Ferrari.jpg”
            },
            {
                “__metadata”: {
                    “id”: “https://…/Lists(guid’f2c6ac85-9999-2222-a306-9500622ff36d’)/Items(154)/AttachmentFiles(‘Maserati.jpg’)”,
                    “uri”: “https://…/Lists(guid’f2c6ac85-9999-2222-a306-9500622ff36d’)/Items(154)/AttachmentFiles(‘Maserati.jpg’)”,
                    “type”: “SP.Attachment”
                },
                “FileName”: “Maserati.jpg”,
                “ServerRelativeUrl”: “/sites/dev/Lists/Utility Jobs/Attachments/154/Maserati.jpg”
            }
        ]
    }
}

Evaluate the data elements returned

Now, you go down the tree using a forward slash (/) between the levels of the elements (Values between square brackets ([]) are in themselves array elements and need to be accessed with a counter)

To get the full array of data, move the Response into a variable of type Dictionary called ‘CurrentResults’.
This is useful when you do not wish to make your code more readable by specifying a shorter key to get the data from ‘CurrentResult’ instead of from ‘Response’

Get d/results from Variable:Response (Output to Variable:CurrentResults)

To get all data of the first element into a variable of type String called ‘RespString’:

Get d/results(0) from Variable:Response (Output to Variable:RespString)

To get all data of the second element into a variable of type String called ‘RespString’:

Get d/results(1) from Variable:Response (Output to Variable:RespString)

To get the attribute ‘FileName’ of the 3rd element into a variable of type String called ‘FileName’:

Get d/results(2)/FileName from Variable:Response (Output to Variable:FileName)
After this statement, the variable ‘FileName’ will contain ‘Maserati.jpg’.
The statement Get CurrentResults(2)/FileName from Variable:Response (Output to Variable:RespString) would yield the same result

To get the attribute ‘ServerRelativeURL of the 3rd element into a variable of type String called ‘SRU’:

Get d/results(2)/ ServerRelativeURL from Variable:Response (Output to Variable:SRU)

Troubleshoot any errors returned

If you receive an error when issuing an HTTP Get action, the ‘ResponseStatusCode’ variable will have a negative comment such as ‘NotFound’ or something similar. In this case, the HTTP Get call will place the error results in JSON format into the ‘ResponseContent’ variable. As a standard I always write the ‘ReponseContent’ variable into the Workflow Log so I can tell if there was a problem with the call as follows (If you do not do this, it may be difficult to troubleshoot any problems):

204-5

In the screen shown above, if the HTTP Get Call was not successful (Variable:ResponseCode not-equal ‘OK’), I added some code to display the actual reason for the error

The Error message written to the ResponseContent variable does not have the same “d/results’ type format as the statement shown above. Instead, it returns a value similar to the one shown below:

{“odata.error”:{“code”:”-2146232832, Microsoft.SharePoint.SPException”,”message”:{“lang”:”en-US”,”value”:”Group cannot be found.”}}}

When you paste this message into the JSON viewer, it generates the following structure:

{
    “odata.error”: {
        “code”: “-2146232832, Microsoft.SharePoint.SPException”,
        “message”: {
            “lang”: “en-US”,
            “value”: “Group cannot be found.”
        }
    }
}

Using the same methodology as shown previously, we can move the error message into a variable with the following action

Get odata.error/message/value from Variable:Response (Output to Variable:ErrorMessage)

We can then display this variable in the workflow log to get more detail on our problem. In this example, ‘ErrorMessage’ contains the value ‘Group cannot be found’.  Now I know that the User Group was not found, probably because the name was incorrect


Workflow – Useful REST calls – Start a workflow

In SharePoint 2013 Microsoft modified the triggers on list items so that inserts or modifications to list items do not trigger the Workflows that are set to start based on those conditions. This was done in an effort to prevent recursive calls to the workflow initiation.

In summary then, even if you have set the workflow start options to ‘Start workflow automatically when an item is created’ or ‘Start workflow automatically when an item is changed’, this will not happen if an item is added or changed from WITHIN a workflow

206-1

However, even though it takes quite a few workflow statements, it is still possible to start the workflow manually from within the calling workflow. Most of the next steps that are performed in Workflow Designer are well documented in other online articles

Define the list and item that you want to start the workflow on

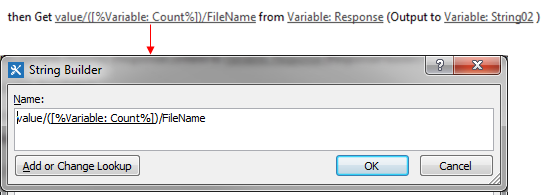
The first step is to specify the list and ID within that list that you want the workflow to run on

206-2

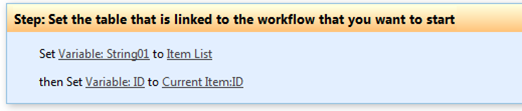
In this example, I set ‘String01’ to the name of the list that I wish to run the workflow on (‘Item List’) and ‘ID’ to the ID of the item within this list. In this particular case, I want to run another workflow on my current item, but in most cases you would use the ID from another list

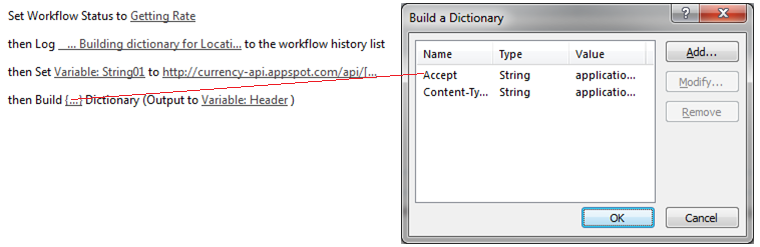
Prepare the dictionary for the call

Insert a ‘Build Dictionary’ action and add the names ‘Accept’ and ‘Content-Type’, both with the value ‘application/json;odata=verbose

202-2

202-3

Instead of using the defaulted name of ‘dictionary’ in the ‘Output to’ command, I use my own name of ‘Header’. This change of name is optional. At any rate, after the dictionary changes have been made, the command looks similar to the following:

206-3

Make the HTTP Web Service call

In the next line, insert a ‘Call HTTP Web Service’ action. This action is part of the process to get the GUID of the list on which the workflow will run. This will place something similar to the following in your workflow:

206-4

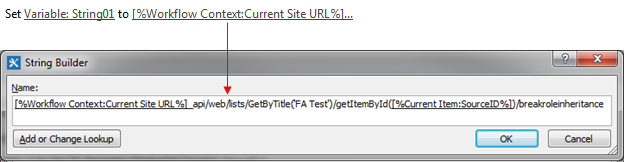
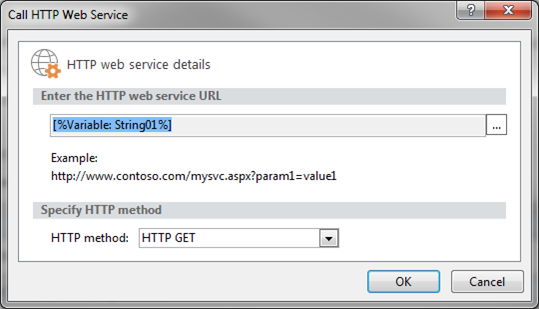
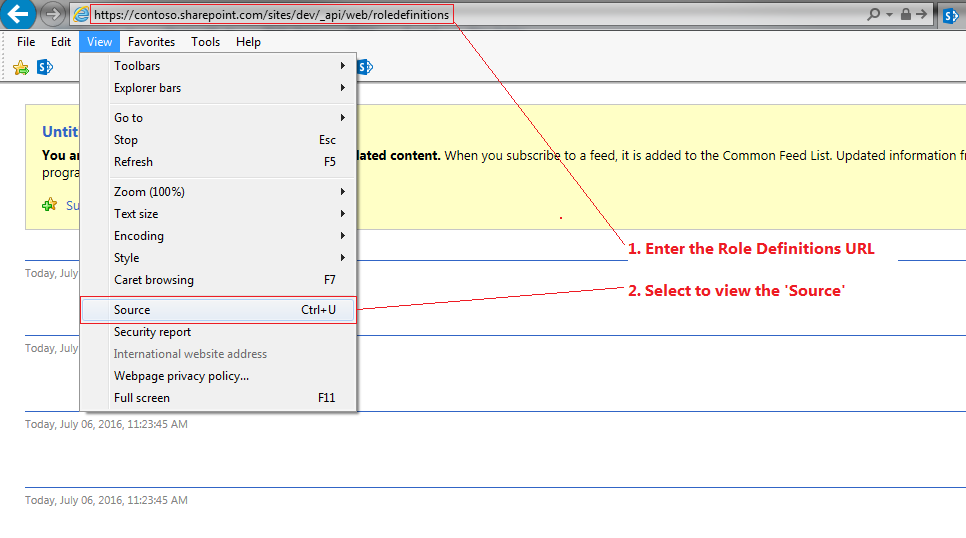
Click on ‘this’ and set the ‘HTTP web service URL’ to the following

206-5
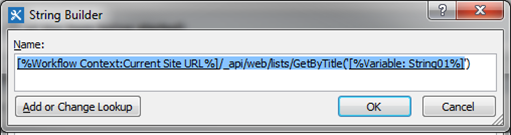
[%Workflow Context:Current Site URL%]/_api/web/lists/GetByTitle(‘[%Variable: String01%]’)

Note that ‘[%Workflow Context:Current Site URL%]’ and ‘[%Variable: String01%]’ are inserted through the ‘Add or Change Lookup’ button. Also note that single quotation marks are required in the ‘GetByTitle’ value (Check that the single quotation marks are correct as these can sometimes be transformed in the cut-and-paste). The ‘HTTP method’ should be set to ‘HTTP GET’

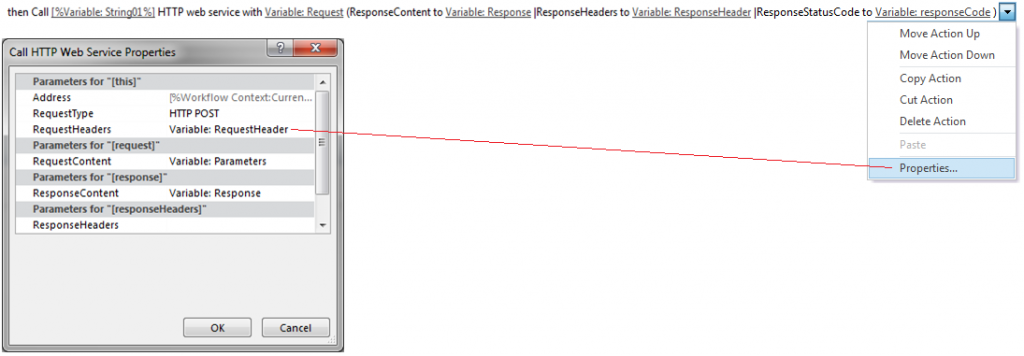
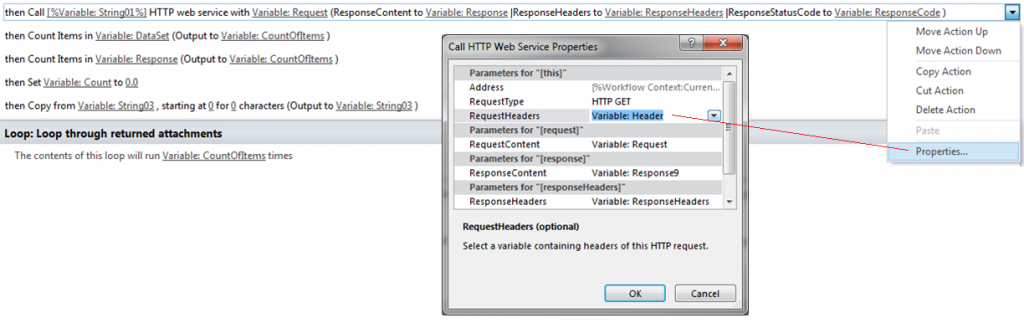
Set the HTTP Call to use the Header dictionary that you defined earlier (the one with the ‘Accept’ and ‘Content‑Type’ values). Right mouse click on the call, and select the ‘Properties …’ option as shown below. Set the ‘RequestHeaders’ to the Workflow variable ‘Header’

204-1

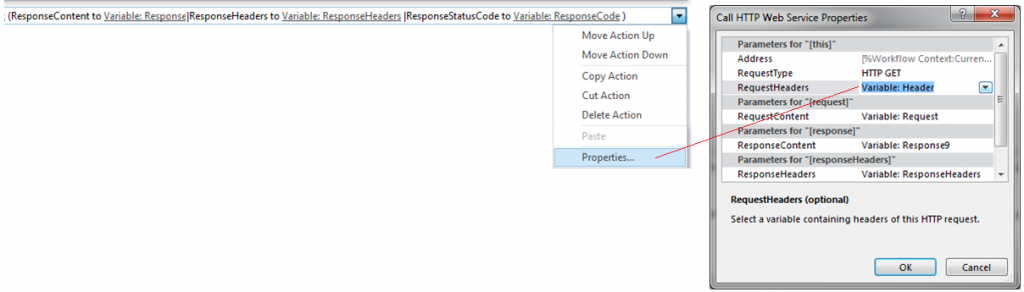
Note: This ‘Header’ definition should be on every HTTP Call statement (even though I may not mention it again). Failing to have this value will result in 0 records being returned by the call

Change the Call’s defaulted names of ‘request’ to ‘Request’, ‘response’ to ‘Response9’, ‘responseHeaders’ to ‘ResponseHeaders’ and ‘responseCode1’ to ‘ResponseCode’. This is probably not necessary in your situation, provided you make the necessary substitutions when examining the code in this document. Once everything is complete, I have a statement that looks as follows:

206-6

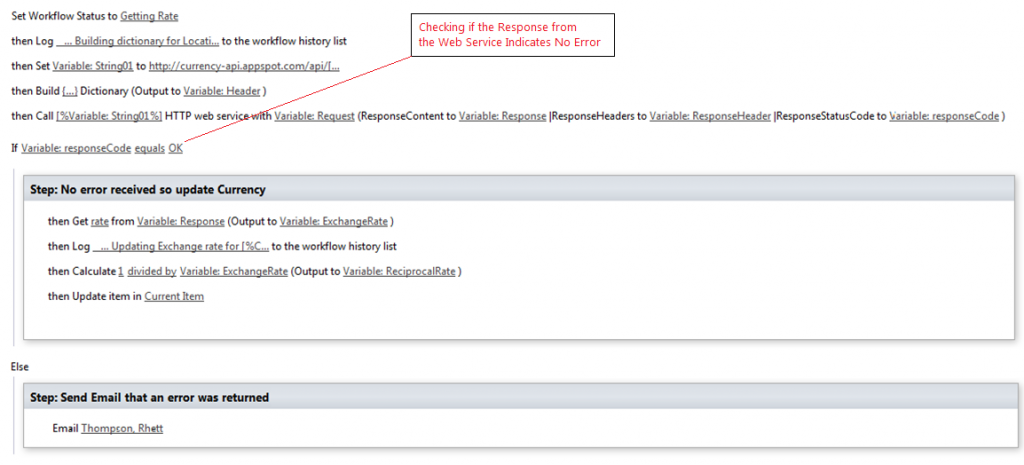
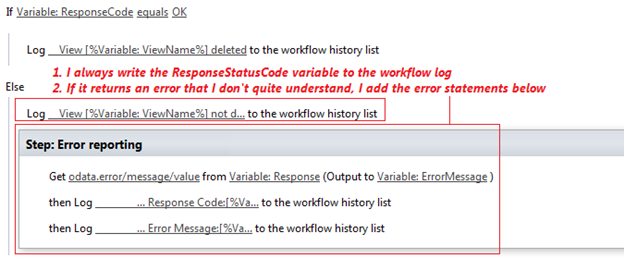
This statement should execute without error, but if you have a problem, you can use a ‘Log’ action to display the value of ‘ResponseCode’ which should always be ‘OK’. Any other value denotes an issue (See my workflow posts about troubleshooting REST errors)

Get the GUID of the list

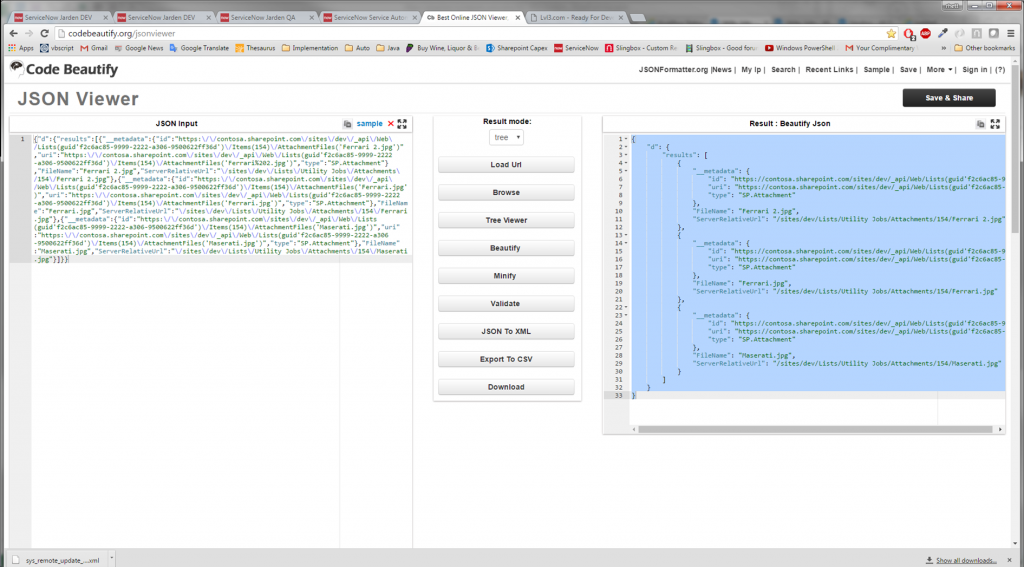
The previous statement makes a call to the SharePoint site and returns information into the dictionary we defined. We now need to interrogate the dictionary to get the GUID of the list. This is done with a ‘Get an item from a dictionary’ action

206-7

Click on the ‘item by name or path’ and type ‘d/Id’ in the fill-in. Then click on ‘dictionary’ and select the ‘ResponseContent to’ variable – in my case this is Response9. At the end of these two changes, your statement should look as follows:

206-8

This statement gets the GUID of the list (in my case the Current Item) and places it in the Workflow GUID variable ‘create’

Get the workflows for the list

Now we need to get a listing of all the workflows related to this list item. To do this, insert another ‘Call HTTP Web Service’ action and set the HTTP web service URL to the following206-9

[%Workflow Context:Current Site URL%]/_api/SP.WorkflowServices.WorkflowSubscriptionService.Current/EnumerateSubscriptionsByList(guid’[%Variable: create%]‘)?select=Id,Name

This call will return a listing of all workflows related to the list (the GUID and Name are returned). Set the HTTP method to ‘HTTP POST’. I then reuse some of the variables that I defined before so that the final statement looks as follows (Remember to use the properties to set the HTTP Call to use the Header dictionary)206-10

Prepare to loop thorough the Workflows

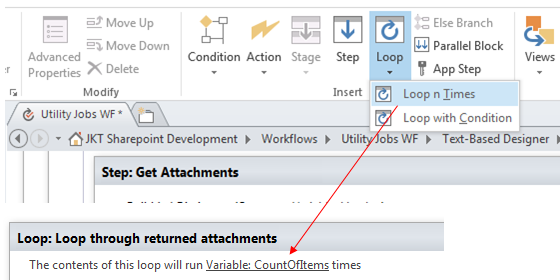
In some situations, as is the case with mine, there will be more than one workflow associated with a list item, so I need to loop through all of them to get the one I want. To perform this looping I use two variables ‘ContinueLoop’ (Boolean) and ‘calc’ (Number)

206-11

Use the Loop function from SharePoint designer to design a loop that continues until the returned workflow returns the name of the workflow I want. This assumes that the name I use for the Workflow (ItemWF02) actually exists otherwise your workflow will suspend itself

206-12

Read the data in the loop

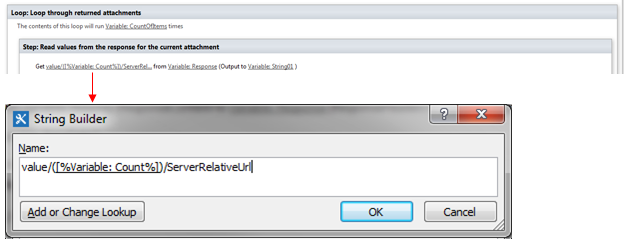
The first statement within the body of the loop is a ‘Get an item from a dictionary’ action. Set the ‘item by name or path’ to type ‘d/results([%Variable: calc%])’ in the fill-in. Then click on ‘dictionary’ and select the ‘ResponseContent to’ a workflow variable ‘Response9’. At the end of these two changes, your statement should look as follows

206-13
This will return the details of the current entry (initially it will be the first entry as calc=0)

Using two more ‘Get an item from a dictionary’ actions, get the GUID and name of the Workflow as follows:

206-14

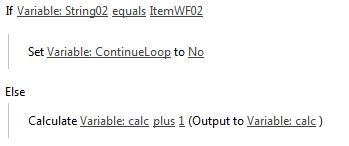
Now we have the name of the workflow. Is it the one we need? If so, set the value ‘ContinueLoop’ to ‘No’ so that we do not read any more values. If this is not the value we need, increment the counter (calc) by one so that the system will read the next workflow for the list, as shown below

206-15

Start the workflow

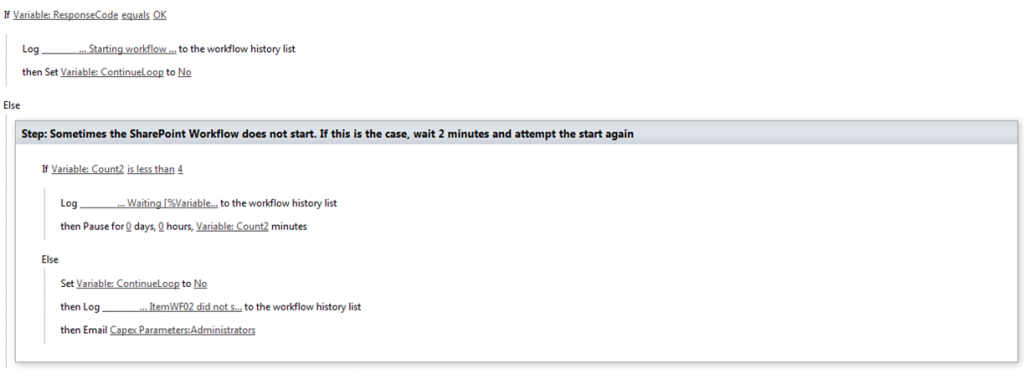
In the documentation I read online, the next statement that executes in the workflow will start the workflow on the list item. My experience is that on occasion, the system will NOT start the workflow on the first attempt, returning an error in the ResponseCode instead. The error appears to be random and may be due to demand on the servers processing the request. No matter, I cannot let this happen, so I create a loop to execute the workflow, pausing for a number of minutes between attempts. This has always worked for me, but you may see some of this code as unnecessary. I show the section of code in its entirety below, followed by a more detailed explanation of the key steps

206-16

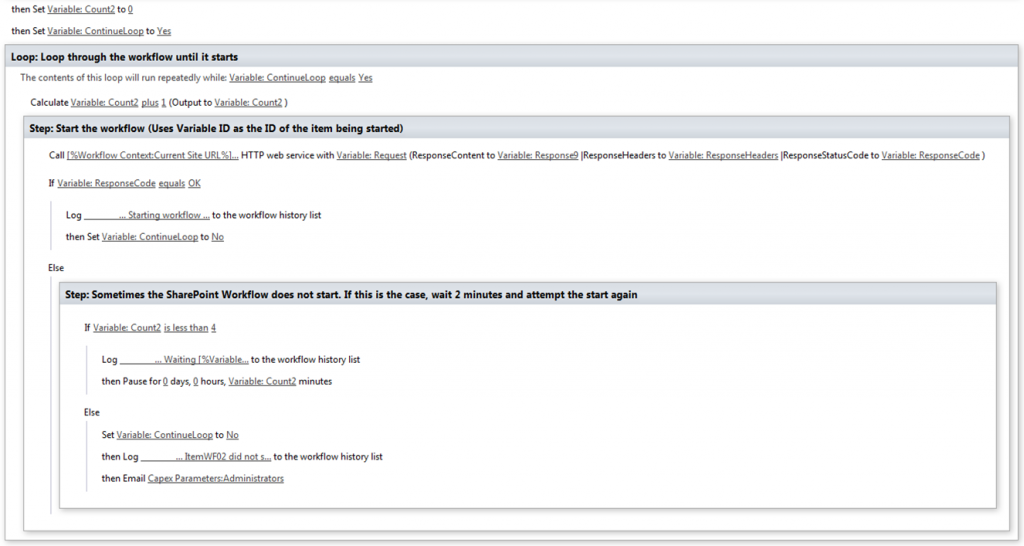
Initialize the Workflow variables for the loop. Here we use the Counter ‘Count2’ (Number) and the Boolean ‘ContinueLoop’ defining them as follows:

206-17

Actual Workflow Start syntax

In the first part of the loop we increment the counter so that we are aware of which iteration we are within the loop, but the key statement is the second one. Here we add another ‘Call HTTP Web Service’ action and set the HTTP web service URL to the following

206-17

[%Workflow Context:Current Site URL%]_api/SP.WorkflowServices.WorkflowInstanceService.Current/StartWorkflowOnListItemBySubscriptionId(subscriptionId=’[%Variable: create%]’),itemId=’[%Variable: ID%]’

This is telling SharePoint that the system must start the workflow with the GUID = Variable:create on the item with ID = Variable:ID. Set the HTTP method to ‘HTTP POST’. I once again change the dictionary variables I use with this statement, but the final one looks like the following (Remember to use the properties to set the HTTP Call to use the Header dictionary)

206-18

If you do not believe me that the workflows do not always start, then ignore the entire loop and execute the statement above after you have the Workflow GUID

The code that follows this statement contain no magic and simply checks the ‘ResponseCode’ returned by the HTTP Call. Since I assume that the reason why the workflows do not execute is due to server load, I pause for a number of minutes before attempting the call again. If after 3 attempts the workflow has not started, I email the administrator that there is a problem

206-19

That is how to initiate a workflow from within another workflow
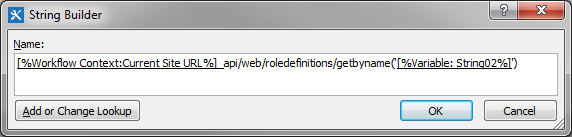
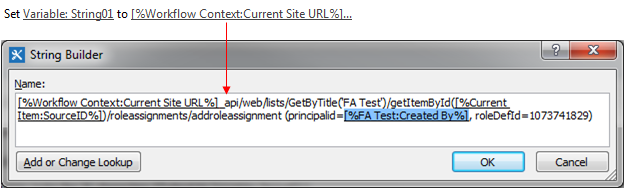

Workflow – Splitting the workflow into multiple parts

As of the time of writing, Microsoft has a limit of 5,000 on the number of operations that can be performed by a workflow within a 24 hour period, and workflows that exceed this quota are automatically suspended. More importantly no-one is notified of this suspension and if this workflow is not manually resumed within an arbitrary amount of time, the workflow itself is cancelled. Apparently, this is to prevent workflows from being stuck in infinite loops. That is all well and good, but my [largish] workflows were not in infinite loops and were still reaching the limit and going into suspension. With hundreds of workflows active at any time, it was a nightmare to manage this situation and resume each workflow

Looking carefully at my workflows, I found it was possible to divide them into 2 or more parts and call one workflow from the other (See ‘Start a workflow within a workflow’ for details on how to do this).

This has had a number of positive spinoffs, namely:

  1. Whilst the original workflow was long and sometimes difficult to navigate through, the resulting workflows were smaller and easier to work with
  2. The split workflows were quicker to publish
  3. This is a subjective assessment, but the workflows seemed to execute much faster. This could be due to a smaller packet being passed between the servers between each step
  4. The splits allow me to restart the workflow at different points in the process if needed
  5. Since some of my workflows ‘live’ for lengthy amounts of time, the previously consolidated version would never function with a new update – it would run with the old functionality until it completed. In the split design, the system can execute the new designs when the split workflow runs.

Normally, I have two stages at the end of my workflows, the first of these uses the logic in ‘Start a workflow on another list within a workflow’ to start the second workflow. This stage then goes to the last stage which marks the calling workflow as complete.

A result of this issue has been that I always consider splitting the workflow between multiple SharePoint designer workflows and it has proven to be more of a help than a hinderance


Workflow – Scoping the App Step

If you are using the App Step in workflows (and I believe you should), then you need to specify which sites the workflow can update and the level of control that the workflow App Step will have within the sites (i.e. Can the workflow update the current site, the current site and the parent site or the entire site collection?). Failure to use the App Step can result in suspended workflows since the workflow object may be unable to read from or write to SharePoint lists)

Most of the data presented here is a direct copy of a great Microsoft article Create a workflow with elevated permissions by using the SharePoint 2013 Workflow platform

To enable the SharePoint Designer Workflows to have full control

Activate the “Workflows can use app permissions” site feature in the site where the workflow exists.

This is done in Site Settings>Site Actions>Manage site features>Workflows can use app permissions

207-4

207-1

Get the Workflow App Identifier

Navigate to Site Settings> Site app permissions where you will see an item called workflow as shown below

207-2

Copy the client portion of the App Identifier as shown below (the data between the | and @ characters , exclusive)

207-3

Give the workflow Full Control

Navigate to <site url>/_layouts/15/appinv.aspx to configure permissions. Then add the client section of the App Identifier in the App Id section and click Lookup to populate the content.

207-5

Paste the scope of the Full Control into the ‘Permission Request XML’ fill-in as follows:

For rights to the current site (Most common usage), paste this into the Permission Request XML exactly:

<AppPermissionRequests>
    <AppPermissionRequest Scope=”http://sharepoint/content/sitecollection/web” Right=”FullControl” />
</AppPermissionRequests>

For rights to the entire collection, paste this into the Permission Request XML exactly (You will need tenant access to do this):

<AppPermissionRequests>
    <AppPermissionRequest Scope=”http://sharepoint/content/tenant” Right=”FullControl” />
</AppPermissionRequests>

For rights to the current, parent and sub-sites, paste this into the Permission Request XML exactly:

<AppPermissionRequests>
    <AppPermissionRequest Scope=”http://sharepoint/content/sitecollection” Right=”FullControl” />
</AppPermissionRequests>

In some cases you may be dealing with user related data, such as getting the manager for a particular user. In this case you will need to scope as follows (I found that I was unable to get the manager details unless I had this scope set):

<AppPermissionRequests>
    <AppPermissionRequest Scope=”http://sharepoint/social/tenant” Right=”FullControl” />
</AppPermissionRequests>

Note 1.

Previously I experienced an ‘Unauthorized’ response from a workflow REST call to add a user to a group. This problem was fixed by specifying the Workflow Request scope, as ‘http://sharepoint/content/sitecollection’ since the users are defined for the entire collection and not for the individual sub-sites

Note 2.

If you want a workflow to have multiple scope requests, you need to add the Application Requests Scopes into a single statement, for example:

<AppPermissionRequests>
    <AppPermissionRequest Scope=”http://sharepoint/content/sitecollection” Right=”FullControl” />

    <AppPermissionRequest Scope=”http://sharepoint/social/tenant” Right=”FullControl” />
</AppPermissionRequests>

Trust the workflow

You will then need to trust the workflow by clicking on the ‘Trust it’ button in the dialog box that is displayed

207-6

Ensure that the App Step’ option is available in the Designer

If the App Step option is not available in the SharePoint Designer menu, exit from the Designer and restart it. The ‘App Step’ should then be available

207-7

Once, you have clicked on ‘App Step’, add all your code within this group.

For more information on scoping, check out this excellent article by Fabian WilliamsGotcha on SharePoint Designer Workflows in App Step


Workflow – Useful REST calls – Attachments in email

From a workflow, you may want to find the attachments that are linked to a list item or even display these attachments within the body of an email. The next steps will guide you through this process. For those among us who are impatient, most of the entire process is shown in the figure below

203-1

Build a dictionary variable

Select the ‘Build a dictionary’ action and click on ‘this’ and use the ‘Add …’ button to define the dictionary names ‘Accept’ and ‘Content Type’, both og which are defined with exactly the same value: ‘application/json;odata=verbose’

203-2

202-3

Change the name ‘dictionary’ to specify a new dictionary variable ‘Header’. The end result looks as follows

203-3

Define the REST call 

Set a variable (String01 in this case) to the HTTP Web Service Call (REST Call) that will get the attachments. This is set to a combination of your site, list and list item as follows

<site>_api/web/lists/getbytitle(‘[%Workflow Context:List Name%]/items([%Current Item:ID%]/AttachmentFiles

203-4

This will return all attachments related to the current item. If you were looping through all items in the list, you could leave out the ([%Current Item:ID%])

Call the web service

Use the REST string previously defined in the ‘String01’ variable to call the web service, setting the ‘RequestHeaders’ in the Properties to the dictionary variable previously defined

203-7

203-6

Data Returned from HTTP Web Service call

When the HTTP Call executes, it will return a packet of data to the ResponseContent variable ‘Response’ that looks similar to the following (Note that is your ‘RequestHeaders’ are set as defined previously, the system will return values in JSON format:

XML (Multiple iterations of ‘value’ removed to save space):

<?xml version=”1.0″ encoding=”UTF-8″ ?>
<odata.metadata>https://contoso.sharepoint.com/sites/dev/_api/$metadata#SP.ApiData.Attachments</odata.metadata>
<value>
    <odata.type>SP.Attachment</odata.type>
    <odata.id>https://contoso.sharepoint.com/sites/dev/_api/Web/Lists(guid’f2c6ac85-9999-222a-a306-9500622ff36d’)/Items(154)/AttachmentFiles(‘Ferrari 2.jpg’)</odata.id>
    <odata.editLink>Web/Lists(guid’f2c6ac85-9999-222a -a306-2433922ff36d’)/Items(154)/AttachmentFiles(‘Ferrari%202.jpg’)</odata.editLink>
    <FileName>Ferrari 2.jpg</FileName>
    <ServerRelativeUrl>/sites/dev/Lists/Utility Jobs/Attachments/154/Ferrari 2.jpg</ServerRelativeUrl>
</value>

JSON:

{
    “d”: {
        “results”: [
          {
                “__metadata”:
{
                    “id”: “https://contosa.sharepoint.com/sites/dev/_api/Web/Lists(guid’f2c6ac85-9999-222a-a306-9500622ff36d’)/Items(154)/AttachmentFiles(‘Ferrari 2.jpg’)”,
                    “uri”: “https://contosa.sharepoint.com/sites/dev/_api/Web/Lists(guid’f2c6ac85-9999-222a-a306-9500622ff36d’)/Items(154)/AttachmentFiles(‘Ferrari%202.jpg’)”,
                    “type”: “SP.Attachment”
                },
                “FileName”: “Ferrari 2.jpg”,
                “ServerRelativeUrl”: “/sites/dev/Lists/Utility Jobs/Attachments/154/Ferrari 2.jpg”
         },
            {
                “__metadata”: {
                    “id”: “https://contosa.sharepoint.com/sites/dev/_api/Web/Lists(guid’f2c6ac85-9999-222a -a306-9500622ff36d’)/Items(154)/AttachmentFiles(‘Ferrari.jpg’)”,
                    “uri”: “https://contosa.sharepoint.com/sites/dev/_api/Web/Lists(guid’f2c6ac85-9999-222a-a306-9500622ff36d’)/Items(154)/AttachmentFiles(‘Ferrari.jpg’)”,
                    “type”: “SP.Attachment”
                },
                “FileName”: “Ferrari.jpg”,
                “ServerRelativeUrl”: “/sites/dev/Lists/Utility Jobs/Attachments/154/Ferrari.jpg”
            },
            {
                “__metadata”: {
                    “id”: “https://contosa.sharepoint.com/sites/dev/_api/Web/Lists(guid’f2c6ac85-9999-222a-a306-9500622ff36d’)/Items(154)/AttachmentFiles(‘Maserati.jpg’)”,
                    “uri”: “https://contosa.sharepoint.com/sites/dev/_api/Web/Lists(guid’f2c6ac85-9999-222a-a306-9500622ff36d’)/Items(154)/AttachmentFiles(‘Maserati.jpg’)”,
                    “type”: “SP.Attachment”
                },
                “FileName”: “Maserati.jpg”,
                “ServerRelativeUrl”: “/sites/dev/Lists/Utility Jobs/Attachments/154/Maserati.jpg”
            }
        ]
    }
}

Note: If you forgot to specify that your ‘ResponseHeaders’ are in JSON format, then the above values will be returned with ‘value’ instead of ‘d/results’ as shown below. This will cause the following commands not to work:

{
    “odata.metadata”: “https://contosa.sharepoint.com/sites/dev/_api/$metadata#SP.ApiData.Attachments”,
    “value”: [
        {
            “odata.type”: “SP.Attachment”,
            “odata.id”: “https:// contoso.sharepoint.com/sites/dev/_api/Web/Lists(guid’f2c6ac85-9999-222a-a306-9500622ff36d’)/Items(154)/AttachmentFiles(‘Ferrari 2.jpg’)”,
            “odata.editLink”: “Web/Lists(guid’f2c6ac85-9999-222a-a306-2433922ff36d’)/Items(154)/AttachmentFiles(‘Ferrari%202.jpg’)”,
            “FileName”: “Ferrari 2.jpg”,
            “ServerRelativeUrl”: “/sites/dev/Lists/Utility Jobs/Attachments/154/Ferrari 2.jpg”

If you look closely at the JSON data above, you will notice that there are multiple iterations of the ‘value’ data element. Since we need to know how many attachments there are, we must move all these iterations into a separate data dictionary to count them. Add a ‘Get’ action to move the ‘’d/results’ elements from variable ‘response’ into the dictionary variable ‘ItemData’

203-9

Count the number of items (Attachments) returned

Once the ‘d/results’ iterations are in the ‘ItemData’ dictionary variable, we count them with the ‘Count Items’ action and place the value in the integer workflow variable ‘CountOfItems’

203-10

Initialize the variables for the loop

Initialize the workflow variable (Count) that will indicate which iteration we are working through in the list. While the kneejerk reaction is make this an integer variable, I recommend making it a ‘Number’ variable since it will save a workflow step when this value is incremented later (Don’t concern yourself that it sets the value to 0.0 – it is still 0)

203-11

Since we will be creating a ‘special’ HTML string that will contain the images of the attachments (In this case I know the attachments are images), we need to empty this string first. Use the following command to set ‘String03’ to empty

203-12

Loop through the attachments (items) returned

Insert a ‘Loop n Times’ action that will loop the number of times indicated by the attachment count you set earlier in the ‘CountOfItems’ variable. This loop will be used to iterate through the ‘values’ returned by the call and build up the data that we wish to include in an email

203-13

Read each attachment

Use a Get statement to read the ServerRelativeURL from the data returned by the HTTP Call for the current iteration indicated by [%Variable:Count%] (the first iteration will be 0, the second 1 and so on). You will notice that I included this statement in a step to make the coding more readable

203-14

It is also possible to get this value from the ItemData dictionary variable defined earlier to get the count from the ‘ItemData’ dictionary instead of the ‘Response’ dictionary using the following action:

Get ([%Variable:Count%])/ServerRelativeURL from Variable:ItemData (Output to Variable:String01)

While this possibly makes it easier to read, I decided to use the structure from the top down to provide more understanding about what is going on

Use a Get statement to read the ‘FileName’ from the data returned by the HTTP Call for the current iteration indicated by [%Variable:Count%]. Follow the same process as you did for the ServerRelativeURL

203-15

‘Fix’ the data by replacing special characters

Replace any special characters (such as spaces and exclamation marks) in the ServerRelativeURL to ensure that if the user clicks on the link it will open up correctly. In my example I replace commas (,), exclamation marks (!) and spaces ( ) with the appropriate encoded characters (%2C, %21 and %20)

Thereafter, log the result (optional) if you wish to view the final URL

203-16

Add the image into the final string that will go into the email

Now that we have the Server Relative URL and the File Name of the attachment, we can construct the body of the email. In my case, I wish to embed the pictures within the email but you could also define a link to the image instead

203-17

As a convenience, I have included the text values here so you can cut and paste if necessary (Note that the [%Variable:String01%] and [%Variable:String03%] will have to be substituted with actual look-ups

[%Variable:String03%]
<tr>
       <td style=”width: 193px”><a href=”[%Variable:String01%] “>
       <img src=”[%Variable:String01%] ” width=”175″/></a></td>
       <td style=”width: 9px”>&nbsp;</td>
       <td style=”width: 600px”><strong><font face=Calibri size=”2″>[%Variable:String02%]</font></strong><br/>
       <br/>
</tr>

‘String03’ is made up of String03 and the new image contained in ‘String01’ together with the title of the attachment in ‘String02’

Increment the counter

Once we have finished with the list item, increment the counter and restart the process for the next iteration. You will notice that because the variable ‘Count’ is a number (as opposed to an integer), you can simply increment its value by adding 1. If the count variable was created as an integer, you would have to first increment a number value and then set the integer value to the incremented number value, requiring two steps

203-18

Define the email

The last step is added AFTER the end of the loop and emails the filenames and images to someone. In this case, the system will email the individual that is maintained in the people picker field ‘Current Item:User’. This is a very simple email but should serve to illustrate what to do. Feel free to add any additional details

203-19

Final result

You should be good to go and your code should then send an email similar to the following (The Maserati was too expensive and was trimmed off to save space)

203-20