Tag : rest

Workflow – Useful REST calls – Getting User Properties

This Sharepoint Designer REST call fetches the manager associated with a user (in this case the person who has initiated the workflow), but it can also be used to get any other attribute associated with the user. The statements shown below have all been included in a single app step in the workflow (Make sure you read the Notes at the end of this blog)

Build a dictionary for a REST call

Add a ‘Build Dictionary’ action as show in the image below

ip0901

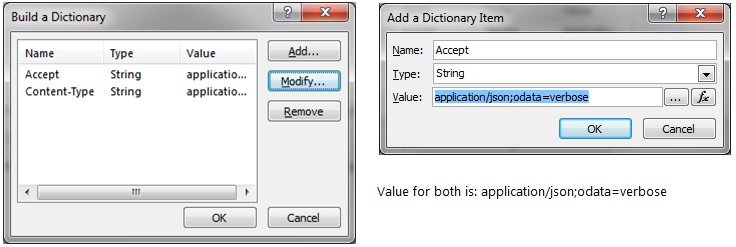
(When you add the ‘Build Dictionary’ action, the system will initially have ‘this‘ instead of the bracketed ellipsis ({…}). Click on ‘this‘ to add the Names ‘Accept’ and ‘Content-Type’ both with the value ‘application/json;odata=verbose‘ as shown below

ip0902

Set the string that you will use for the rest call

Create a string that you will contain the rest call that you will make as follows

ip0903

For clarity, the String Builder is as follows:

[%Workflow Context:Current Site URL%]_api/SP.UserProfiles.PeopleManager/GetUserProfilePropertyFor(accountName=@v,propertyName=’Manager’)?@v=’[%Workflow Context:Initiator%]’

Where:

[%Workflow Context:Current Site URL%]

The URL of your site. This is taken from the ‘Workflow Context’ Data Source but could also be hard-coded

_api/SP.UserProfiles.PeopleManager/GetUserProfilePropertyFor(accountName=@v,

This is the method used to get the properties. Enter this as is

propertyName=’Manager’)

This tells the system that the property we wish to retrieve is the ‘Manager’ (This is what we are retrieving in this example, but this could also be any of the other user properties such as ‘Department’, ‘PreferredName’, ‘PictureURL’ or any of the others. Search on the web for other properties or visit https://technet.microsoft.com/en-us/library/hh147510.aspx to get a list of a few of the properties)

@v=’[%Workflow Context:Initiator%]’

The user whose manager you wish to get (Note the single quotes). I used the ‘Workflow Context’ Data Source to get the Login name of the user who initiated the workflow, but you can use the ‘Created By’ value or a string value that is defined in the following format:

i:0#.f|membership|username@contosa.com

 Change certain reserved characters in the string

The user name has certain properties that need to be ‘translated’ for the rest call to work properly. Use the ‘Replace’ action in Designer to substitute i:0#.f with i%3A0%23.f in the string ‘String01′ (this is simply replacing the characters with their encoded ASCII value)ip0904

Write the final string to the log

To make sure that you the correct expression has been defined, write the final string to the log as shown below

ip0905

Call the REST service with the string you have defined

Insert a ‘Call HTTP Web Service’ action as shown below.

ip0906

Some things about this call.

The original ‘this‘ was changed to the following:
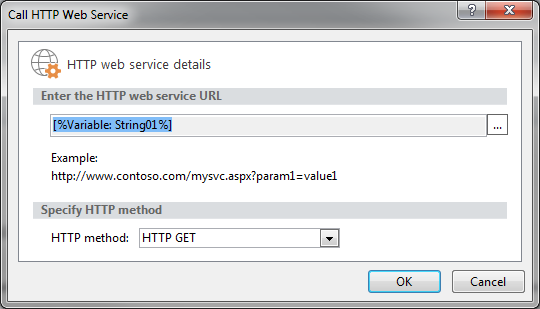
ip0908

Also, click on the down arrow of the action, select properties and then set ‘RequestHeaders to the dictionary variable you created earlier (Header) as shown below

ip0909

Get the Managers name (or other property)

Insert a ‘Get an item from a dictionary’ action to fetch the name of the manager (or other data requested) as shown below where I re-use the ‘String01’ variable to contain the result. The result is in the same format as the user login name you used in the REST request (i:0#.f|membership|username@contosa.com)

ip0911

The actual statement ‘Get‘ statement is ‘d/GetUserProfilePropertyFor‘ if you want to copy and paste.

Display the value that you you have retrieved to make sure it is what was expected 

ip0912

Display any errors that have been returned (See Workflow – Troubleshooting REST calls  for troubleshooting any issues)

ip0913

Notes

You need to at least have ‘Read’ rights on the social tenant. See Workflow – Scoping the App Step on how to set this up, but in short your ‘Permission Request XML’ should look similar to the following (The second line allows your workflows to update any data in the site collection, while the third line allows you access to the social data):

<AppPermissionRequests>
<AppPermissionRequest Scope=”http://sharepoint/content/sitecollection” Right=”FullControl” />
<AppPermissionRequest Scope=”http://sharepoint/social/tenant” Right=”Read” />
</AppPermissionRequests>
Workflow – Useful REST calls – Listing views (and deleting them)

This REST call is useful for listing and deleting the list views. Be aware that the RAW call from a browser returns ALL Views, including Personal ones, while in SharePoint Designer only the public views are returned. Go figure! Nevertheless, here are the steps to list and delete Public Views

Define your Request Header dictionary

Add a ‘Build Diictionary’ action to create the header dictionary that specifies that the REST call must return data in JSON format. Create the Names ‘Accept’ and ‘Content-Type’ setting them both to the String value ‘application/json;odata=verbose’.
202-2

Click on ‘this’ and use the ‘Add …’ button to define the dictionary names ‘Accept’ and ‘Content‑Type’ as follows:
202-3
Both of these items have exactly the same value ‘application/json;odata=verbose

Instead of using the defaulted name of ‘dictionary’ in the ‘Output to’ command, I use my own name of ‘Header’. This change of name is optional. At any rate, after the dictionary changes have been made, the command looks similar to the following:
202-4

Define the dictionary that will be used to delete the views

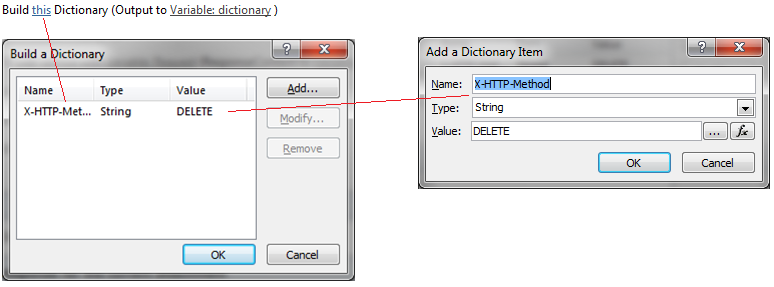
Since we will also be deleting certain views in this process, we need to add a dictionary that specifies the elements to delete. Create a name called ‘X-HTTP-Method’ and set the value to ‘DELETE’ . Once defined, change the name of the dictionary to ‘DeleteHeader’

214-1

214-2

Build the REST Call string

Build the string that will return all the views. This is performed in 2 steps since the SharePoint Designer has an issue when the contents exceed 255 characters

214-3
[%Workflow Context:Current Site URL%]_api/Lists/GetbyTitle(‘Table Name’)/views

214-4
[%String01%]?$Top=500&$Select=Title,Id,ServerRelativeURL

Log the string that you have formulated to help if troubleshooting is necessary

214-5

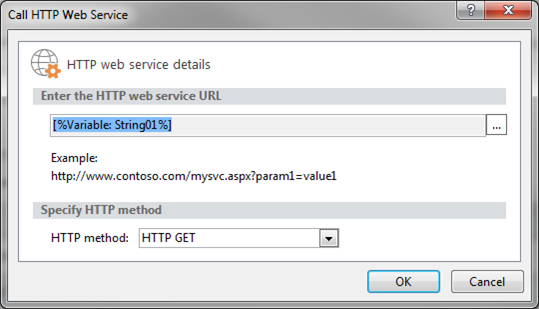
 Make the HTTP (Rest) call to the Web Service with the string that you have previously defined

214-6

214-7

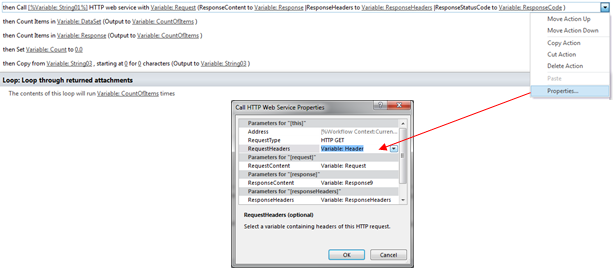
We are still not finished with the web service call yet.  Click on the right combo-box of the ‘Call’ action and select ‘Properties …’ and then set ‘RequestHeaders’ to the ‘Header’ dictionary previously defined

214-8

Get the results of the call

The rest call returns all the data into the ‘ResponseContent’ variable. Move the results into the a new dictionary variable called ‘ItemData’ so that you can count the number of items returned

214-9

Count the number of items so that we know how many views have been returned and store the value in a Workflow Variable called ‘CountOfItems’

214-10

Log the Response received from the call to assist in troubleshooting if necessary

214-11

Loop through the views returned

Initialize the variable you will use for looping through the views returned by the REST call

214-12

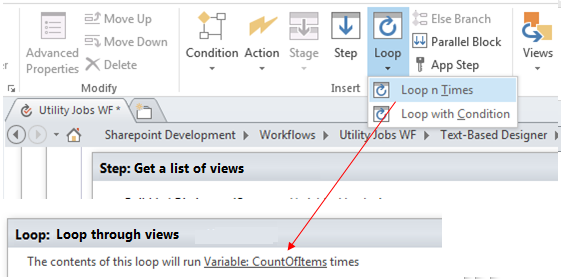
Create a loop for the number of items returned by the REST call

214-13

Get the Title of the returned item (View) for the current iteration and move it into the workflow string variable ‘ViewName’

214-14

Log the Title for troubleshooting purposes if needed

214-15

In my case, I only wish to delete specific views so I check a condition to make sure the view returned matches my parameters (For some reason, there are hundreds of views that have been created – not by the users but from somewhere else. This is a problem that Microsoft are investigating at the time of writing)

214-16

Get the Id of the view (this is the GUID) and save it in the Workflow Variable ‘ViewID’

214-17

 Formulate another REST string – this time to delete the view

214-18

[%Workflow Context:Current Site URL%]_api/Lists/GetbyTitle(‘Table Name’)/views(‘Variable:ViiewID%]’)

Log the string that you have formulated for troubleshooting purposes

214-5

Make the HTTP (REST) Call. Set this up as you did previously but click on the ‘Properties…’ and set the ‘RequestHeaders’ to the ‘DeleteHeader’ dictionary defined previously.

214-19

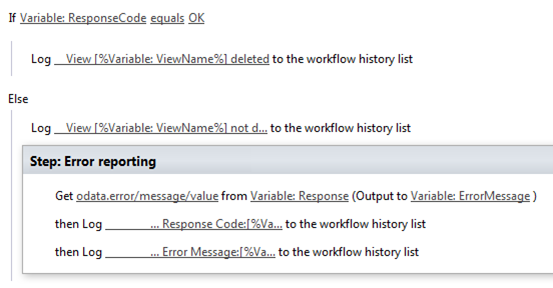
Check the Response code. If the delete was successful (ResponseCode = ‘OK’) write to the log and If the response was unsuccessful, get the error data returned and log the values to assist in troubleshooting

214-20

 Increment the counter so that we read the next row when the loop iterates

214-21

That is the end of the loop and the end of the process. The system should now run through the views and delete the ones selected

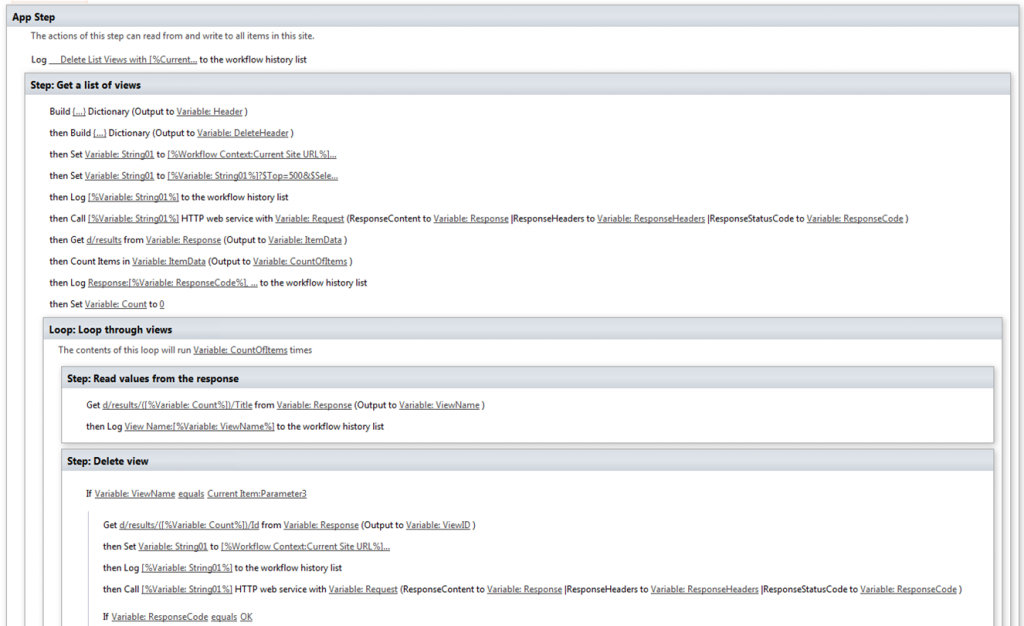
Final code

The entire code section is as follows (See next page for remaining screen dump. The ‘Update item in ‘Current Item’ statement is not needed):

214-22

214-23


Workflow – Useful REST calls – Get foreign currency

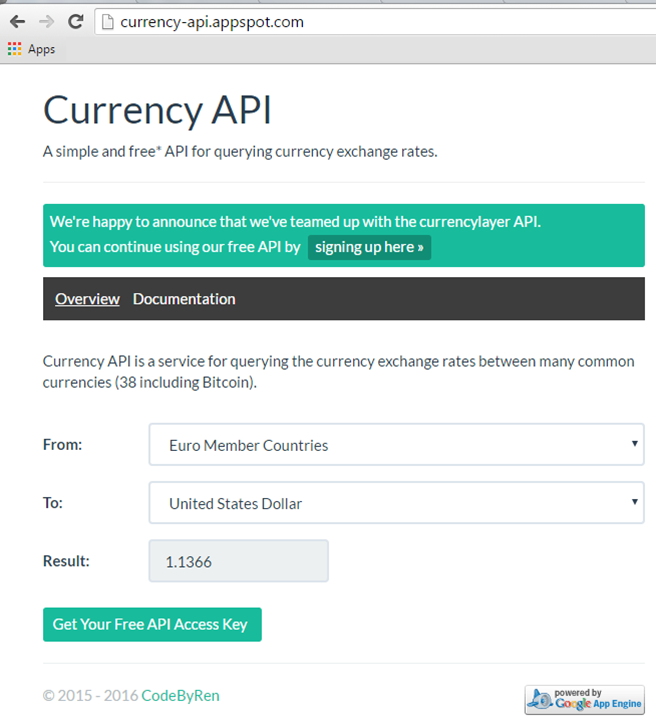
I cannot remember the post that pointed me in this direction. While there are many Web Services that return currency cross rates, the site http://currency-api.appspot.com returns a restricted set of rates for free – all you need is to get an access key. The API is documented and easy to work with, but there some restrictions, namely how many rate requests you can make in a month.

To work with this Web Service:

Get you Free API Access key

Visit ‘http://currency-api.appspot.com/’ and click on the button ‘Get Your Free API Access Key’ . This will open up a new screen where you can sign up for free. Follow all instructions to get your key. The key is important

208-1

Create the REST call string

In your workflow, create a string with the following value

http://currency-api.appspot.com/api/EUR/USD.json?key=3af4391296f24977235b738d5f2e4680

208-2

This string converts from EUR to USD using my key:

(You can perform any desired substitutions in the string makeup with the variables available in your workflow)

Call the Web Service to get the rate

Build the ‘standard’ Header dictionary with the names ‘Accept’ and ‘Content-Type’ set to ‘application/json;odata=verbose’

208-3

Call the Web Service with a Call HTTP Web Service action using the string previously defined

208-4

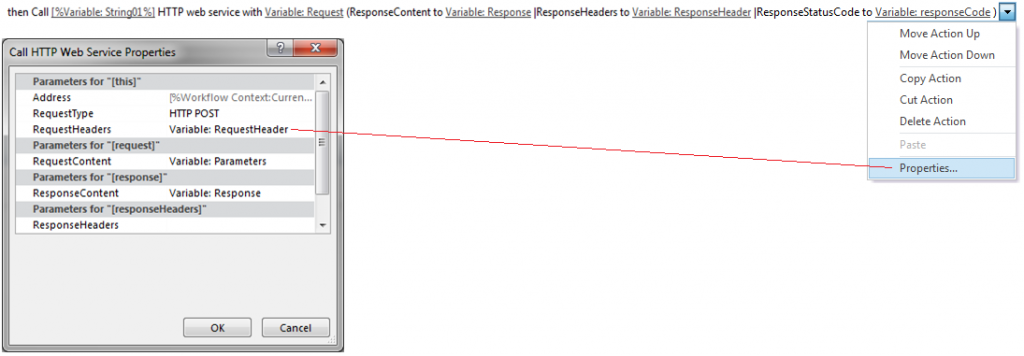
Create the various dictionary items needed in the call and remember to set the ‘RequestHeaders’  to your Header dictionary previously defined by using the ‘Properties’ option of the call statement

208-6

This should return something similar to the following in the response:

{
successtrue,
source: “EUR“,
target: “USD“,
rate1.1366,
amount1.14,
message: “”
}

Check if data returned is OK

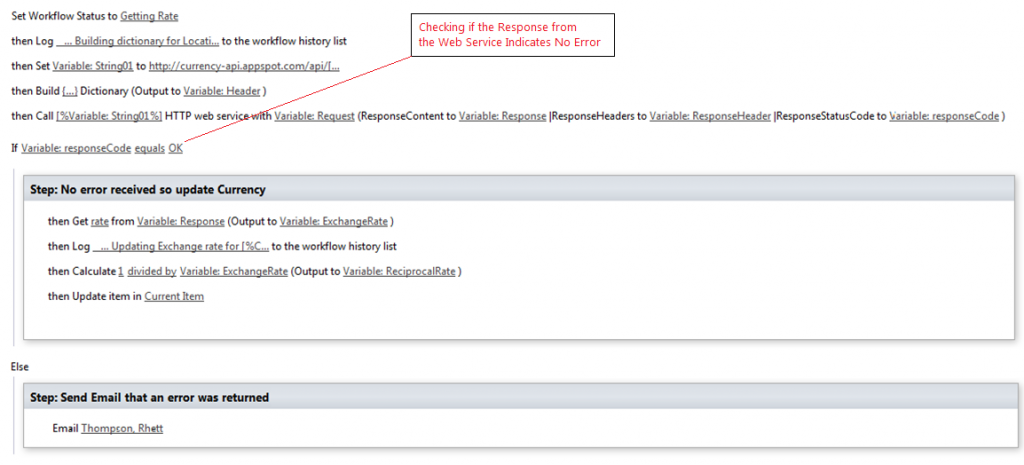
I then check if the Response code equals OK before I move to the next step. If it is not OK, I know something went wrong in the call, and I email the administrator

208-7

Get the exchange rate

The next steps involve getting the rate from the returned response. This is performed using a Get action as follows (remember to get the case correct):

Get rate from Variable:Response (Output to Variable:ExchangeRate)

Finally, you have the exchange rate of EUR to USD to do with as is your wont. Since the API has a restriction on the number of times it can be accessed, I allow the users to specify how often they would like the rate updated and in most cases, they selected a monthly update. But your user may require more up-to-date information so it could be that you have to buy ‘professional’ access to the API


Workflow – Troubleshooting REST calls

When the REST/HTTP Call to a Web Service is not returning correct results, the reason why may not be immediately obvious. In these cases you may need to interrogate the data returned to discover what went wrong

Check the Response Status Code

Add a Log action after the rest call to display the value of the ‘ResponseStatusCode’ variable ‘ResponseCode’ as shown below

205-1

Check the logged Response Status Code

Run your workflow and check your workflow log. If everything is OK, this will normally return a positive indication such as ‘OK’ or ‘Created’. If there is a problem, it will display something similar to the message shown below:

205-2

If it returns a message such as ‘NotFound’ (as shown above) or ‘InternalServerError’ you may need to display the error in more detail, by logging the actual error message to the workflow log. This is done using a ‘Get’ action on the ResponseContent Variable (‘Response’) as follows:

Get odata.error/message/value from Variable:Response (Output to Variable:ErrorMessage)

205-3

The field ‘ErrorMessage’ is a workflow variable that I created to store the contents of the error message. Alternatively, you can display the entire ‘Response’ but displaying this value if the length is greater than 255 characters would hang your workflow.

Run the workflow again

Publish and run the workflow again and check your workflow log again. In my case it displayed the following

205-4

In my case, the message is saying that it could not find the SharePoint resource ‘GetByNameXXX’.

Aha! – It should be ‘GetByName’ not ‘GetByNameXXX’. I change my workflow to specify ‘GetByName’ instead of ‘GetByNameXXX’ and republish it. When it runs without error, I remove the error message from the workflow and the world is in balance

Other issues

If no error is being generated, it could be that the field names or their assignments are incorrect in the ODATA call. Check the following:

The body of the REST/HTTP call is normally in an ODATA format similar to the following:

[%Workflow Context:Current Site URL%]_api/Lists/GetbyTitle(‘Quotes’)/items/?$select=ID&$filter=Form_x0020_Status eq ‘In Approval’ and Active eq 1&$Top=500&$orderby=SpecApprover

Some common mistakes in the REST calls:

  1. Your field names are not in the correct case. If your SharePoint field is ‘Title’, then in the REST call it should be ‘Title’ not ‘title’
  2. Your field names are incorrectly stated in either the select, filter or orderby options. This can sometimes be tricky especially if your SharePoint fields have spaces in them (Not the best practice, but it happens). For example the SharePoint field Form Status must be specified as Form_x0020_Status. To find the real value of the field, open the list and select Library Settings. Scroll down to the field you are interested in and click on it. Then cut the full URL it navigates to and view the last bit after ‘Field=’. This is the internal field name. In my case, Form Status is actually Form%5Fx0020%5FStatus (Note how the system substitutes %5F for underscores and x0020% for spaces)
  3. You have mistakenly used ‘=’ instead of ‘eq’ or vice-versa in your ODATA statement
  4. Your Boolean vales are specified as true or false or yes or no. Boolean values must be specified as 1 for true and 0 for false. To check for records that have the field ‘Active’ equal to Yes, the ODATA statement should contain Active eq 1 and not Active eq Yes
  5. Your Top query option ($top) is not specified and will therefore only return 100 rows. If you expect more, then set ‘$Top’ to the maximum amount you expect (say ‘$Top=500’). At the time of writing, the maximum number of rows returned is 500
  6. Your string filter values are not enclosed in single quotes (for example BU eq AB should be BU eq ‘AB’ or BU eq ‘[%Current Item:BUShortName%]’
  7. Your number values are placed in single quotes (ID eq ‘307’ should be ID eq 307)
  8. When an HTTP Call statement returned more records than expected, I often found that either the names of fields or values was specified incorrectly (Boolean values in ODATA appear to be 1 or 0 instead of true or false for example, or perhaps the field name was misspelled or used spaces instead of the substitution characters)


Workflow – Understanding returned JSON format

Sometimes you need to see the data that is returned by a REST call to be able to work out how to use it. To view the data returned, I copy the HTTP Call Response into a Multi-Line field in a SharePoint list, query the list item and then cut and paste the string into a JSON Viewer (Like http://codebeautify.org/jsonviewer). I do not display the results of the call in the log as the Response content is often over the 255 character SharePoint print limit, which would result in a hung workflow.

The following steps assume that your REST Call is contained in the workflow variable ‘String01’

Setup your RequestHeaders dictionary

Create a dictionary variable as follows

203-3

… then click on the ellipsis (…) to define the names ‘Accept’ and ‘Content-Type’ in the dictionary. Set the value for both of these names to

application/json;odata=verbose

202-3

Make the HTTP Get Web Service Call

Specify the HTTP Get Web Service call using your REST statement (In my example, this is defined in ‘String01’). Be sure to use the ‘Properties…’ option to specify the correct ‘RequestHeaders’ variable otherwise the data may not be returned in the correct format

202-8

204-1

Save the response into a multi-line text field

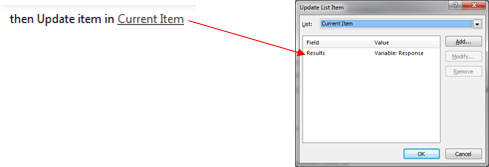
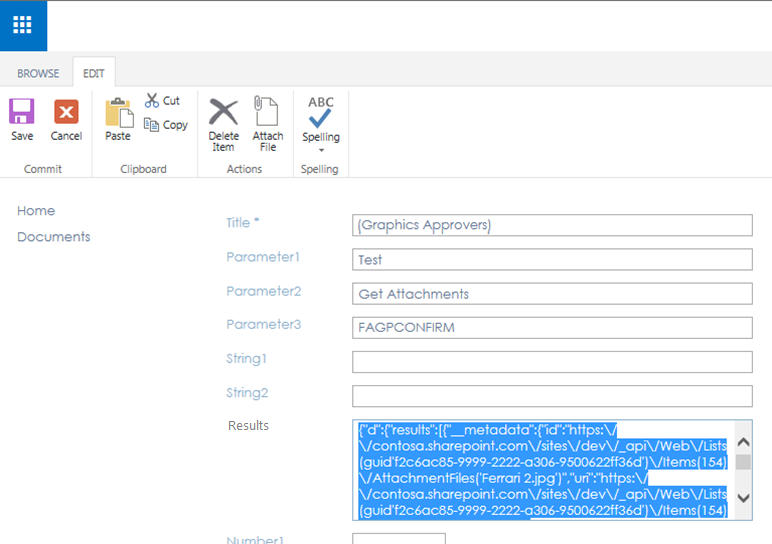
Copy the response into a SharePoint Multi-Line field. In this example, I update the ‘Results’ field in ‘Current Item’ with the response returned by the call

204-2

Copy the data returned

Open the list item in SharePoint and copy the string from the field ‘Results’ to the clipboard

204-3

The example I used copied the following data to the clipboard

{“d”:{“results”:[{“__metadata”:{“id”:”https:\/\/contosa.sharepoint.com\/sites\/dev\/_api\/Web\/Lists(guid’f2c6ac85-9999-2222-a306-9500622ff36d’)\/Items(154)\/AttachmentFiles(‘Ferrari 2.jpg’)”,”uri”:”https:\/\/contosa.sharepoint.com\/sites\/dev\/_api\/Web\/Lists(guid’f2c6ac85-9999-2222-a306-9500622ff36d’)\/Items(154)\/AttachmentFiles(‘Ferrari%202.jpg’)”,”type”:”SP.Attachment”},”FileName”:”Ferrari 2.jpg”,”ServerRelativeUrl”:”\/sites\/dev\/Lists\/Utility Jobs\/Attachments\/154\/Ferrari 2.jpg”},{“__metadata”:{“id”:”https:\/\/contosa.sharepoint.com\/sites\/dev\/_api\/Web\/Lists(guid’f2c6ac85-9999-2222-a306-9500622ff36d’)\/Items(154)\/AttachmentFiles(‘Ferrari.jpg’)”,”uri”:”https:\/\/contosa.sharepoint.com\/sites\/dev\/_api\/Web\/Lists(guid’f2c6ac85-9999-2222-a306-9500622ff36d’)\/Items(154)\/AttachmentFiles(‘Ferrari.jpg’)”,”type”:”SP.Attachment”},”FileName”:”Ferrari.jpg”,”ServerRelativeUrl”:”\/sites\/dev\/Lists\/Utility Jobs\/Attachments\/154\/Ferrari.jpg”},{“__metadata”:{“id”:”https:\/\/contosa.sharepoint.com\/sites\/dev\/_api\/Web\/Lists(guid’f2c6ac85-9999-2222-a306-9500622ff36d’)\/Items(154)\/AttachmentFiles(‘Maserati.jpg’)”,”uri”:”https:\/\/contosa.sharepoint.com\/sites\/dev\/_api\/Web\/Lists(guid’f2c6ac85-9999-2222-a306-9500622ff36d’)\/Items(154)\/AttachmentFiles(‘Maserati.jpg’)”,”type”:”SP.Attachment”},”FileName”:”Maserati.jpg”,”ServerRelativeUrl”:”\/sites\/dev\/Lists\/Utility Jobs\/Attachments\/154\/Maserati.jpg”}]}}

View the data in a JSON viewer

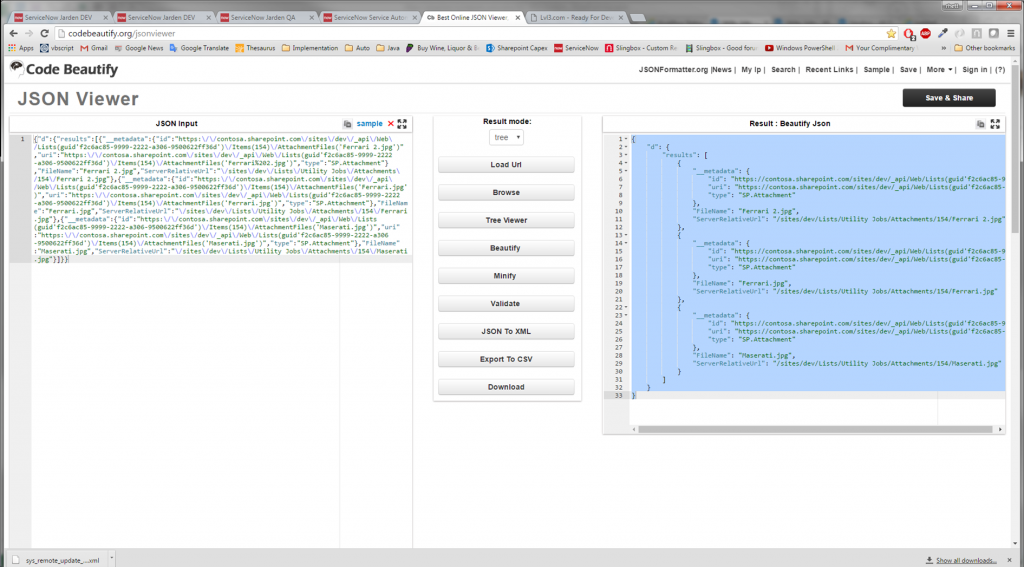
Open a JSON viewer in a browser (I’ll use http://codebeautify.org/jsonviewer) and paste the clipboard into the viewer. In the example shown below, I pasted the data into the ‘JSON Input’ field. Once that is done, click on the format button in the viewer (‘Beautify’) and the system will display the data in an easier to read format as shown below on the right

204-4

If your ‘HeaderRequest’ dictionary had the ‘Accept’ and ‘Content-Type’ names set to ‘application/json;odata=verbose’, then your values should almost always have a “d” as the first element in the data, but there are some exceptions, especially when you are evaluating returned errors

The JSON formatted data from the above request is shown here for convenience (I replaced the ‘contosa.sharepoint.com/sites/dev/_api/Web’ with ‘…’ to make it easier to read:

{
    “d”: {
        “results”: [
            {
                “__metadata”: {
                    “id”: “https://…/Lists(guid’f2c6ac85-9999-2222-a306-9500622ff36d’)/Items(154)/AttachmentFiles(‘Ferrari 2.jpg’)”,
                    “uri”: “https://…/Lists(guid’f2c6ac85-9999-2222-a306-9500622ff36d’)/Items(154)/AttachmentFiles(‘Ferrari%202.jpg’)”,
                    “type”: “SP.Attachment”
                },
                “FileName”: “Ferrari 2.jpg”,
                “ServerRelativeUrl”: “/sites/dev/Lists/Utility Jobs/Attachments/154/Ferrari 2.jpg”
            },
            {
                “__metadata”: {
                    “id”: “https://…/Lists(guid’f2c6ac85-9999-2222-a306-9500622ff36d’)/Items(154)/AttachmentFiles(‘Ferrari.jpg’)”,
                    “uri”: “https://…/Lists(guid’f2c6ac85-9999-2222-a306-9500622ff36d’)/Items(154)/AttachmentFiles(‘Ferrari.jpg’)”,
                    “type”: “SP.Attachment”
                },
                “FileName”: “Ferrari.jpg”,
                “ServerRelativeUrl”: “/sites/dev/Lists/Utility Jobs/Attachments/154/Ferrari.jpg”
            },
            {
                “__metadata”: {
                    “id”: “https://…/Lists(guid’f2c6ac85-9999-2222-a306-9500622ff36d’)/Items(154)/AttachmentFiles(‘Maserati.jpg’)”,
                    “uri”: “https://…/Lists(guid’f2c6ac85-9999-2222-a306-9500622ff36d’)/Items(154)/AttachmentFiles(‘Maserati.jpg’)”,
                    “type”: “SP.Attachment”
                },
                “FileName”: “Maserati.jpg”,
                “ServerRelativeUrl”: “/sites/dev/Lists/Utility Jobs/Attachments/154/Maserati.jpg”
            }
        ]
    }
}

Evaluate the data elements returned

Now, you go down the tree using a forward slash (/) between the levels of the elements (Values between square brackets ([]) are in themselves array elements and need to be accessed with a counter)

To get the full array of data, move the Response into a variable of type Dictionary called ‘CurrentResults’.
This is useful when you do not wish to make your code more readable by specifying a shorter key to get the data from ‘CurrentResult’ instead of from ‘Response’

Get d/results from Variable:Response (Output to Variable:CurrentResults)

To get all data of the first element into a variable of type String called ‘RespString’:

Get d/results(0) from Variable:Response (Output to Variable:RespString)

To get all data of the second element into a variable of type String called ‘RespString’:

Get d/results(1) from Variable:Response (Output to Variable:RespString)

To get the attribute ‘FileName’ of the 3rd element into a variable of type String called ‘FileName’:

Get d/results(2)/FileName from Variable:Response (Output to Variable:FileName)
After this statement, the variable ‘FileName’ will contain ‘Maserati.jpg’.
The statement Get CurrentResults(2)/FileName from Variable:Response (Output to Variable:RespString) would yield the same result

To get the attribute ‘ServerRelativeURL of the 3rd element into a variable of type String called ‘SRU’:

Get d/results(2)/ ServerRelativeURL from Variable:Response (Output to Variable:SRU)

Troubleshoot any errors returned

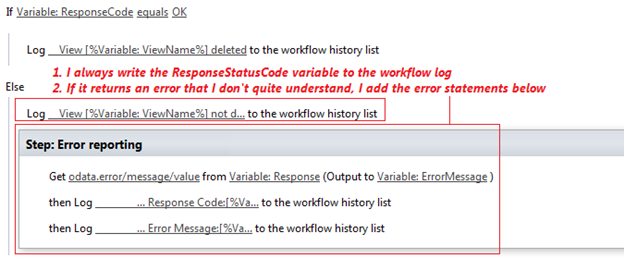
If you receive an error when issuing an HTTP Get action, the ‘ResponseStatusCode’ variable will have a negative comment such as ‘NotFound’ or something similar. In this case, the HTTP Get call will place the error results in JSON format into the ‘ResponseContent’ variable. As a standard I always write the ‘ReponseContent’ variable into the Workflow Log so I can tell if there was a problem with the call as follows (If you do not do this, it may be difficult to troubleshoot any problems):

204-5

In the screen shown above, if the HTTP Get Call was not successful (Variable:ResponseCode not-equal ‘OK’), I added some code to display the actual reason for the error

The Error message written to the ResponseContent variable does not have the same “d/results’ type format as the statement shown above. Instead, it returns a value similar to the one shown below:

{“odata.error”:{“code”:”-2146232832, Microsoft.SharePoint.SPException”,”message”:{“lang”:”en-US”,”value”:”Group cannot be found.”}}}

When you paste this message into the JSON viewer, it generates the following structure:

{
    “odata.error”: {
        “code”: “-2146232832, Microsoft.SharePoint.SPException”,
        “message”: {
            “lang”: “en-US”,
            “value”: “Group cannot be found.”
        }
    }
}

Using the same methodology as shown previously, we can move the error message into a variable with the following action

Get odata.error/message/value from Variable:Response (Output to Variable:ErrorMessage)

We can then display this variable in the workflow log to get more detail on our problem. In this example, ‘ErrorMessage’ contains the value ‘Group cannot be found’.  Now I know that the User Group was not found, probably because the name was incorrect