These next steps take you through a Rest call to add a user to a user group and illustrate how to define the body of the REST in the workflow.
Get the format of the regular call
From the Microsoft URL https://msdn.microsoft.com/en-us/library/office/dn531432.aspx we see that the javascript REST call to add a user to a group is as follows:
executor.executeAsync({
url: “<app web url>/_api/SP.AppContextSite(@target)/web /sitegroups(7)/users ?@target='<host web url>'”,
method: “POST”,
body: “{ ‘__metadata’: { ‘type’: ‘SP.User’ }, ‘LoginName’:’i:0#.w|domain\\user’ }”,
headers: {
“accept”: “application/json; odata=verbose”,
“content-type”: “application/json; odata=verbose”
},
success: successHandler,
error: errorHandler
});
We will use this example to define our Designer Workflow statements for adding a user to a group (and once you understand the notation of a REST call, you should be able to apply these steps to post to other URL’s)
Define your Request Header dictionary
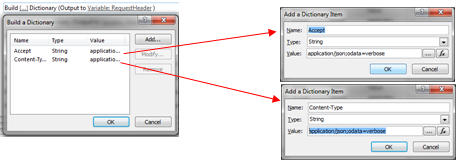
Create the dictionary variable with the the Names ‘Accept’ and ‘Content-Type’ setting them both to the String value ‘application/json;odata=verbose’. In this case I called the dictionary variable RequestHeader (In most other posts I called this ‘Header’)
Define your Meta Data dictionary
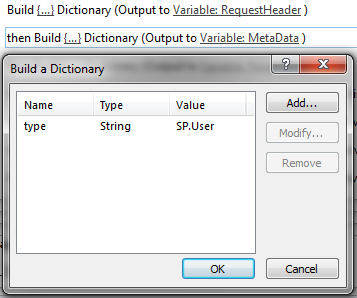
Create another dictionary variable called ‘MetaData’ and add the name ‘type’ set to the String ‘SP.User’ as follows:
Define your calling parameters dictionary
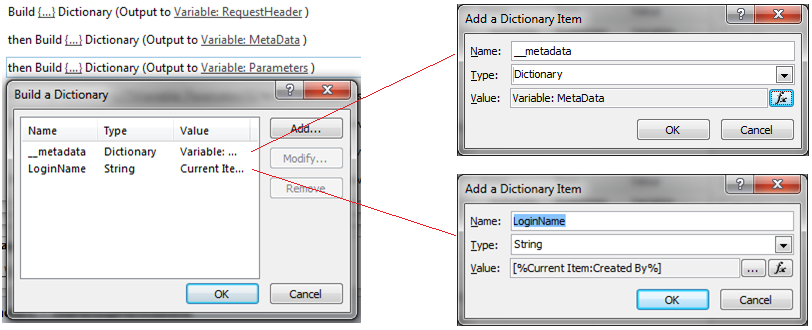
Create a third dictionary variable called ‘Parameters’ as defined below and add the following names to this dictionary:
__metadata Set this to the dictionary item you created previously
LoginName Set this to a string of a user account (e.g. i:0#.f|membership|jbloggs@dom.net
Note the double underscores (__) in the name ‘__metadata’. Also, Do not concern yourself if the word ‘Dictionary’ does not appear if you click on the ‘Modify’ button. Your data should look as follows
Log the parameters so that we can see what will actually be passed

Make the call to add the user to the user group
In the call you need to specify the name of the user group you want to add the user to (I used FACUSTOP’ as the group name) and specify the complete URL as follows:
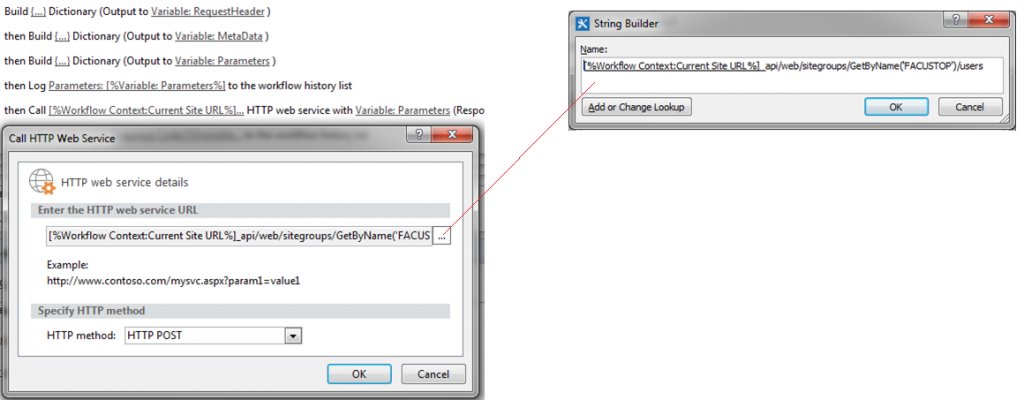
[%Workflow Context:Current Site URL%]_api/web/sitegroups/GetByName(‘FACUSTOP’)/users
Set the request headers for the call
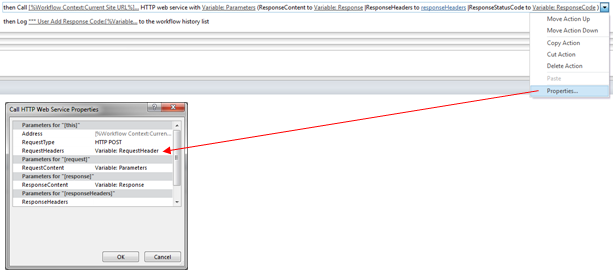
This part is ‘hidden’ so you need to click on the properties of the call to set the ‘RequestHeaders’ to ‘RequestHeader’ as shown below
Check the status of the call
Make sure the call executed correctly and in this case the Response should return ‘Created’. If the response returned is ‘Unauthorized’, check the scope of your App Step permissions

The final structure of the Designer process is as follows

You should be good to go. When these steps are executed, the system will add a user to a user group
