Category : SharePoint

SharePoint – Change number of views displayed

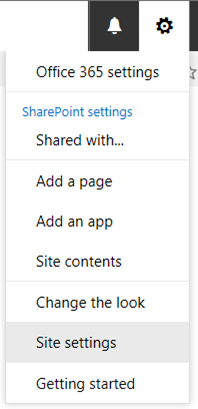
This post will demonstrate how to change the number of views that are displayed for a list. Many thanks to Vadim Gremyachev for these concise details

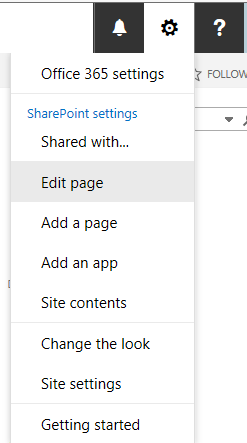
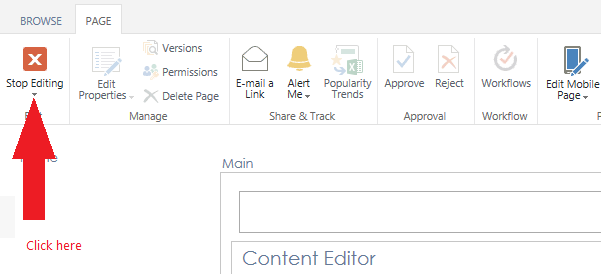
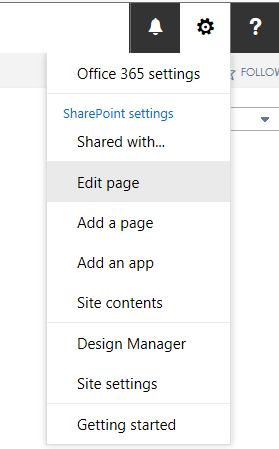
Switch to Edit Page mode

ip1000

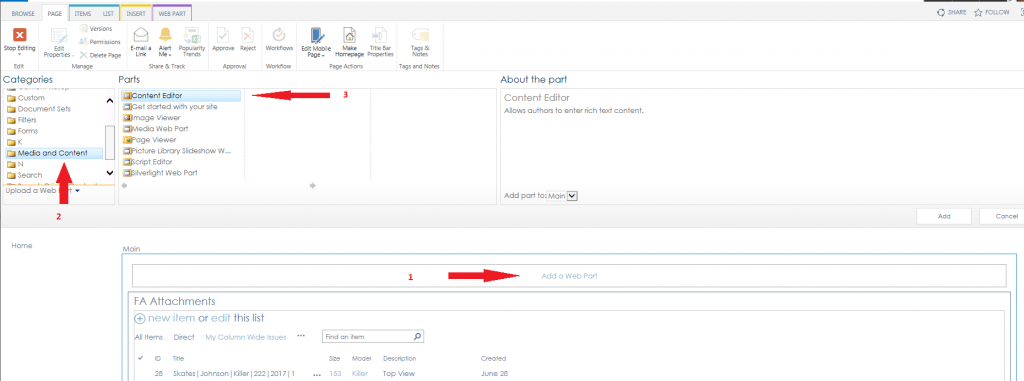
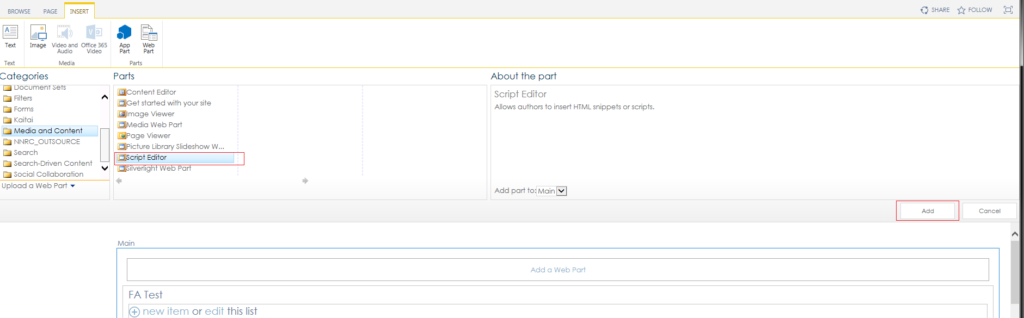
Add a Script Editor Web Part below your list

Use the ‘Media and Content Category’ to select and add the ‘Script Editor’ web part to your page. Click ‘Add’ and when it has been added, drag it below the list

ip1001

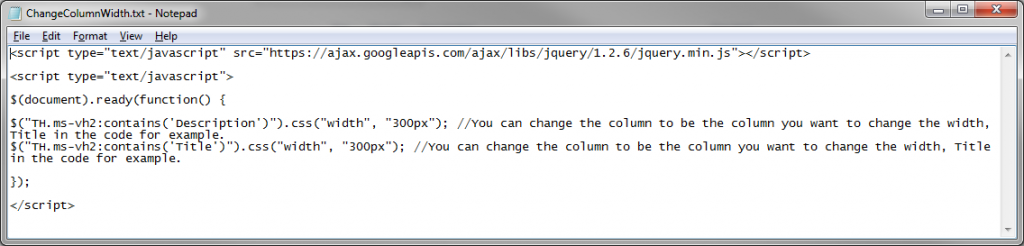
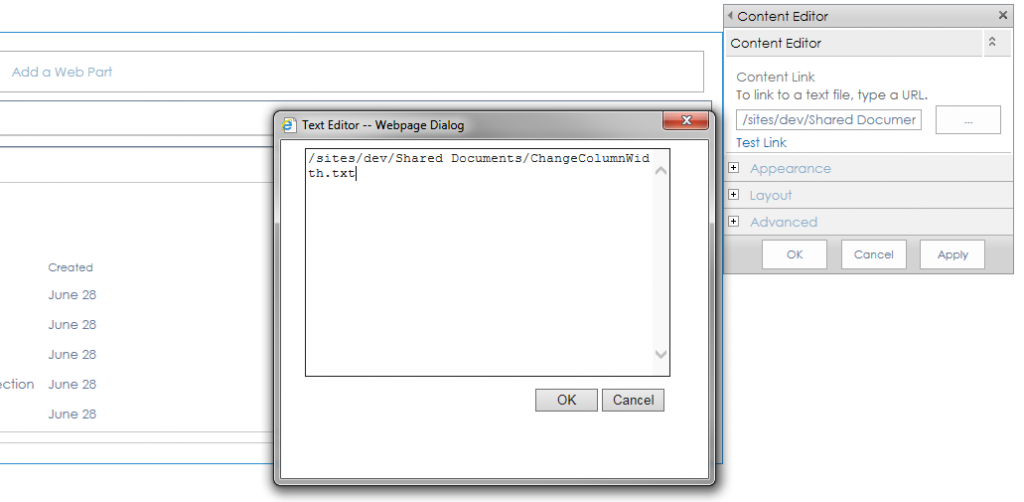
Add code into the web part

Add the following code to your web part (The statement ‘viewData.length -2’ is the one that tells SharePoint to display all views. If you wanted to only display 5 views for example, you would substitute 5 for this statement)

<script type=”text/javascript”>{
function renderHeaderTemplateWithAllViewsMenu(renderCtx, fRenderHeaderColumnNames){
var viewData = eval(renderCtx.ListSchema.ViewSelectorPivotMenuOptions);
ClientPivotControl.prototype.SurfacedPivotCount = viewData.length -2; //display all View options except ‘Create View’ & ‘Modify View’
return RenderHeaderTemplate(renderCtx, fRenderHeaderColumnNames); //render default Header template
}

SPClientTemplates.TemplateManager.RegisterTemplateOverrides({
Templates: {
Header: renderHeaderTemplateWithAllViewsMenu
}
});
}</script>

Save the page

The web part will now display all available views


SharePoint – Add Navigation to Site Settings

To enable the ‘Navigation’ feature, you need to enable the ‘SharePoint Server Publishing Infrastructure’ and ‘SharePoint Server Publishing’.

Activate the ‘SharePoint Server Publishing Infrastructure’

Select ‘Site Settings’ from the Gear icon

302-1

Activate ‘SharePoint Server Publishing Infrastructure’

In the ‘Site Administration’ group, select ‘Site collection features’. You will need to have Tenant permission otherwise you will not see this option

302-2

In the Site collection features, locate and Activate ‘SharePoint Server Publishing Infrastructure’ as shown below

302-3

Activate the ‘SharePoint Server Publishing’ feature

Select ‘Site settings’ from the gear icon again

302-1

 In the ‘Site Actions’ group, select ‘Manage site features’

302-4

Activate:

302-5

Turn on Navigation

Select ‘Site settings’ from the gear icon again

302-1

In the ‘Look and Feel’ group, select ‘Navigation’

302-6

That’s it – Setup your menu


SharePoint – Change Column Width

On occasion you may wish to change the column width within a SharePoint view. Many of the posts that I have seen recommend opening the view in SharePoint Designer and modifying the HTML script. To me this is cumbersome and the best solution I found that actually worked involved adding a webpart to the page where the view appears that changes the column sizes.

Here are the steps

Create a .txt file to define the column width

Create a .txt file(Say ChangeColumnWidth.txt) containing the code below:

301-1

<script type=”text/javascript” src=”https://ajax.googleapis.com/ajax/libs/jquery/1.2.6/jquery.min.js“></script>
<script type=”text/javascript”>
$(document).ready(function()
{
$(“TH.ms-vh2:contains(‘Description’)”).css(“width”, “300px”); // Add these lines for each column you wish to resize
$(“TH.ms-vh2:contains(‘Title’)”).css(“width”, “200px”); // Add these lines for each column you wish to resize
});
</script>

Upload the .txt file to a document library in SharePoint

301-2

Open the view who column widths you wish to change

I created a new view as shown below (Note the width of both the ‘Title’ and ‘Description’ fields)

301-3

Edit the page and add a Content Editor Web Part to the view

301-4

Edit the page and then add a content editor web part by following the steps 1,2 and 3 and then clicking on OK

301-5

Update the Web Part to refer to the file previously uploaded

Edit the web part by selecting the Edit Web Part option in the menu on the right hand side of the Content Editor Web Part.

301-8

Update the Content Link to reference the URL for the Text File that you previously uploaded (You can get this link by opening the file from the document library in SharePoint and copying the URL)

(https://contoso.sharepoint.com/sites/dev/Shared%20Documents/ChangeColumnWidth.txt)

Click on the ‘OK’ button when done

Stop editing the list

301-7

Save your changes by stopping the edit

Your columns now display in the correct width

301-9


InfoPath – Getting data from a spreadsheet into InfoPath

Data in an Excel sheet is unstructured and often split across multiple tabs. The users I was dealing with were flexible enough to use a couple of cut-and-pastes from Excel into spreadsheet to get this option working. This is what I did to allow the users to import the data:

Setup

  1. Create a separate folder in the Excel spreadsheet for importing the data, called ‘SPImport’.
  2. In row 1, add column headings for each cell that you wish to import. This is so you can easily identify which property is in which cell
  3. In row 2, add a regular Excel expression to point to the cell that contains the data (examples: =Data!A16, =Data!D24 etc.). You can add some additional functions in the row to strip of unneeded characters that could cause a problem in SharePoint loads, including hidden spaces, linefeeds, forward and backward slashes, quotation marks etc.
  4. You will probably need to make a couple of the fields ‘key fields’, meaning that they will contain values that uniquely identify the import
  5. In the end you will have a single row of data that will auto populate with the referenced cells values. This spreadsheet should then become the master spreadsheet for the data
  6. Now, create a SharePoint list, say called ‘SPExcelImport’ that contains the same columns as your spreadsheet and the default Datasheet view in exactly the same format. You may choose to auto populate the Title field or use it to hold one of the values you intend to import.
  7. In your InfoPath form, create a Data Connection to the ‘SPExcelImport’ SharePoint list, provisioning all the fields
  8. In my form I added an ‘Import Button’ that was only enabled when I can find an entry in the ‘SPExcelImport’ list with matching key fields
  9. When the user clicks on the Import button, set the values in the form to the values in the import file (I was dealing with over 100 fields in my example, so I split the Action on the Import button into multiple rules)

Operation

  1. The user completes the spreadsheet
  2. The user opens the ‘SPImport’ folder, highlight the cells in Row 2 that are needed and selects Ctrl-C to copy the data (They should not highlight the entire row as this will attempt to copy all the columns in the row into the spreadsheet and the user will receive an error)
  3. The user opens the ‘SPExcelImport’ table with the cursor on the first cell and presses Ctrl-V to paste the copied values into the SharePoint list. This will paste the cells from the spreadsheet into the SharePoint cells (Sometime, you may find that it copies all the data into a single cell. When this happens, tab out of the cell, shift-tab back in and do the copy again). Stop editing the list
  4. The user then opens the InfoPath form and enters the key data in the header. InfoPath queries the ‘SPExcelImport’ list with the key data and if an entry is available, enables the import button
  5. The user then clicks on the Import button to import the data