Tag : hyperlink

Workflow – Link from email to list item

In many emails it is helpful if the user can click on a link to open the document directly. To enable this functionality is a simple process in SharePoint

Adding a link to display the document

Insert a ‘Send an Email’ action in the workflow

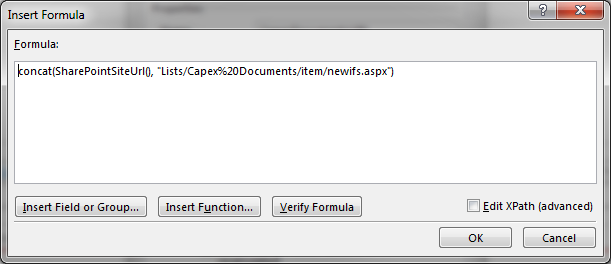
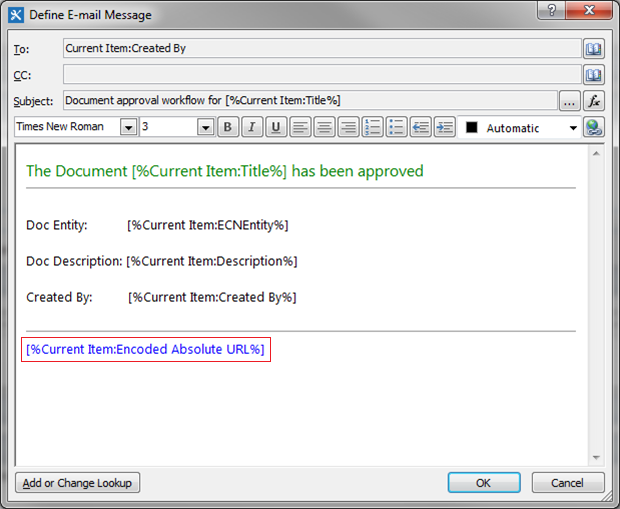
Insert the Current items ‘Encoded Absolute URL’ into the body of the email as shown below

213-1

Make the link user friendly

While the link will work, the actual information displayed does not entice the user to click on the link and it may be necessary to include some small HTML coding to make it easier on the eye. Change the Properties of the email by Right clicking on the Action and selecting Properties as shown below

213-2

A screen similar to the following will be displayed.

213-3

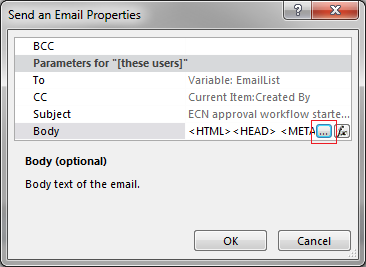
Click on the ellipsis (…) to display the detail (mess) of the body of the email (I have highlighted the ‘Encoded Absolute URL’

213-4

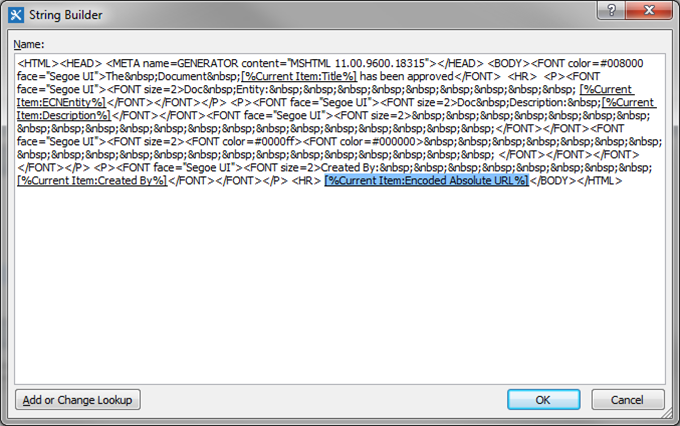
Now, change the highlighted section as follows

213-5

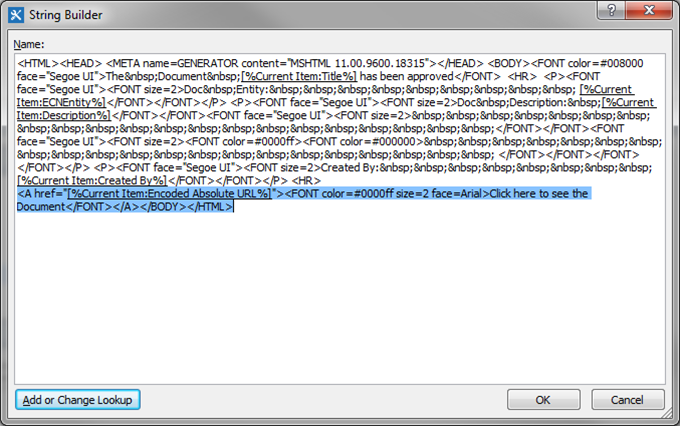
<A href=”[%Current Item:Encoded Absolute URL%]”><FONT color=#0000ff size=2 face=Arial>Click here to see the Document</FONT></A>

After you have made the change, click OK and then OK again to save your changes and exit from the ‘Properties’.  Then Click on your email action again and it should now display a friendlier invitation as shown below

213-6

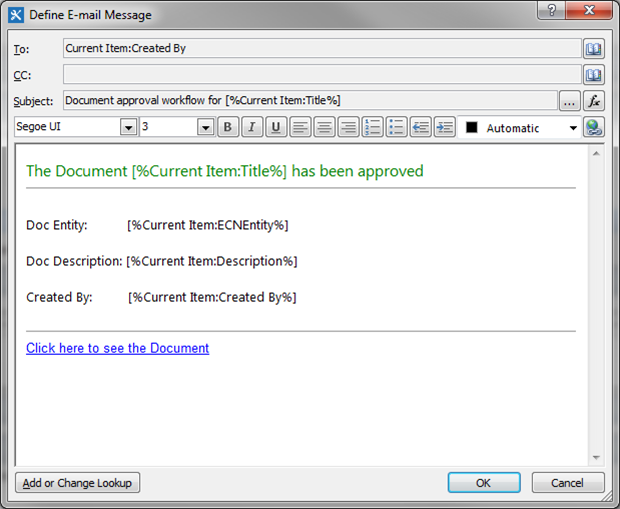
(Note the line above the ‘Click here to see the document link. This is useful and can be added using the <HR> tag)

Adding a link to edit the document

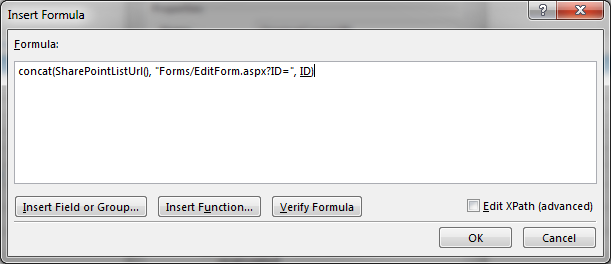
To add a link to the email that will open the list item directly in Edit mode, follow the same procedures covered above, but substitute …

[%Workflow Context:Current Site URL%]Lists/DOC/EditForm.aspx?ID=[%Current Item:ID%]‘ for ‘[%Current Item:Encoded Absolute URL%]

… in the body of the email, where ‘DOC’ represents the name of the list you are referencing. For example, if the name of the list was ‘Item Prices’, the URL would look as follows:

[%Workflow Context:Current Site URL%]Lists/Item%20Prices/EditForm.aspx?ID=[%Current Item:ID%]

Note that the spaces in the list name need to be substituted by ‘%20’. You may also want to change the hyperlink label to ‘Click here to edit the document’


InfoPath – Hyperlinks with ‘Page not found’ or how to deal with URL’s with spaces

InfoPath will allow you to display links to external files (such as attachments in a list accessed through a Data Connection), but if those URL’s have spaces in them (as many user files do), it could be that when you click on the link you get the ‘Page not found’ message as shown below

110-1

This could be happening because you have used the Hyperlink found in the Control Tools instead of the Hyperlink found in the ‘INSERT’ tab in InfoPath. Pretty weird! Anyway, use this method to make sure your linked content displays correctly

Create a Data Connection link to the table that has the attachments.

Make sure to select the attachment in the list of fields as shown below

110-2

Drag the table onto your form to create a Repeating Table control

110-3

Arrange the columns

Arrange the columns in the format you want and delete any unneeded columns like the ID AND the attachment column (You delete the attachment column as we will add it later and you do not want duplicate links, especially ones that do not function correctly). Insert a column to the Left or Right at the point where you want the Hyperlink. In the image shown below, you will notice that the last column, which I titled ‘Attachment link’ is empty. Your form should look similar to the following

110-4

Create the Hyperlink

Place your cursor in the empty cell in the repeating table, switch to the INSERT tab and select the ‘Hyperlink’ button …110-5

This will open up a dialog box for you to complete as follows

110-6

In the dialog box for the Link to section, select ‘Data source’ and link the Data Source to the attachment as shown above (in most cases the system will automatically default to the attachments

In the display selection you will probably want to select ‘Data source’. You can then use the Field selector to display the attachment URL or some other detail available in the data connection, or you could use a formula similar to the one below to reduce the size of the URL and only show the last section

substring-after(.,”Attachments/”)

This formula will show the portion of the attachment that follows ‘Attachments/’ – in this case the file name associated with the attachment. This is useful since you do not want to display a URL that is a mile-long and that the users will have problems understanding

Publish the form

Publish the form, and when you click on the link, the image should display with no error


InfoPath – Link to a list item from a URL

It is possible to open another list item directly from the form in another window. This can be useful when you wish to link to related items in another list or add another list item. This is done by building a URL that points to the list that you wish to link to. While the building of the URL can be performed directly in the Hyperlink Data Source, I have found that it is clearer to build the link in a field and then tie the Data source directly to the field.

Add a text field to contain the URL

Add a text field to the form, in the example below I added the field ‘URLAttachment’. Note that the checkbox ‘Refresh value when formula is recalculated’ is checked

ip0812

Using the fx button,set the default value to one of the following

To open the window in ‘Insert/Add’ mode:

concat(SharePointSiteUrl(), “Lists/<List Name>/item/newifs.aspx”)

ip0814

Ultimately, the concatenation statement would yield something similar to:

https://contosa.sharepoint.com/sites/DEV/capex/Lists/Capex%20Documents/item/newifs.aspx

To open the window in Edit mode (ID = the ID of the item you wish to open):

concat(SharePointSiteUrl(), “<List Name>/Forms/EditForm.aspx?ID=235”)

ip0813

Ultimately, the concatenation statement would yield something like

https://contosa.sharepoint.com/sites/DEV/capex/Capex/Forms/EditForm.aspx?ID=235

If you are using an InfoPath form, the concatenation is different since you must open the XML document:

concat(SharePointSiteUrl(), “_layouts/15/FormServer.aspx?XmlLocation=”, substring-after(SharePointListUrl(), “.com”), <FileName>, “.xml&ClientInstalled=true&DefaultItemOpen=1&Source=”, SharePointSiteUrl(), “SitePages/CloseWindow.aspx”)

where <FileName> is the name of the XML file without the .xml extension (you may have to store this value in a variable in your form – mine is shown as File_x0020_Name[ID = OriginalCapex] in the figure below).

ip0811

NB. The code from ‘&Source=’ onwards is optional and is used to close the window automaticallt when the form is closed (See InfoPath – Close window automatically). Ultimately, the concatentation would yield something like

https://contosa.sharepoint.com/sites/JAH-DEV/capex/_layouts/15/FormServer.aspx?XmlLocation=/sites/DEV/capex/Capex/C16081611166332.xml&ClientInstalled=true&DefaultItemOpen=1&Source=https://contosa.sharepoint.com/sites/DEV/capex/SitePages/CloseWindow.aspx

Create a hyperlink in your form

Enter the text that you want the user to see for the prompt (For example: Click here to add an attachment) into a cell as follows

108-5

Tie the hyperlink’s ‘Link To Data Source’ to the created field

Highlight the line you typed in the previous step, right click and select ‘Hyperlink …’. A dialog box will open up. In the ‘Link To’ section, click on the radio-set option ‘Data source’ and then click on the Field Selector button to open up the Field Selection Dialog Box. From this box, select the field that you created in the first step above. Click ‘OK’ to save your settings

108-5

Publish the form

The link will now appear as a hypertext as shown below. Publish the form and whenever the hyperlinked text is selected, a new window will open with either the New or Edit form displayed

108-6

Notes on the above

  1. If your list has spaces in the name, you need to substitute ‘%20’ for each space
  2. This document was originally defined in MS/Word which sometimes changes the character representation when the font changes. To make sure that the quotation marks don’t change (as I have found they often do), make sure to replace any quotation marks copied from this document with new quotation marks
  3. It may be possible to use a similar URL structure in emails to allow the user to click the hyperlink directly from within the email, but I have come across some issues with buttons being enabled and you may have to use a different URL within emails