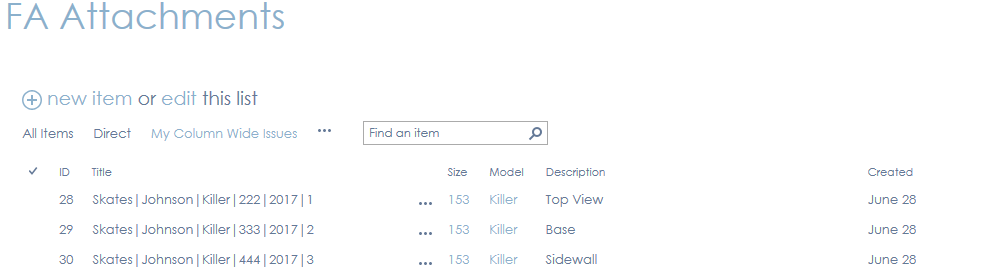
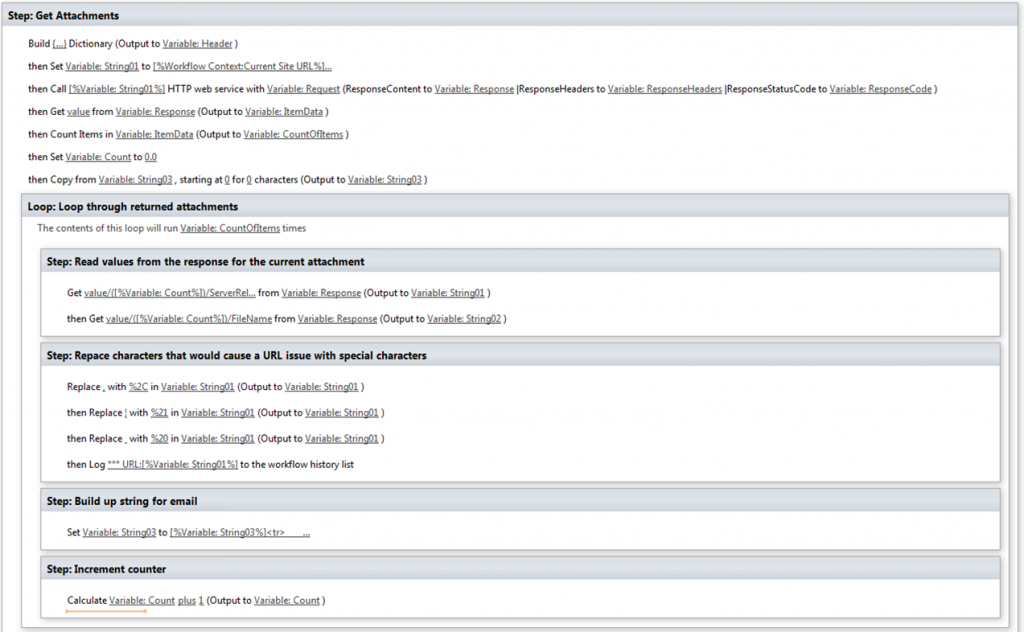
From a workflow, you may want to find the attachments that are linked to a list item or even display these attachments within the body of an email. The next steps will guide you through this process. For those among us who are impatient, most of the entire process is shown in the figure below
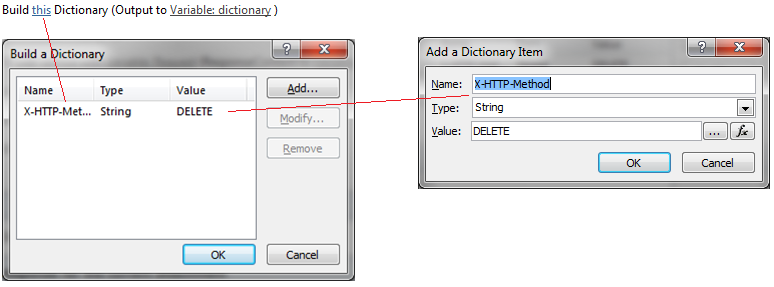
Build a dictionary variable
Select the ‘Build a dictionary’ action and click on ‘this’ and use the ‘Add …’ button to define the dictionary names ‘Accept’ and ‘Content Type’, both og which are defined with exactly the same value: ‘application/json;odata=verbose’

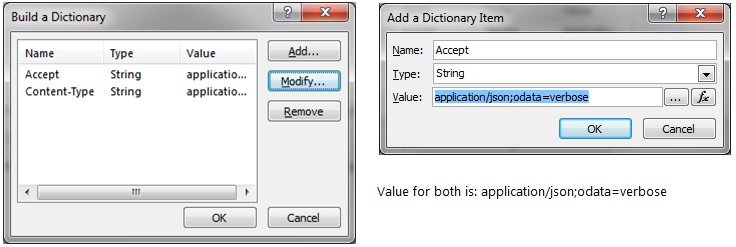
Change the name ‘dictionary’ to specify a new dictionary variable ‘Header’. The end result looks as follows

Define the REST call
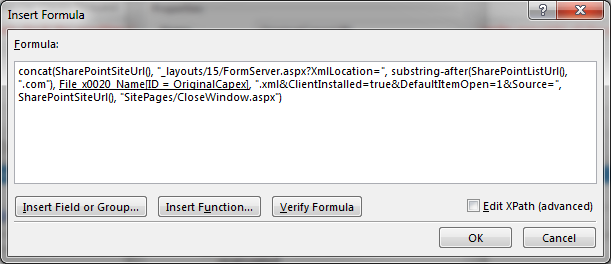
Set a variable (String01 in this case) to the HTTP Web Service Call (REST Call) that will get the attachments. This is set to a combination of your site, list and list item as follows
<site>_api/web/lists/getbytitle(‘[%Workflow Context:List Name%]/items([%Current Item:ID%]/AttachmentFiles
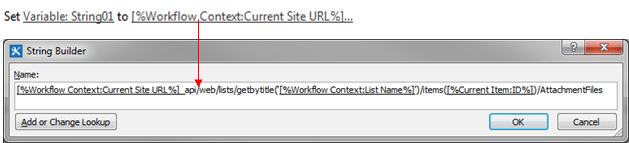
This will return all attachments related to the current item. If you were looping through all items in the list, you could leave out the ([%Current Item:ID%])
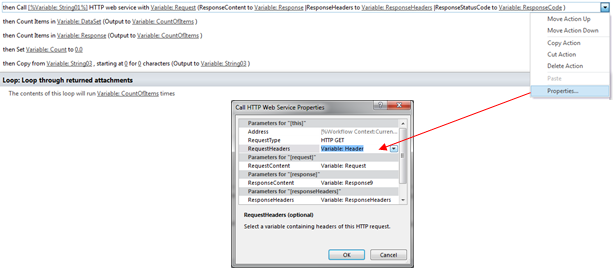
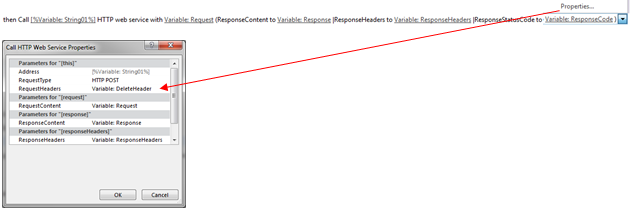
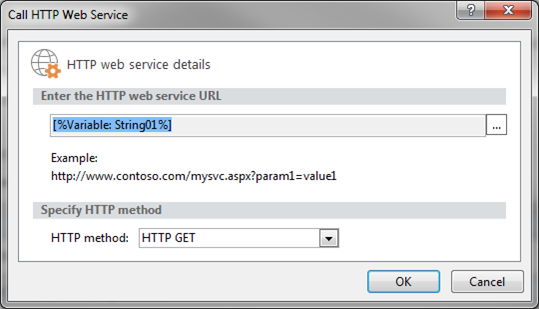
Call the web service
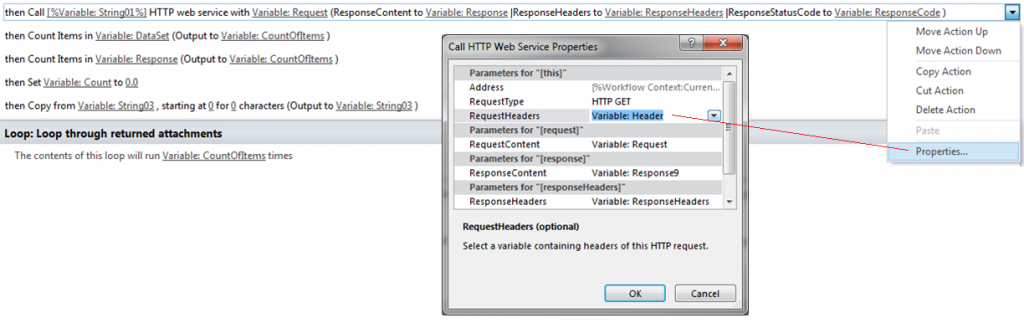
Use the REST string previously defined in the ‘String01’ variable to call the web service, setting the ‘RequestHeaders’ in the Properties to the dictionary variable previously defined
Data Returned from HTTP Web Service call
When the HTTP Call executes, it will return a packet of data to the ResponseContent variable ‘Response’ that looks similar to the following (Note that is your ‘RequestHeaders’ are set as defined previously, the system will return values in JSON format:
XML (Multiple iterations of ‘value’ removed to save space):
<?xml version=”1.0″ encoding=”UTF-8″ ?>
<odata.metadata>https://contoso.sharepoint.com/sites/dev/_api/$metadata#SP.ApiData.Attachments</odata.metadata>
<value>
<odata.type>SP.Attachment</odata.type>
<odata.id>https://contoso.sharepoint.com/sites/dev/_api/Web/Lists(guid’f2c6ac85-9999-222a-a306-9500622ff36d’)/Items(154)/AttachmentFiles(‘Ferrari 2.jpg’)</odata.id>
<odata.editLink>Web/Lists(guid’f2c6ac85-9999-222a -a306-2433922ff36d’)/Items(154)/AttachmentFiles(‘Ferrari%202.jpg’)</odata.editLink>
<FileName>Ferrari 2.jpg</FileName>
<ServerRelativeUrl>/sites/dev/Lists/Utility Jobs/Attachments/154/Ferrari 2.jpg</ServerRelativeUrl>
</value>
JSON:
{
“d”: {
“results”: [
{
“__metadata”:
{
“id”: “https://contosa.sharepoint.com/sites/dev/_api/Web/Lists(guid’f2c6ac85-9999-222a-a306-9500622ff36d’)/Items(154)/AttachmentFiles(‘Ferrari 2.jpg’)”,
“uri”: “https://contosa.sharepoint.com/sites/dev/_api/Web/Lists(guid’f2c6ac85-9999-222a-a306-9500622ff36d’)/Items(154)/AttachmentFiles(‘Ferrari%202.jpg’)”,
“type”: “SP.Attachment”
},
“FileName”: “Ferrari 2.jpg”,
“ServerRelativeUrl”: “/sites/dev/Lists/Utility Jobs/Attachments/154/Ferrari 2.jpg”
},
{
“__metadata”: {
“id”: “https://contosa.sharepoint.com/sites/dev/_api/Web/Lists(guid’f2c6ac85-9999-222a -a306-9500622ff36d’)/Items(154)/AttachmentFiles(‘Ferrari.jpg’)”,
“uri”: “https://contosa.sharepoint.com/sites/dev/_api/Web/Lists(guid’f2c6ac85-9999-222a-a306-9500622ff36d’)/Items(154)/AttachmentFiles(‘Ferrari.jpg’)”,
“type”: “SP.Attachment”
},
“FileName”: “Ferrari.jpg”,
“ServerRelativeUrl”: “/sites/dev/Lists/Utility Jobs/Attachments/154/Ferrari.jpg”
},
{
“__metadata”: {
“id”: “https://contosa.sharepoint.com/sites/dev/_api/Web/Lists(guid’f2c6ac85-9999-222a-a306-9500622ff36d’)/Items(154)/AttachmentFiles(‘Maserati.jpg’)”,
“uri”: “https://contosa.sharepoint.com/sites/dev/_api/Web/Lists(guid’f2c6ac85-9999-222a-a306-9500622ff36d’)/Items(154)/AttachmentFiles(‘Maserati.jpg’)”,
“type”: “SP.Attachment”
},
“FileName”: “Maserati.jpg”,
“ServerRelativeUrl”: “/sites/dev/Lists/Utility Jobs/Attachments/154/Maserati.jpg”
}
]
}
}
Note: If you forgot to specify that your ‘ResponseHeaders’ are in JSON format, then the above values will be returned with ‘value’ instead of ‘d/results’ as shown below. This will cause the following commands not to work:
{
“odata.metadata”: “https://contosa.sharepoint.com/sites/dev/_api/$metadata#SP.ApiData.Attachments”,
“value”: [
{
“odata.type”: “SP.Attachment”,
“odata.id”: “https:// contoso.sharepoint.com/sites/dev/_api/Web/Lists(guid’f2c6ac85-9999-222a-a306-9500622ff36d’)/Items(154)/AttachmentFiles(‘Ferrari 2.jpg’)”,
“odata.editLink”: “Web/Lists(guid’f2c6ac85-9999-222a-a306-2433922ff36d’)/Items(154)/AttachmentFiles(‘Ferrari%202.jpg’)”,
“FileName”: “Ferrari 2.jpg”,
“ServerRelativeUrl”: “/sites/dev/Lists/Utility Jobs/Attachments/154/Ferrari 2.jpg”
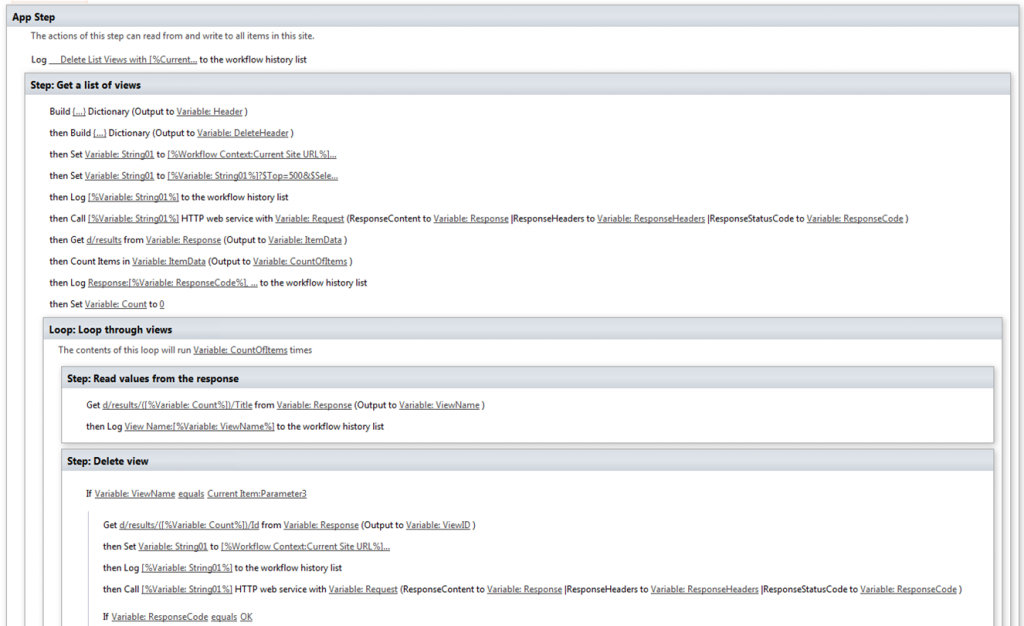
If you look closely at the JSON data above, you will notice that there are multiple iterations of the ‘value’ data element. Since we need to know how many attachments there are, we must move all these iterations into a separate data dictionary to count them. Add a ‘Get’ action to move the ‘’d/results’ elements from variable ‘response’ into the dictionary variable ‘ItemData’

Count the number of items (Attachments) returned
Once the ‘d/results’ iterations are in the ‘ItemData’ dictionary variable, we count them with the ‘Count Items’ action and place the value in the integer workflow variable ‘CountOfItems’

Initialize the variables for the loop
Initialize the workflow variable (Count) that will indicate which iteration we are working through in the list. While the kneejerk reaction is make this an integer variable, I recommend making it a ‘Number’ variable since it will save a workflow step when this value is incremented later (Don’t concern yourself that it sets the value to 0.0 – it is still 0)

Since we will be creating a ‘special’ HTML string that will contain the images of the attachments (In this case I know the attachments are images), we need to empty this string first. Use the following command to set ‘String03’ to empty

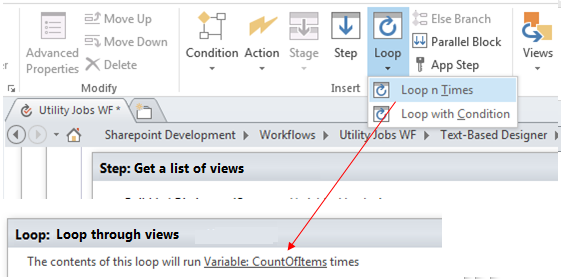
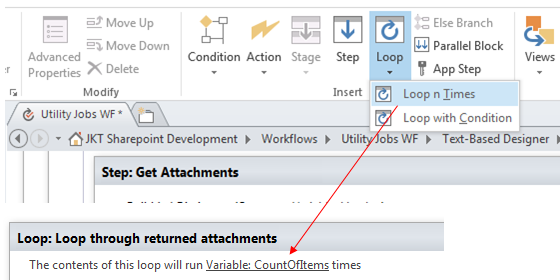
Loop through the attachments (items) returned
Insert a ‘Loop n Times’ action that will loop the number of times indicated by the attachment count you set earlier in the ‘CountOfItems’ variable. This loop will be used to iterate through the ‘values’ returned by the call and build up the data that we wish to include in an email
Read each attachment
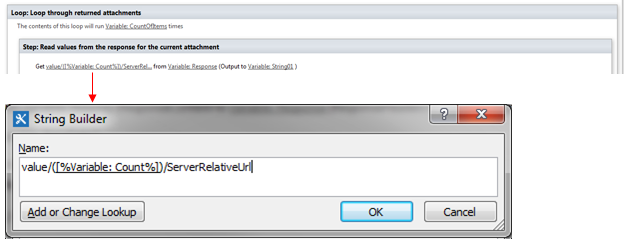
Use a Get statement to read the ServerRelativeURL from the data returned by the HTTP Call for the current iteration indicated by [%Variable:Count%] (the first iteration will be 0, the second 1 and so on). You will notice that I included this statement in a step to make the coding more readable
It is also possible to get this value from the ItemData dictionary variable defined earlier to get the count from the ‘ItemData’ dictionary instead of the ‘Response’ dictionary using the following action:
Get ([%Variable:Count%])/ServerRelativeURL from Variable:ItemData (Output to Variable:String01)
While this possibly makes it easier to read, I decided to use the structure from the top down to provide more understanding about what is going on
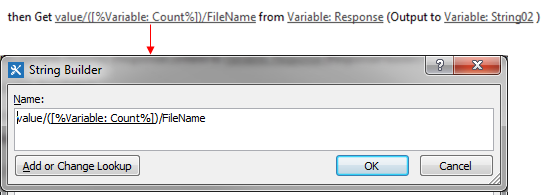
Use a Get statement to read the ‘FileName’ from the data returned by the HTTP Call for the current iteration indicated by [%Variable:Count%]. Follow the same process as you did for the ServerRelativeURL
‘Fix’ the data by replacing special characters
Replace any special characters (such as spaces and exclamation marks) in the ServerRelativeURL to ensure that if the user clicks on the link it will open up correctly. In my example I replace commas (,), exclamation marks (!) and spaces ( ) with the appropriate encoded characters (%2C, %21 and %20)
Thereafter, log the result (optional) if you wish to view the final URL

Add the image into the final string that will go into the email
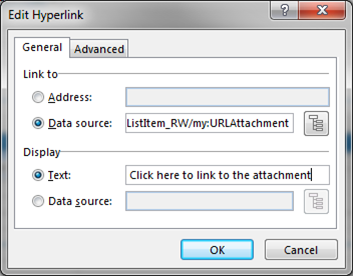
Now that we have the Server Relative URL and the File Name of the attachment, we can construct the body of the email. In my case, I wish to embed the pictures within the email but you could also define a link to the image instead
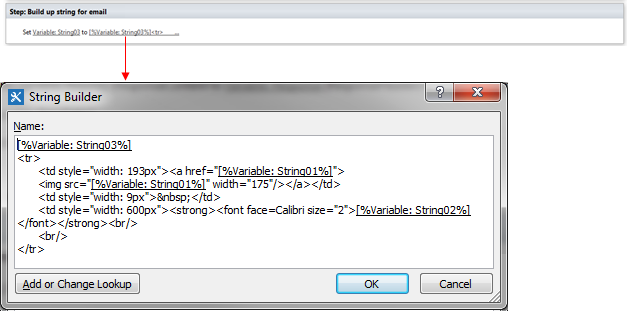
As a convenience, I have included the text values here so you can cut and paste if necessary (Note that the [%Variable:String01%] and [%Variable:String03%] will have to be substituted with actual look-ups
[%Variable:String03%]
<tr>
<td style=”width: 193px”><a href=”[%Variable:String01%] “>
<img src=”[%Variable:String01%] ” width=”175″/></a></td>
<td style=”width: 9px”> </td>
<td style=”width: 600px”><strong><font face=Calibri size=”2″>[%Variable:String02%]</font></strong><br/>
<br/>
</tr>
‘String03’ is made up of String03 and the new image contained in ‘String01’ together with the title of the attachment in ‘String02’
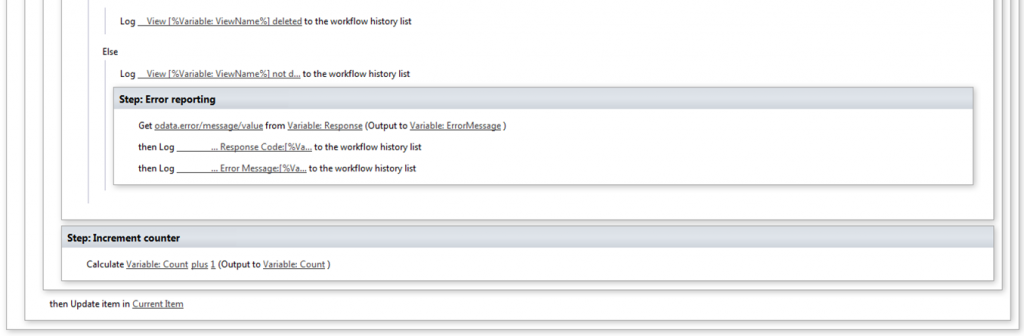
Increment the counter
Once we have finished with the list item, increment the counter and restart the process for the next iteration. You will notice that because the variable ‘Count’ is a number (as opposed to an integer), you can simply increment its value by adding 1. If the count variable was created as an integer, you would have to first increment a number value and then set the integer value to the incremented number value, requiring two steps

Define the email
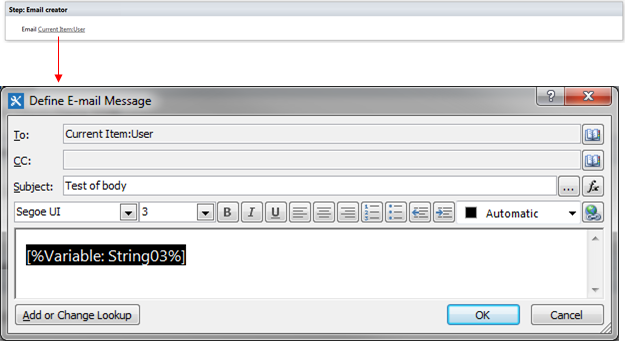
The last step is added AFTER the end of the loop and emails the filenames and images to someone. In this case, the system will email the individual that is maintained in the people picker field ‘Current Item:User’. This is a very simple email but should serve to illustrate what to do. Feel free to add any additional details
Final result
You should be good to go and your code should then send an email similar to the following (The Maserati was too expensive and was trimmed off to save space)