Author Archives: admin

SharePoint – Change number of views displayed

This post will demonstrate how to change the number of views that are displayed for a list. Many thanks to Vadim Gremyachev for these concise details

Switch to Edit Page mode

ip1000

Add a Script Editor Web Part below your list

Use the ‘Media and Content Category’ to select and add the ‘Script Editor’ web part to your page. Click ‘Add’ and when it has been added, drag it below the list

ip1001

Add code into the web part

Add the following code to your web part (The statement ‘viewData.length -2’ is the one that tells SharePoint to display all views. If you wanted to only display 5 views for example, you would substitute 5 for this statement)

<script type=”text/javascript”>{
function renderHeaderTemplateWithAllViewsMenu(renderCtx, fRenderHeaderColumnNames){
var viewData = eval(renderCtx.ListSchema.ViewSelectorPivotMenuOptions);
ClientPivotControl.prototype.SurfacedPivotCount = viewData.length -2; //display all View options except ‘Create View’ & ‘Modify View’
return RenderHeaderTemplate(renderCtx, fRenderHeaderColumnNames); //render default Header template
}

SPClientTemplates.TemplateManager.RegisterTemplateOverrides({
Templates: {
Header: renderHeaderTemplateWithAllViewsMenu
}
});
}</script>

Save the page

The web part will now display all available views


Workflow – Useful REST calls – Getting User Properties

This Sharepoint Designer REST call fetches the manager associated with a user (in this case the person who has initiated the workflow), but it can also be used to get any other attribute associated with the user. The statements shown below have all been included in a single app step in the workflow (Make sure you read the Notes at the end of this blog)

Build a dictionary for a REST call

Add a ‘Build Dictionary’ action as show in the image below

ip0901

(When you add the ‘Build Dictionary’ action, the system will initially have ‘this‘ instead of the bracketed ellipsis ({…}). Click on ‘this‘ to add the Names ‘Accept’ and ‘Content-Type’ both with the value ‘application/json;odata=verbose‘ as shown below

ip0902

Set the string that you will use for the rest call

Create a string that you will contain the rest call that you will make as follows

ip0903

For clarity, the String Builder is as follows:

[%Workflow Context:Current Site URL%]_api/SP.UserProfiles.PeopleManager/GetUserProfilePropertyFor(accountName=@v,propertyName=’Manager’)?@v=’[%Workflow Context:Initiator%]’

Where:

[%Workflow Context:Current Site URL%]

The URL of your site. This is taken from the ‘Workflow Context’ Data Source but could also be hard-coded

_api/SP.UserProfiles.PeopleManager/GetUserProfilePropertyFor(accountName=@v,

This is the method used to get the properties. Enter this as is

propertyName=’Manager’)

This tells the system that the property we wish to retrieve is the ‘Manager’ (This is what we are retrieving in this example, but this could also be any of the other user properties such as ‘Department’, ‘PreferredName’, ‘PictureURL’ or any of the others. Search on the web for other properties or visit https://technet.microsoft.com/en-us/library/hh147510.aspx to get a list of a few of the properties)

@v=’[%Workflow Context:Initiator%]’

The user whose manager you wish to get (Note the single quotes). I used the ‘Workflow Context’ Data Source to get the Login name of the user who initiated the workflow, but you can use the ‘Created By’ value or a string value that is defined in the following format:

i:0#.f|membership|username@contosa.com

 Change certain reserved characters in the string

The user name has certain properties that need to be ‘translated’ for the rest call to work properly. Use the ‘Replace’ action in Designer to substitute i:0#.f with i%3A0%23.f in the string ‘String01′ (this is simply replacing the characters with their encoded ASCII value)ip0904

Write the final string to the log

To make sure that you the correct expression has been defined, write the final string to the log as shown below

ip0905

Call the REST service with the string you have defined

Insert a ‘Call HTTP Web Service’ action as shown below.

ip0906

Some things about this call.

The original ‘this‘ was changed to the following:

ip0908

Also, click on the down arrow of the action, select properties and then set ‘RequestHeaders to the dictionary variable you created earlier (Header) as shown below

ip0909

Get the Managers name (or other property)

Insert a ‘Get an item from a dictionary’ action to fetch the name of the manager (or other data requested) as shown below where I re-use the ‘String01’ variable to contain the result. The result is in the same format as the user login name you used in the REST request (i:0#.f|membership|username@contosa.com)

ip0911

The actual statement ‘Get‘ statement is ‘d/GetUserProfilePropertyFor‘ if you want to copy and paste.

Display the value that you you have retrieved to make sure it is what was expected 

ip0912

Display any errors that have been returned (See Workflow – Troubleshooting REST calls  for troubleshooting any issues)

ip0913

Notes

You need to at least have ‘Read’ rights on the social tenant. See Workflow – Scoping the App Step on how to set this up, but in short your ‘Permission Request XML’ should look similar to the following (The second line allows your workflows to update any data in the site collection, while the third line allows you access to the social data):

<AppPermissionRequests>
<AppPermissionRequest Scope=”http://sharepoint/content/sitecollection” Right=”FullControl” />
<AppPermissionRequest Scope=”http://sharepoint/social/tenant” Right=”Read” />
</AppPermissionRequests>


Workflow – Useful REST calls – Listing views (and deleting them)

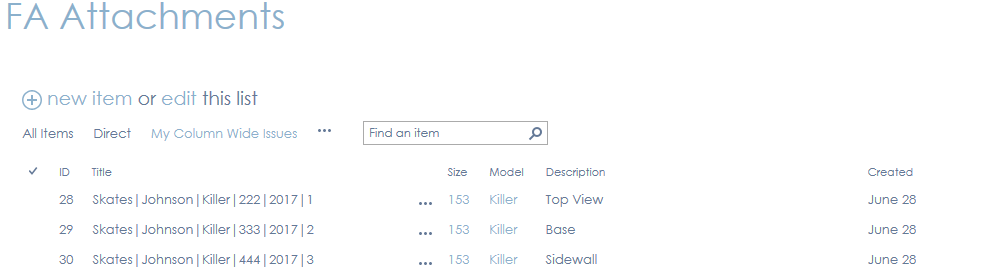
This REST call is useful for listing and deleting the list views. Be aware that the RAW call from a browser returns ALL Views, including Personal ones, while in SharePoint Designer only the public views are returned. Go figure! Nevertheless, here are the steps to list and delete Public Views

Define your Request Header dictionary

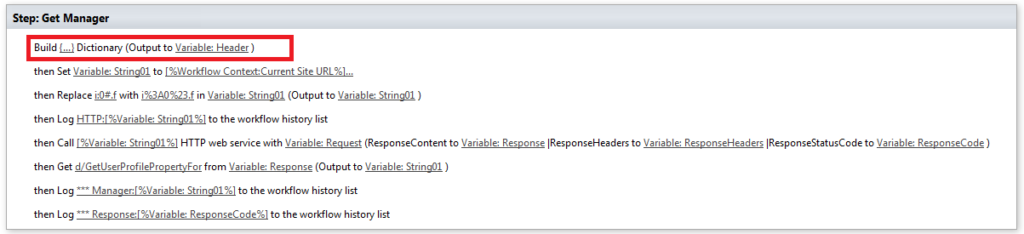
Add a ‘Build Diictionary’ action to create the header dictionary that specifies that the REST call must return data in JSON format. Create the Names ‘Accept’ and ‘Content-Type’ setting them both to the String value ‘application/json;odata=verbose’.
202-2

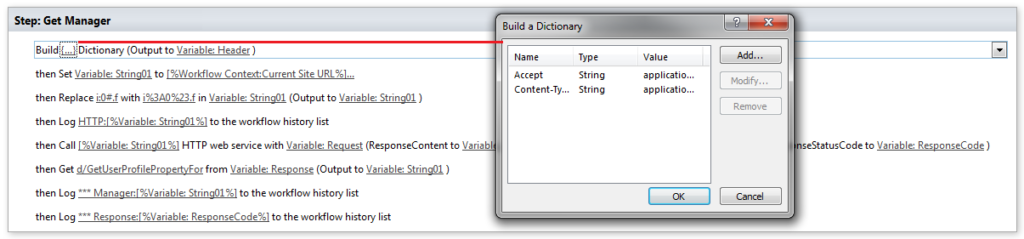
Click on ‘this’ and use the ‘Add …’ button to define the dictionary names ‘Accept’ and ‘Content‑Type’ as follows:
202-3
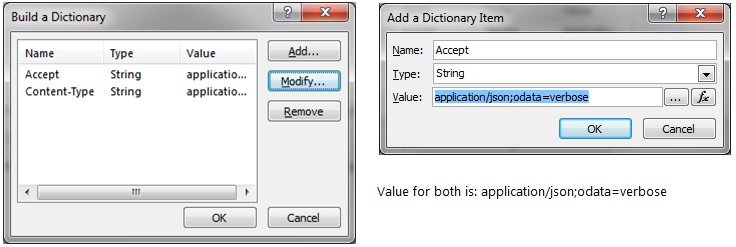
Both of these items have exactly the same value ‘application/json;odata=verbose

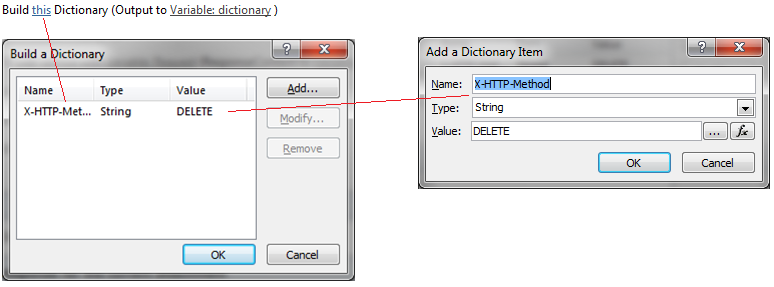
Instead of using the defaulted name of ‘dictionary’ in the ‘Output to’ command, I use my own name of ‘Header’. This change of name is optional. At any rate, after the dictionary changes have been made, the command looks similar to the following:
202-4

Define the dictionary that will be used to delete the views

Since we will also be deleting certain views in this process, we need to add a dictionary that specifies the elements to delete. Create a name called ‘X-HTTP-Method’ and set the value to ‘DELETE’ . Once defined, change the name of the dictionary to ‘DeleteHeader’

214-1

214-2

Build the REST Call string

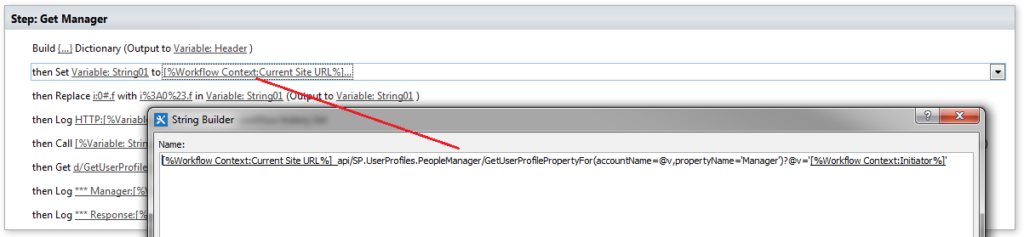
Build the string that will return all the views. This is performed in 2 steps since the SharePoint Designer has an issue when the contents exceed 255 characters

214-3
[%Workflow Context:Current Site URL%]_api/Lists/GetbyTitle(‘Table Name’)/views

214-4
[%String01%]?$Top=500&$Select=Title,Id,ServerRelativeURL

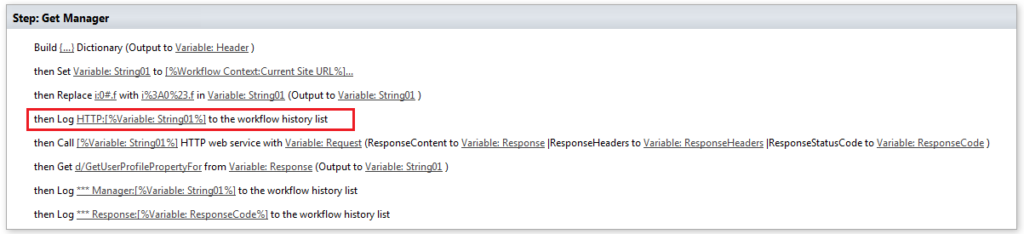
Log the string that you have formulated to help if troubleshooting is necessary

214-5

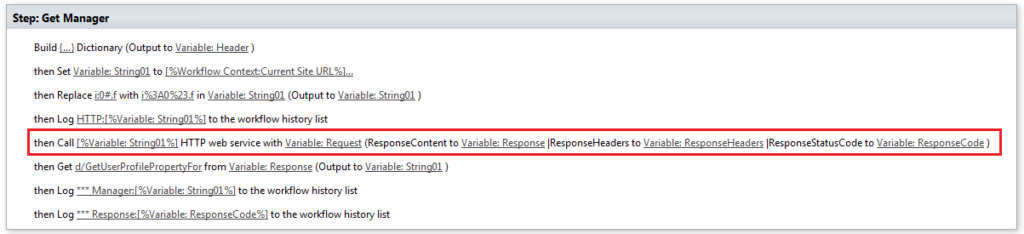
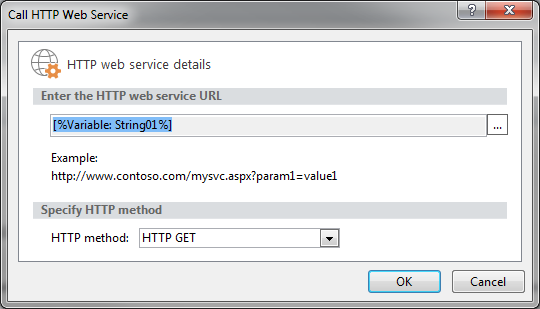
 Make the HTTP (Rest) call to the Web Service with the string that you have previously defined

214-6

214-7

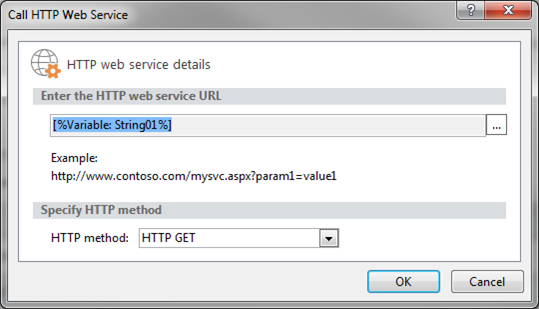
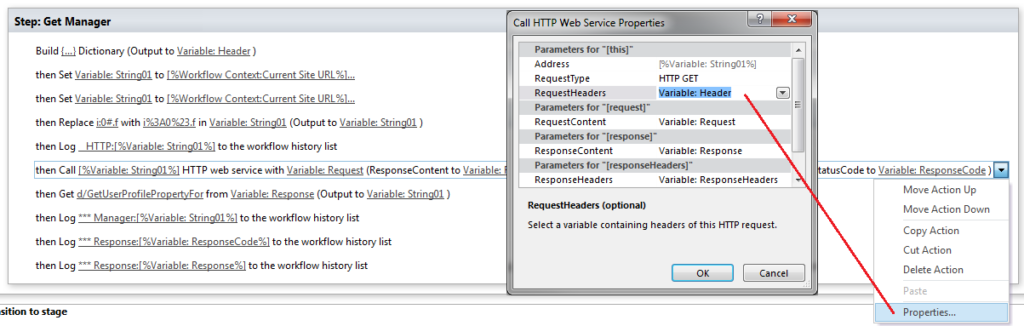
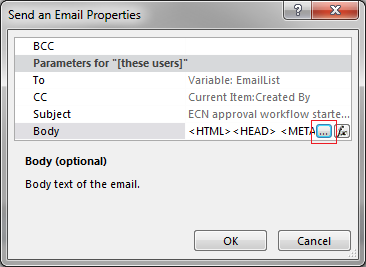
We are still not finished with the web service call yet.  Click on the right combo-box of the ‘Call’ action and select ‘Properties …’ and then set ‘RequestHeaders’ to the ‘Header’ dictionary previously defined

214-8

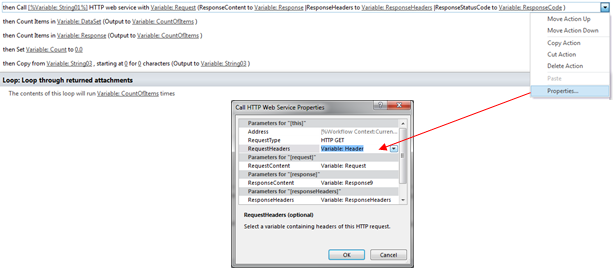
Get the results of the call

The rest call returns all the data into the ‘ResponseContent’ variable. Move the results into the a new dictionary variable called ‘ItemData’ so that you can count the number of items returned

214-9

Count the number of items so that we know how many views have been returned and store the value in a Workflow Variable called ‘CountOfItems’

214-10

Log the Response received from the call to assist in troubleshooting if necessary

214-11

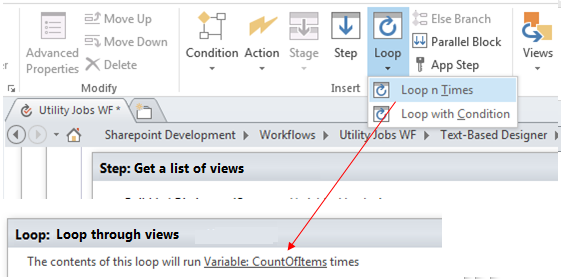
Loop through the views returned

Initialize the variable you will use for looping through the views returned by the REST call

214-12

Create a loop for the number of items returned by the REST call

214-13

Get the Title of the returned item (View) for the current iteration and move it into the workflow string variable ‘ViewName’

214-14

Log the Title for troubleshooting purposes if needed

214-15

In my case, I only wish to delete specific views so I check a condition to make sure the view returned matches my parameters (For some reason, there are hundreds of views that have been created – not by the users but from somewhere else. This is a problem that Microsoft are investigating at the time of writing)

214-16

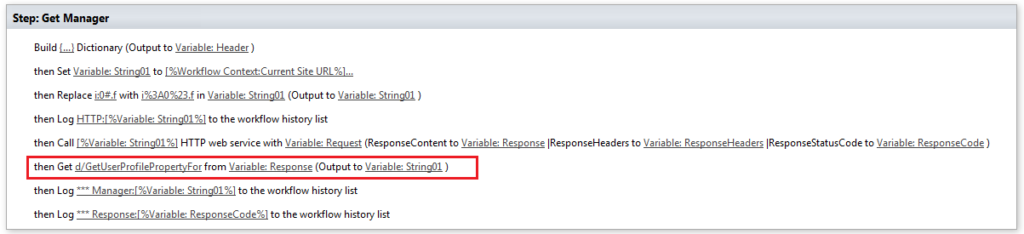
Get the Id of the view (this is the GUID) and save it in the Workflow Variable ‘ViewID’

214-17

 Formulate another REST string – this time to delete the view

214-18

[%Workflow Context:Current Site URL%]_api/Lists/GetbyTitle(‘Table Name’)/views(‘Variable:ViiewID%]’)

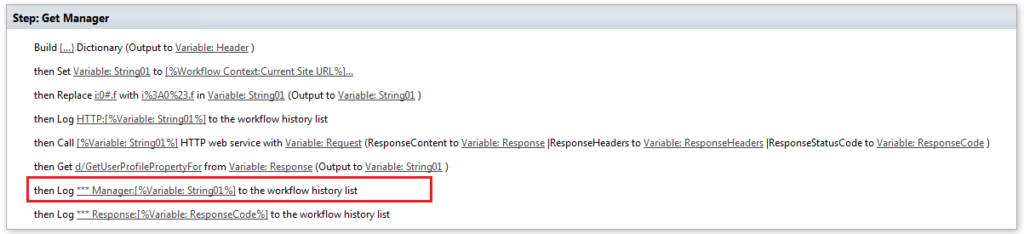
Log the string that you have formulated for troubleshooting purposes

214-5

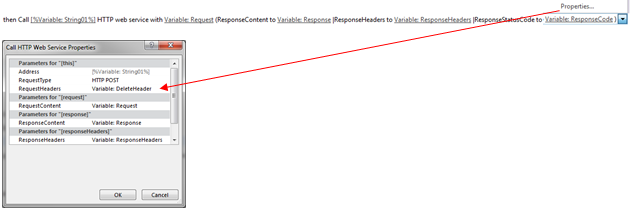
Make the HTTP (REST) Call. Set this up as you did previously but click on the ‘Properties…’ and set the ‘RequestHeaders’ to the ‘DeleteHeader’ dictionary defined previously.

214-19

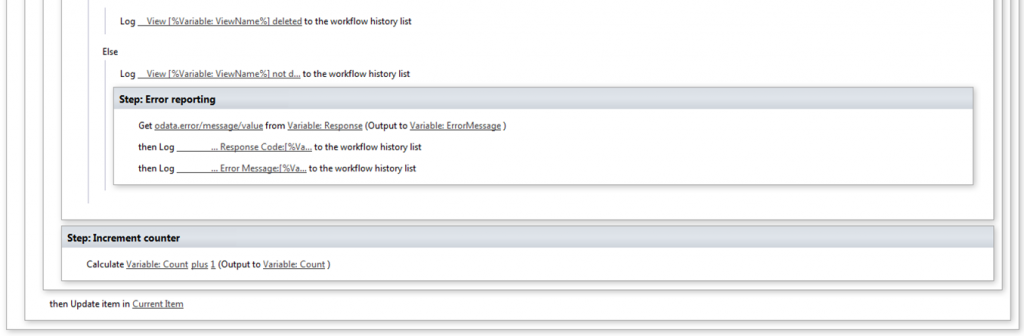
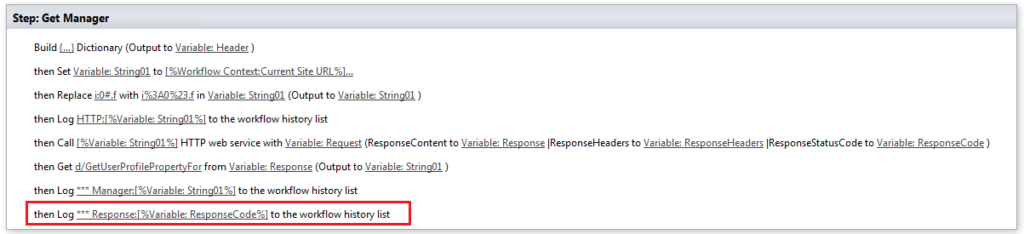
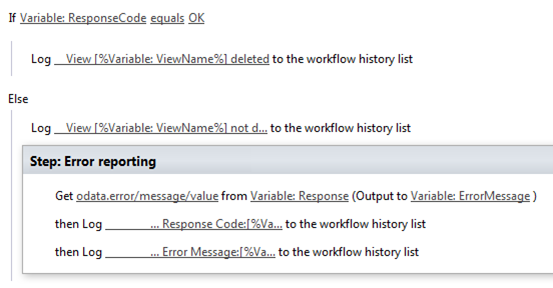
Check the Response code. If the delete was successful (ResponseCode = ‘OK’) write to the log and If the response was unsuccessful, get the error data returned and log the values to assist in troubleshooting

214-20

 Increment the counter so that we read the next row when the loop iterates

214-21

That is the end of the loop and the end of the process. The system should now run through the views and delete the ones selected
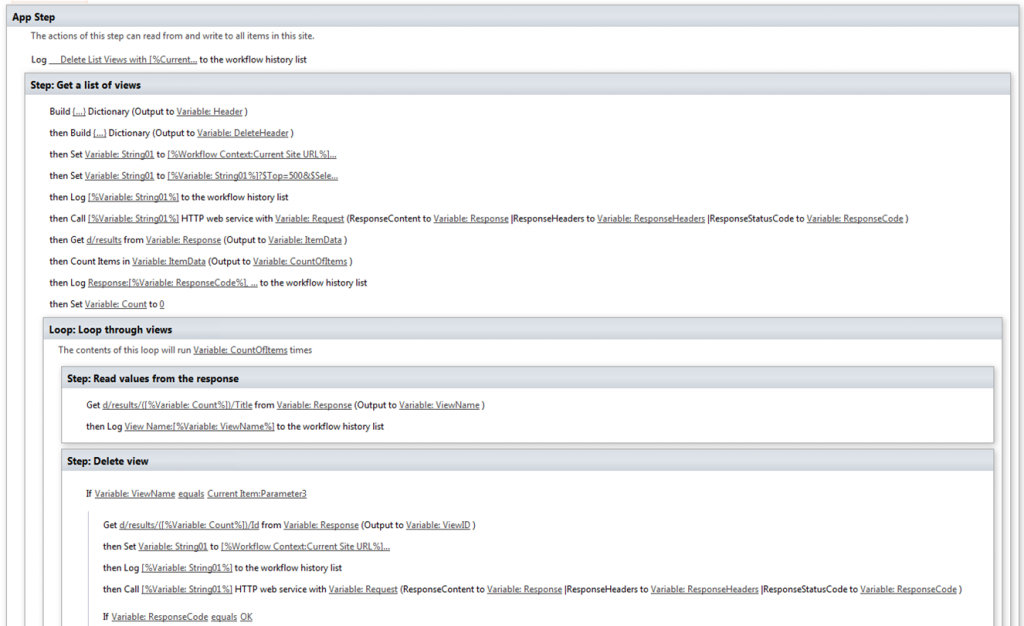
Final code

The entire code section is as follows (See next page for remaining screen dump. The ‘Update item in ‘Current Item’ statement is not needed):

214-22

214-23


SharePoint – Add Navigation to Site Settings

To enable the ‘Navigation’ feature, you need to enable the ‘SharePoint Server Publishing Infrastructure’ and ‘SharePoint Server Publishing’.

Activate the ‘SharePoint Server Publishing Infrastructure’

Select ‘Site Settings’ from the Gear icon

302-1

Activate ‘SharePoint Server Publishing Infrastructure’

In the ‘Site Administration’ group, select ‘Site collection features’. You will need to have Tenant permission otherwise you will not see this option

302-2

In the Site collection features, locate and Activate ‘SharePoint Server Publishing Infrastructure’ as shown below

302-3

Activate the ‘SharePoint Server Publishing’ feature

Select ‘Site settings’ from the gear icon again

302-1

 In the ‘Site Actions’ group, select ‘Manage site features’

302-4

Activate:

302-5

Turn on Navigation

Select ‘Site settings’ from the gear icon again

302-1

In the ‘Look and Feel’ group, select ‘Navigation’

302-6

That’s it – Setup your menu


SharePoint – Change Column Width

On occasion you may wish to change the column width within a SharePoint view. Many of the posts that I have seen recommend opening the view in SharePoint Designer and modifying the HTML script. To me this is cumbersome and the best solution I found that actually worked involved adding a webpart to the page where the view appears that changes the column sizes.

Here are the steps

Create a .txt file to define the column width

Create a .txt file(Say ChangeColumnWidth.txt) containing the code below:

301-1

<script type=”text/javascript” src=”https://ajax.googleapis.com/ajax/libs/jquery/1.2.6/jquery.min.js“></script>
<script type=”text/javascript”>
$(document).ready(function()
{
$(“TH.ms-vh2:contains(‘Description’)”).css(“width”, “300px”); // Add these lines for each column you wish to resize
$(“TH.ms-vh2:contains(‘Title’)”).css(“width”, “200px”); // Add these lines for each column you wish to resize
});
</script>

Upload the .txt file to a document library in SharePoint

301-2

Open the view who column widths you wish to change

I created a new view as shown below (Note the width of both the ‘Title’ and ‘Description’ fields)

301-3

Edit the page and add a Content Editor Web Part to the view

301-4

Edit the page and then add a content editor web part by following the steps 1,2 and 3 and then clicking on OK

301-5

Update the Web Part to refer to the file previously uploaded

Edit the web part by selecting the Edit Web Part option in the menu on the right hand side of the Content Editor Web Part.

301-8

Update the Content Link to reference the URL for the Text File that you previously uploaded (You can get this link by opening the file from the document library in SharePoint and copying the URL)

(https://contoso.sharepoint.com/sites/dev/Shared%20Documents/ChangeColumnWidth.txt)

Click on the ‘OK’ button when done

Stop editing the list

301-7

Save your changes by stopping the edit

Your columns now display in the correct width

301-9


Workflow – Link from email to list item

In many emails it is helpful if the user can click on a link to open the document directly. To enable this functionality is a simple process in SharePoint

Adding a link to display the document

Insert a ‘Send an Email’ action in the workflow

Insert the Current items ‘Encoded Absolute URL’ into the body of the email as shown below

213-1

Make the link user friendly

While the link will work, the actual information displayed does not entice the user to click on the link and it may be necessary to include some small HTML coding to make it easier on the eye. Change the Properties of the email by Right clicking on the Action and selecting Properties as shown below

213-2

A screen similar to the following will be displayed.

213-3

Click on the ellipsis (…) to display the detail (mess) of the body of the email (I have highlighted the ‘Encoded Absolute URL’

213-4

Now, change the highlighted section as follows

213-5

<A href=”[%Current Item:Encoded Absolute URL%]”><FONT color=#0000ff size=2 face=Arial>Click here to see the Document</FONT></A>

After you have made the change, click OK and then OK again to save your changes and exit from the ‘Properties’.  Then Click on your email action again and it should now display a friendlier invitation as shown below

213-6

(Note the line above the ‘Click here to see the document link. This is useful and can be added using the <HR> tag)

Adding a link to edit the document

To add a link to the email that will open the list item directly in Edit mode, follow the same procedures covered above, but substitute …

[%Workflow Context:Current Site URL%]Lists/DOC/EditForm.aspx?ID=[%Current Item:ID%]‘ for ‘[%Current Item:Encoded Absolute URL%]

… in the body of the email, where ‘DOC’ represents the name of the list you are referencing. For example, if the name of the list was ‘Item Prices’, the URL would look as follows:

[%Workflow Context:Current Site URL%]Lists/Item%20Prices/EditForm.aspx?ID=[%Current Item:ID%]

Note that the spaces in the list name need to be substituted by ‘%20’. You may also want to change the hyperlink label to ‘Click here to edit the document’


InfoPath – Getting around the 5MB form limit

InfoPath has a limit on the file size when publishing forms to a document library. In some cases the combined size of the files embedded into the form can exceed this limit. To work-around this issue, consider creating an additional document library that allows the user to add documents with a link to the form. Then, in your form create a Data Connection to this table to show the attachments and allow the user to click on the hyperlink to the attachment. If you are feeling adventurous, add another link that connects directly to the SharePoint List in Add Mode, and pre-populates the key fields in the attachment List item using an Info-Path Web Part (See the link InfoPath – Prepopulate a list item from a URL)


InfoPath – Consider saving the form and possibly workflow version

In most companies development is ongoing and applications tend to grow horns and tails as users and developers become familiar with existing functionality and require enhancements. This can be a problem especially when working with workflows since although the InfoPath form has changed to the new release, the workflow is still functioning with an older instance. This could mean that functionality in the form is not available in a workflow, since for example, it is only expecting Outcomes 1 through 3, but the form is now providing Outcome 4.

I have found it convenient to develop workflows with the first setting writing the version of the workflow to the SharePoint list (I maintain my own version numbers). That way, when I open the form I will only offer functionality if the workflow version supports it. Alternatively, you can maintain a Form version number and validate against this field

For example, if one only added delete functionality to the system from Version 2.06 onwards, one could create a rule that hid the control so that the user could not select it as shown below

111-1


InfoPath – Restart workflows at different stages

In most of my forms that are linked to workflows, I provide the ability for an administrator to restart the workflow at a particular point if needed. This is not only useful in testing situations (since a workflow can skip time consuming steps if they have already been completed), but it provides much needed flexibility in SharePoint where server throttling situations can result in a suspended workflow which needs to be restarted at a previous point.

In this case I maintain a ‘StartFrom’ combo box in my ‘hidden’ view, that if changed sets a value ‘Restart’ to true. If I need to restart a particular workflow at a specific point, I do the following:

  1. Terminate the current workflow
  2. Open the form, select the hidden view, and set the ‘StartFrom’ to my starting point
  3. I then restart the workflow. The first stage checks if the workflow is being restarted and then uses a series of linked stages to decide the point at which to restart the workflow

InfoPath – Use a ‘hidden’ button to show ‘hidden’ fields

It is often useful in a form to hide certain fields that are only used in rules and calculations, however this can make troubleshooting a form with issues difficult since key data may not be displayed.  Displaying these values on the form on the other hand can cause confusion with your users.

In these situations I normally create an alternate ‘hidden’ view that displays all fields, which ‘normal’ users do not see. On one or all of the ‘visible’ views I then add a button hidden to all but me (actually, I usually use another field that has a comma separated list of people who can see the button). When this button is clicked, the alternate view opens up and you can examine all values.

As an added benefit this format allows the people who can access the button to modify any fields if needed. This is very useful in that it can allow you restart workflows at particular points or change some data without having to run a new workflow