Author Archives: admin

Workflow – Set string to empty

Surprisingly there is no standard function is SharePoint Designer to set a string field to empty. After many workarounds I realized that the easiest way to do this is through the ‘Extract Substring of String from Index with Length’ action, specifying the length as 0.

For example, assuming that we wanted to set the string ‘String01’ to empty, we could use the following ‘Extract string …’ statement:

Copy from Variable:String01, starting at 0 for 0 characters (Output to Variable:String01)

Since 0 characters are being copied, the resulting string ‘String01’ is empty


Workflow – Useful REST calls – Get users in a group

From within a workflow you may want to get a listing of users within a specific group. This requires the use of a REST call which builds a dictionary of users within the group and then loops through them one by one

Define the REST call in a string

Set a Workflow variable to contain the partial contents of the REST call to the user group
202-1
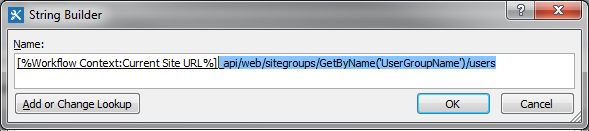
[%Workflow Context:Current Site URL%]_api/web/sitegroups/GetByName(‘UserGroupName’)/usersWhere UserGroupName is the name of the group that you wish to get the users from (Note the quotation marks are important)

Build a dictionary to define the return format

Next, insert a ‘Build Dictionary’ action. Initially, it appears as follows:
202-2

Click on ‘this’ and use the ‘Add …’ button to define the dictionary names ‘Accept’ and ‘Content‑Type’ as follows:
202-3
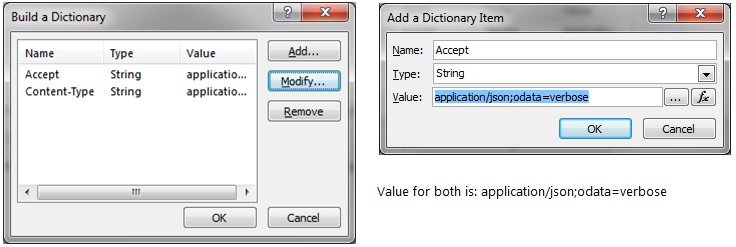
Both of these items have exactly the same value ‘application/json;odata=verbose

Instead of using the defaulted name of ‘dictionary’ in the ‘Output to’ command, I use my own name of ‘Header’. This change of name is optional. At any rate, after the dictionary changes have been made, the command looks similar to the following:
202-4

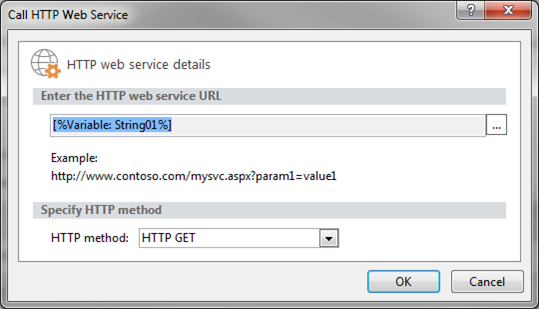
Use a ‘Call HTTP Web Service’ action to make the REST call

In the next line, insert a ‘Call HTTP Web Service’ action. This will place something similar to the following in your workflow:202-5

Click on ‘this’ and set the ‘HTTP web service URL’ to the workflow variable ‘String01’ and the HTTP method to ‘HTTP GET’

202-6

Set the HTTP Call to use the Header dictionary that you defined earlier (the one with the ‘Accept’ and ‘Content‑Type’ values). Right mouse click on the call, and select the ‘Properties …’ option as shown below. Set the ‘RequestHeaders’ to the Workflow variable ‘Header’

202-7

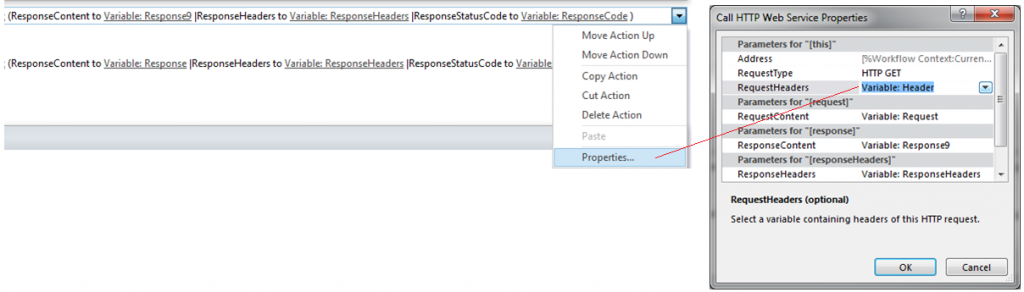
I once again change the Call’s defaulted names of ‘request’ to ‘Request’, ‘response’ to ‘Response’, ‘responseHeaders’ to ‘ResponseHeaders’ and ‘responseCode1’ to ‘ResponseCode’. This is probably not necessary in your situation, provided you make the necessary substitutions when examining the code in this document.Once everything is complete, I have a statement that looks as follows
202-8

Get the number of items (users) returned by the call

The previous statement makes a call to the SharePoint site and returns information into the dictionary we defined. We now need to interrogate the dictionary to get the results of the call. This is done with a ‘Get an item from a dictionary’ action
202-9

Click on the ‘item by name or path’ and type ‘d/results’ in the fill-in. Then click on ‘dictionary’ and select the ‘ResponseContent to’ variable’ Response’ and Output the result to a dictionary variable called DataSet. At the end of these changes, your statement should look as follows:
202-10

You then should count the number or items (users) that have been returned and place the result in a workflow variable. This is done using a ‘Count Items in a dictionary’ action as shown below:
202-11

Prepare the initial values to loop through the list of users

Since I intend to loop through all the items in the dictionary, and write data to a variable, I need to prepare the initial values. This is done by setting ‘Count’ to 0 and ‘String02’ to an empty string. I also write to the log file to indicate how many items have been returned and the ‘ResponseCode’ of the call in case there are problems
202-12

Loop through the users returned by the REST call

The next group of statements loops through the returned values and writes the ID of the user name to a variable (I write the value of the ‘LoginName’ to a variable update the Current Item as shown below). These values (LoginName, Id) are a couple of the properties that are returned by the HTTP GET, but there are others that can be used, such as ‘Email’. For a comprehensive listing of fields available, visit https://msdn.microsoft.com/en-us/library/office/dn531432.aspx

202-13
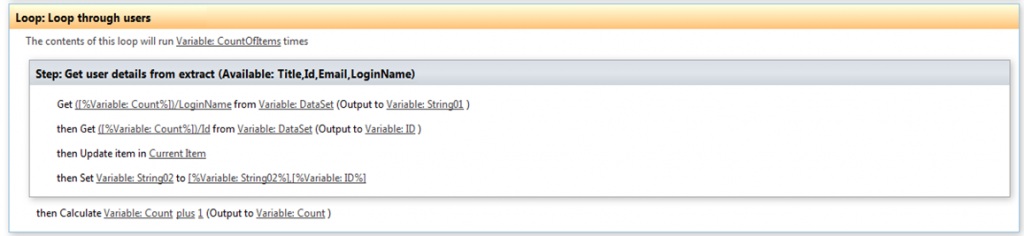
The key part of this step is the second last statement which concatenates all the user ID’s into a single workflow variable, ‘String02’. A word of caution here: Designer Workflows have a limit of 255 characters, and if your code attempts to write a larger value to a string, the workflow will suspend. If this happens, two of the options available for addressing the problem are:

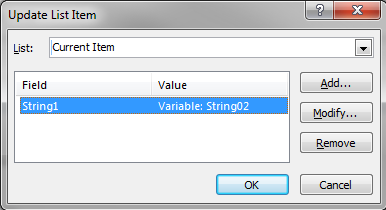
Write the data to a multi-line text field instead. I sometimes include such a field in a temporary table and use an ‘Update List Item’ action to update the list. Then, in an InfoPath form, you can validate against this data. In the example above, because I expect that the values of the User Account ID’s will exceed 255 characters, I do exactly this in the ‘then Update item in Current Item’ statement which writes the following value to TempMultiLine : [%CurrentItem:TempMultiLine%];[%Variable: String01%]

..or ..

Write the data to a Multiple Value People Picker field. This means that you will have to prepare a valid People Picker format in each iteration and write it to the field

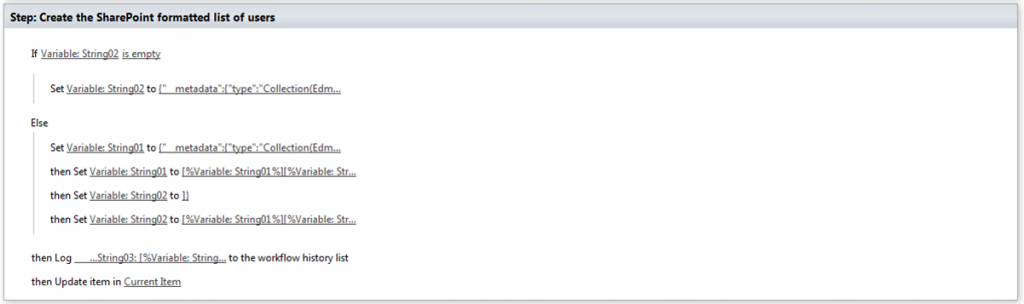
Once the loop is finished, I have all the ID’s of the users in the group in the workflow variable ‘String02’. I then prepare this data in a format the SharePoint Person/Group field will accept. The next few statements will refer to the following figure (do not expect the string containing the number of users in this particular group to be greater than 255 characters)
202-14

Build the user string

If the string is empty, I set the update string ‘String02’ to a special sequence, not an empty string. This is because the empty string representation in a multiple Person/Group picker field is different to an empty string in a single Person/Group picker field. In this case, the value is set to

{“__metadata”:{“type”:”Collection(Edm.Int32)”},”results”:[]}

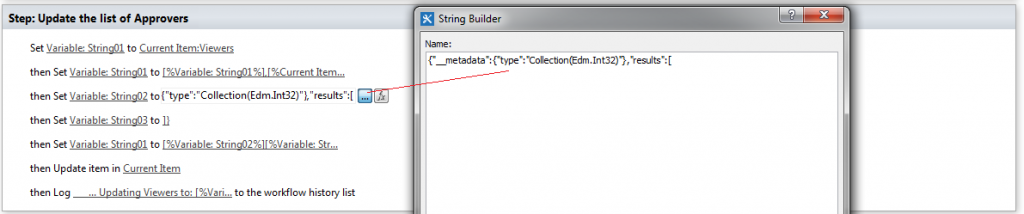
If the string is not empty, I set the initial part of the update string ‘String01’ to the following:

{“__metadata”:{“type”:”Collection(Edm.Int32)”},”results”:[

I then join the user ID’s that I assembled in the previous statements to the string ‘String01’

[%Variable: String01%][%Variable: String02%]

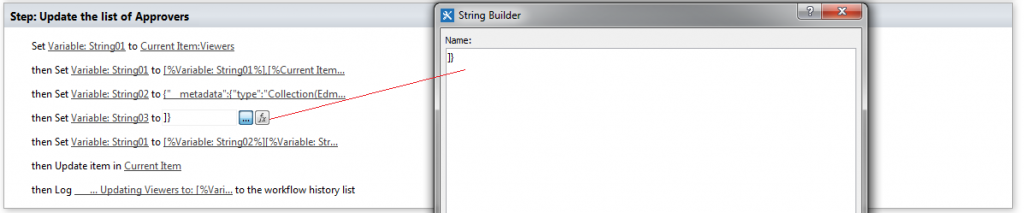
To terminate the string, I set a ‘String02’ to the final characters as shown below (this is done because SharePoint Designer sometimes complains about special characters being used together, and this is a workaround since it does not object to variables being used together)

]}

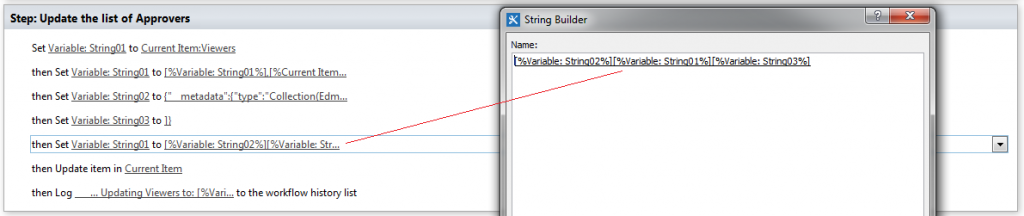
I now concatenate the prefix (String01) and suffix (String02) to formulate the final update string, reusing ‘String02’ as the workflow variable that contains this value

[%Variable: String01%][%Variable: String02%]

The String is now ready for writing to a SharePoint Person/Group field and would look something like the following if you displayed the value in a log

{“__metadata”:{“type”:”Collection(Edm.Int32)”},”results”:[16,330,19,27,1960]}

… where the numbers 16,330,19,27, and 1960 are the user ID’s within the group

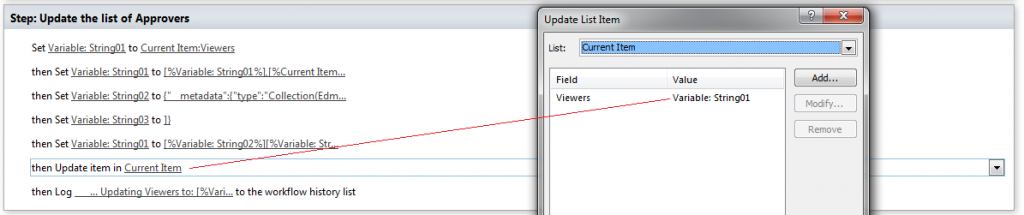
Update the user list

In the last ‘Update item in Current Item statement, I write the string to a Person/Group string in my current item (Please pardon the field name)
202-15


Workflow – Add users to People Picker

You may wish to update a list of individuals in a SharePoint People Picker field for a number of reasons including filtering a View based on the users in this field. This is basically performed through string manipulation and in the example shown below we will update the list of viewers for a list item within a workflow step. The entire process is shown in the figure below and then broken out in separate steps (These steps apply to the multiple value People Picker field – to assign a single value people picker field is much simpler and involves setting the field to the login name)

201-1
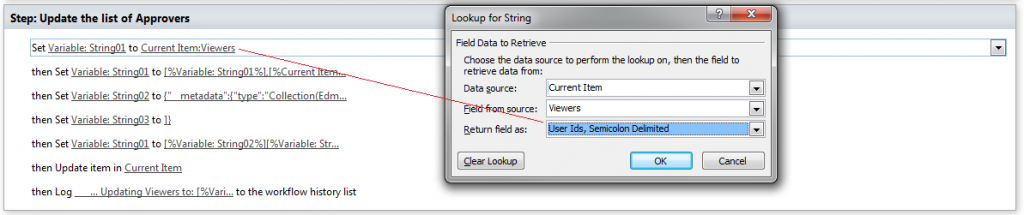
Get the current list of viewers of the list item

We first need to get the current list of viewers of the list item into a workflow variable. To do this we set the Workflow Variable to the User ID’s of the multiple value People Picker field. In our case we use the People Picker field that is called ‘Viewers’

201-2

Get the user login ID

The next step is to add the login ID of the user who modified the list item to the list of current viewers. Here we reuse the the Workflow Variable ‘String01’ and add the User ID Number of the person who modified the list. Note the comma between the value shown below and that it makes no difference if the User ID already appears in the viewer list as SharePoint will ignore the duplicates

201-3

We now have a comma separated list of User ID’s stored in the Workflow Variable ‘String01’

Define the prefix of the final People Picker string

This step stores the first part of the multiple value People Picker string in the variable ‘String02’. This value is exactly

{“__metadata”:{“type”:”Collection(Edm.Int32)”},”results”:[

201-4

Define the suffix of the final People Picker string

The last part of the people picker string is stored in the Workflow Variable ‘String03’ (This cannot be done during the final construction of the string since it will generate an error). The value is set to:

]}

201-5

Combine the temporary variables to formulate the final viewer list

We now combine the elements of the People Picker string into a final string that we will use to update the list of viewers. Once again we reuse the ‘String01’ for this purpose. Note that these strings are not separated by any characters.

201-6

After this step the ‘String01′ should look something like the following but with different ID’s in the body (the value ’22’ is duplicated here to underscore the fact that duplicate ID’s will not cause an error):

{“__metadata”:{“type”:”Collection(Edm.Int32)”},”results”:[109,98,167,22,36,22]}

Update the list item with the new viewer list

Now overwrite the viewer list with the list that you have constructed into ‘String01’

201-7

The list of viewers now contains the user who has just modified the form. We then log the final list of viewers to help with troubleshooting (Unlike the code shown here, it is better to show the ‘Log’ statement before the update)

Create a view that filters with the ‘[Me]’ option

In SharePoint we then modify the view of the current item to only display the list items when the ‘Viewers’ equal [Me]. Note that here we use ‘is equal to’ instead of ‘contains’. This view will only display the items when the Viewers field contains the ID of the individual who is currently accessing the view

201-8


InfoPath – Close window automatically

If you are accessing a SharePoint related InfoPath form directly through a URL in a form or an email, you may notice that when you exit from the form, a message ‘The form has been closed.’ is displayed. This is painful especially when you are accessing the form directly from a mobile device and you want the active screen to return to the calling application

105-1

After much searching online (and forgetting where I found this advice), here is a method to avoid this message

  • Create a site page in the SharePoint call CloseWindow.aspx (actually, any name could be used, but this makes it easy to understand the function of the site page)
  • Edit the page and embed the following code. Do not be surprised when the page closes automatically after you have embedded the code

<script language=”javascript” type=”text/javascript”>
    window.open(“”, “_self”);
    window.close();
</script>

105-2

  • In the URL that opens the page, add the following statement as a suffix to the URL that is used to access the form

?source=<SiteUrl>/SitePages/CloseWindow.aspx

  • The complete URL should look similar to the following

https://contoso.sharepoint.com/sites/Test/Lists/Attachments/Direct1.aspx?source= https://contoso.sharepoint.com/sites/Test/SitePages/CloseWindow.aspx

  • The window should now close automatically when you exit the form. Note that this may not work if the page you accessed has additional web parts defined

InfoPath – Temporary fields in InfoPath form

When creating InfoPath forms directly from the SharePoint list toolbar, all fields that you create in the form are added to the SharePoint list. When you only require a field to hold a temporary value for the duration of time that the form is open, adding theis field to the SharePoint list can complicate the list item with unneeded data. Instead of defining these fields in the SharePoint list, you can create a Data Connection to an XML file that defines the temporary fields you wish to use (I picked this tip up from ‘The Tinkerer’s Journal’ – many thanks Peter Northcott). The values in these fields will NOT be saved with the form. This is how this works

  1. Create an XML file

The first step is to create an xml file that contains the values needed. Create a file using Notepad called, for example, ‘temporary.xml’ that has the following contents (you can set these to initial values if you need to by following the previous xml example):

<?xml version=”1.0″ encoding=”utf-8″?>

<TemporaryValues>

 <ItemCost />

 <ItemPrice />

</TemporaryValues>

  1. Add a data connection to this xml file and set ‘Automatically retrieve data when form is opened’ to true
  1. Reference the fields within the xml file as you would any other field by using the ‘Insert Field or Group …’ button in your formulas or using an Action to set the values as needed

Note.

The values of these fields are refreshed everytime the form is opened


InfoPath – Getting multiple values from a field

When dealing with fields that are defined as containing multiple values in SharePoint it may be necessary within the form (and in any workflows that could be defined) to know all the values that were selected. Use the magical ‘eval’ function to provide you with a delimited field that contains the values (if you intend to only use the combined values in a SharePoint workflow, you can use the ‘Merge’ function when promoting the fields instead of following these instructions)

Create a new field that will contain a semi-colon separated list of the values selected

104-1

Set the Default value of the field to a value similar to the one shown below to get a semi-colon delimited field (ensure that the box ‘Refresh value when formula is recalculated is checked)

104-2

If you wish to only bring specific values into the field, you can use the filter option on the field when ‘Insert Field or Group …’ is selected

104-3


InfoPath – Adding special characters to text boxes

To separate comments or data within a text field you can use a line feed and carriage return. You can enter these special characters into the field directly but I have found that a data connection to an xml file that defines these values makes it simpler to use and understand

Create an XML file

The first step is to create an xml file that contains the values needed. Create a file using Notepad called, for example, ‘characters.xml’ that has the following contents (You can add more fields if you need to – just stick to the format):

<?xml version=”1.0″ encoding=”UTF-8″?>

<characters

    cr=”&#xD;”

    lf=”&#xA;”

    crlf=”&#xD;&#xA;”

/>

Add a data connection to the file

Add a data connection to this xml file and set ‘Automatically retrieve data when form is opened’ to true

103-2

Use the fields in the file

Reference the fields within the xml file as you would any other field by using the ‘Insert Field or Group …’ button in your formulas

103-1

The concat() command above will produce the following result:

Hello

World


InfoPath – How to clear out a repeating table

On occasion you may wish to clear out a local table completely every time you visit the form, for example when you want the user to enter new details in a table format and do not want previously entered rows to display. Since there is no [easy] method to delete all the rows in the table in the form load (which is where you would most likely want to perform this action), there is a small workaround that allows you to clear out all rows. Here are the steps you need to follow

Add a text field to your form that is the name of the repeating table that you will later create, say ‘TableXXX’ (The table must not have already been defined)

102-1

In the ‘Form Load’ section, create an action to set this field to blank as shown below

102-2

Delete the field but leave the Action in the Form load

Insert the Repeating Table into your form, configuring the columns as required. Do not concern yourself with changing the group name at this point

102-4

Now, right click of parent group (group 5) of the repeating section, select properties and change the name of the field to the name of the field that you previously deleted. When you have completed this, the field layout should be as shown below

102-5

Since the previous rule of the text box ‘TableXXX’ remains, you have now tricked InfoPath to clear out this table each time the form opens. If you wish to clear out the table on some other action, create the action on the field and set the temporary text value to empty BEFORE you insert the actual table itself


InfoPath – Borders appearing when they should not

When the subsequent row in an InfoPath table has fewer columns than the preceding row, the system may automatically add in a border where none is defined. This can manifest itself when the designer is simulating selection tabs at the top or bottom of the form to allow the user to select a page view. In short, to get around this issue, ensure that both preceding and subsequent rows have the same format and number of columns

For example:

The form is designed similar to the following figure. Notice that the row with the headings (General, Costs, Prices and Other) has 4 columns, while the row below only has 1 column

101-1

When you preview the form it displays correctly, as though the page for ‘General’ is ‘open’

101-2

However, if you open the form in the Browser, it sometimes adds an extra border as shown below under the ‘GENERAL’ text

101-3

To correct this problem ensure that the row following the tab row has exactly the same column layout as shown below (I have found that this problem occurs when you make formatting changes anywhere on the form AFTER you have defined the Tabulated row).

101-4

Correct all your borders and publish the form which will now open with the correct borders as shown below

101-5